iT邦幫忙

2023 iThome 鐵人賽

DAY 24
0
Mobile Development

30天React Native之旅:從入門到活用系列 第 24

Day 24:取得Apple開發者憑證

  • 分享至 

  • xImage
  •  

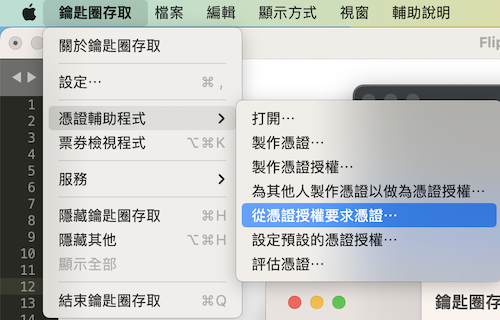
在Day 22和23,我們介紹了Android的本地和遠端推送。而在介紹iOS的推送前,我們需要先取得Apple開發者憑證。本文將引導大家完成取得憑證的過程。另外,你需要有一個已付費的Apple開發者帳號。

創建Certificate Signing Request (CSR)

  1. 在Mac中打開鑰匙圈,從憑證授權要求憑證
    https://ithelp.ithome.com.tw/upload/images/20231009/20103365vXphyyPgaf.png
  2. 輸入你的Email地址和名稱,選擇"儲存到磁盤"。
  3. 得到一個.certSigningRequest檔案

創建 Certificates

  1. 登錄到你的Apple Developer後台

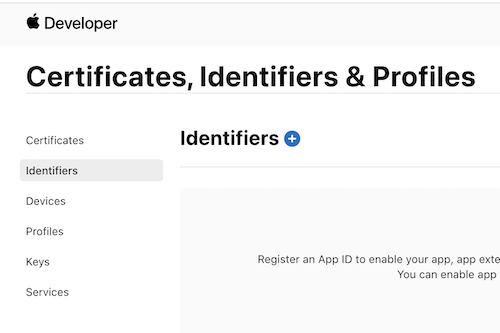
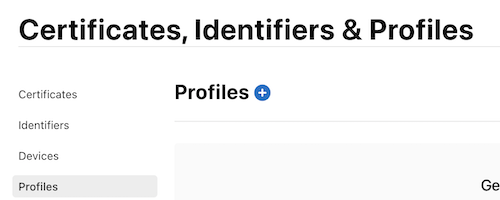
  2. 選擇"Certificates, Identifiers & Profiles"。

  3. 在"Certificates"部分,點擊"+"按鈕來創建一個新的憑證。
    https://ithelp.ithome.com.tw/upload/images/20231009/20103365WYRaauhldi.png

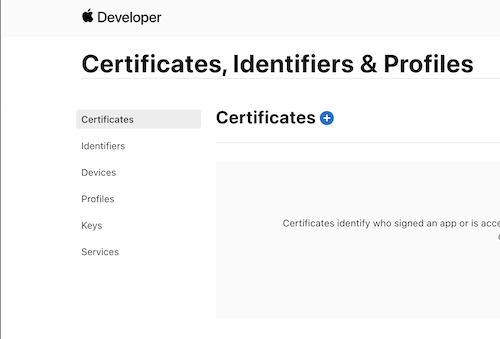
  4. 選擇憑證類型。這裡我們選擇Apple Development(用於開發環境的憑證)
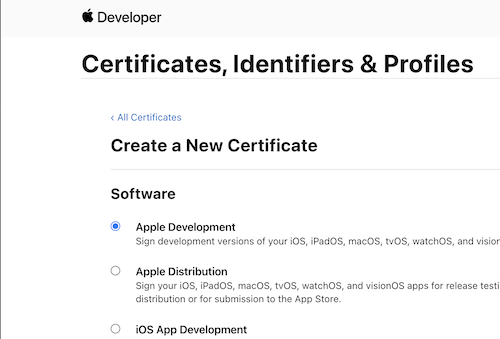
    https://ithelp.ithome.com.tw/upload/images/20231009/20103365RGSQfz4PDU.png

  5. 上傳你的CSR
    上傳剛剛從鑰匙圈存取得到的CSR文件,然後點擊Continue。
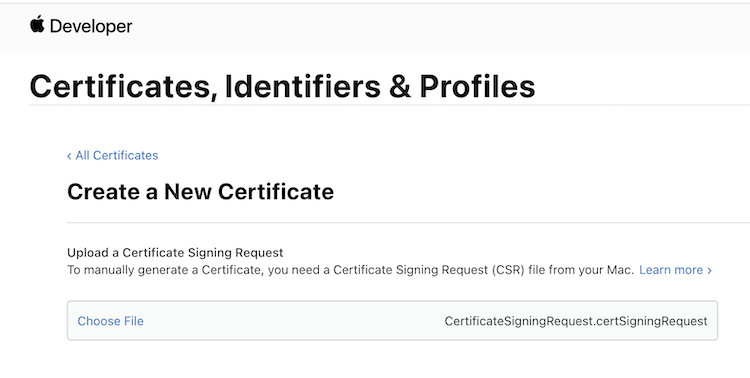
    https://ithelp.ithome.com.tw/upload/images/20231009/201033652XMbS5Ziaz.png

  6. 下載憑證並安裝到鑰匙圈
    下載後,雙擊它自動安裝到鑰匙圈

創建 Identifiers

  1. Developer後台中選擇Identifiers
  2. 按 + 新增
    https://ithelp.ithome.com.tw/upload/images/20231009/20103365CQgKzoB7UG.png
  3. 選擇"App IDs",點擊Continue。
    https://ithelp.ithome.com.tw/upload/images/20231009/201033651zmRnLTnR3.png
  4. Select a type選擇App
    https://ithelp.ithome.com.tw/upload/images/20231009/201033656YRfv5b3Km.png
  5. 填寫資訊
    https://ithelp.ithome.com.tw/upload/images/20231009/20103365YO74i4V1r8.png
  • Description: 輸入你的應用程式名稱或描述。
  • Bundle ID: 選擇一個唯一的bundle identifier。例如com.companyname.appname。
  • App Services: 因為我們要使用推送,所以要將Push Notifications打勾
    https://ithelp.ithome.com.tw/upload/images/20231009/201033658E8tv3uM7H.png
  1. 點擊"Continue", 確認你的設定後點擊"Register"

創建 Profiles

  1. Developer後台中選擇Profiles
  2. 點擊 + 新增
    https://ithelp.ithome.com.tw/upload/images/20231009/20103365Z5XUPbJGo1.png
  3. 設定檔類型選擇iOS App Development(因為我們只是在開發階段),點擊「Continue」。
  4. 選擇剛剛創建的App ID
    https://ithelp.ithome.com.tw/upload/images/20231009/20103365JNcDFfkFaf.png
  5. 選擇Certificates
    https://ithelp.ithome.com.tw/upload/images/20231009/20103365hIOVUShKht.png
  6. 選擇裝置,點擊「Continue」。
    如果裝置列是空的,請先看下一點,註冊一個測試裝置。
    https://ithelp.ithome.com.tw/upload/images/20231009/20103365ZWPUazRAxL.png
  7. 為設定檔輸入一個名稱。點擊「Generate」。
  8. 當設定檔生成後,點擊「Download」按鈕將其下載到你的電腦。

如果創建Profiles時裝置列表為空

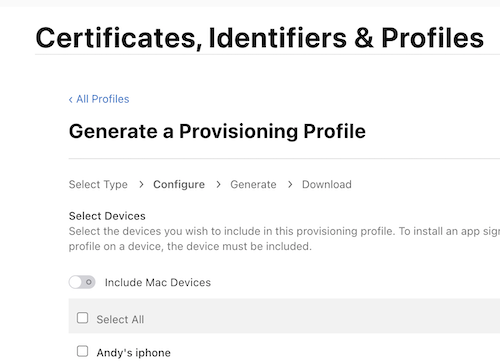
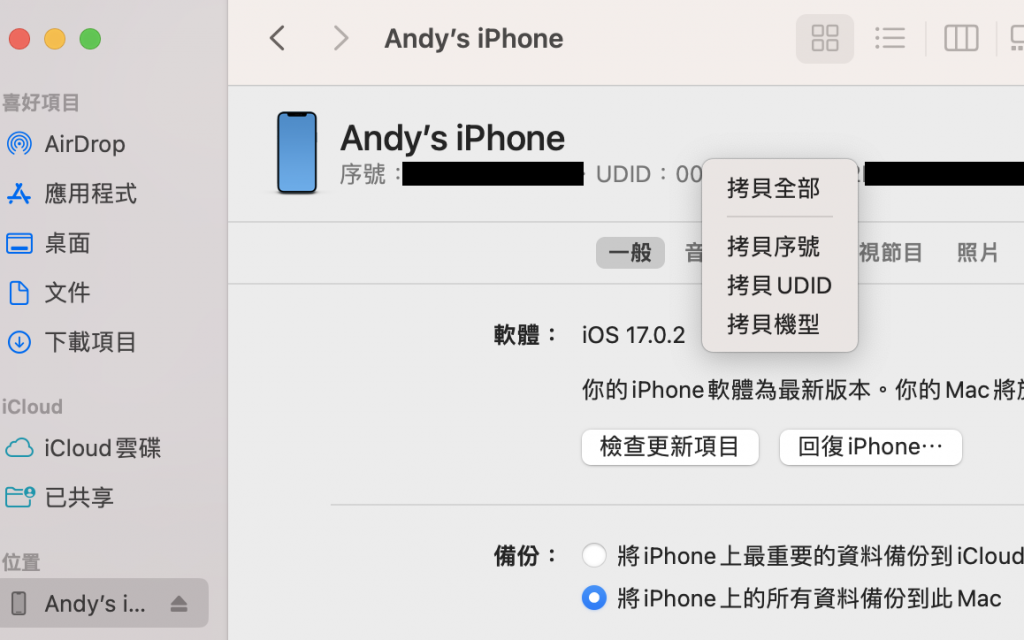
裝置列表為空,表示你尚未在Apple Developer註冊任何測試裝置。我們需要添加一個

  1. 取得裝置的UDID:
    • 連接你的iOS裝置到Mac。
    • 打開Finder。
    • 在Finder的側邊欄中,點擊你的裝置名稱。
    • 點擊上方資訊欄,找到「UDID」,右鍵點擊UDID以複製到剪貼簿。
      https://ithelp.ithome.com.tw/upload/images/20231008/20103365vNyqTydhyz.png
  2. 在Apple Developer註冊裝置:
    • 在左側導航欄中,選擇「Devices」
    • 點擊右上角的"+"按鈕。
    • 在出現的頁面中,輸入你的裝置名稱和先前複製的UDID。
    • 點擊「Continue」然後完成註冊。

完成專案Xcode配置

  1. 打開專案的 .xcworkspace 檔。
  2. 在Xcode的左側,選擇專案名稱。
  3. 在主視窗中,選擇「TARGETS」,然後點擊App的名稱。
  4. 在上方的標籤列中,選擇「Signing & Capabilities」。
    • Provisioning Profile:import剛剛下載的Profile。
    • Bundle Identifier:輸入在 Identifier 中設定的 Bundle ID。
      https://ithelp.ithome.com.tw/upload/images/20231009/20103365oSHls10Dye.png

上一篇
Day 23:用Firebase Cloud Messaging遠端推送消息(Android)
下一篇
Day 25:本地消息推送(IOS)
系列文
30天React Native之旅:從入門到活用30
圖片
  直播研討會
圖片
{{ item.channelVendor }} {{ item.webinarstarted }} |
{{ formatDate(item.duration) }}
直播中

尚未有邦友留言

立即登入留言