終於來到和 DevOps 這個主題比較相關的部分了,感謝前面有耐心跟著讀的讀者 😆
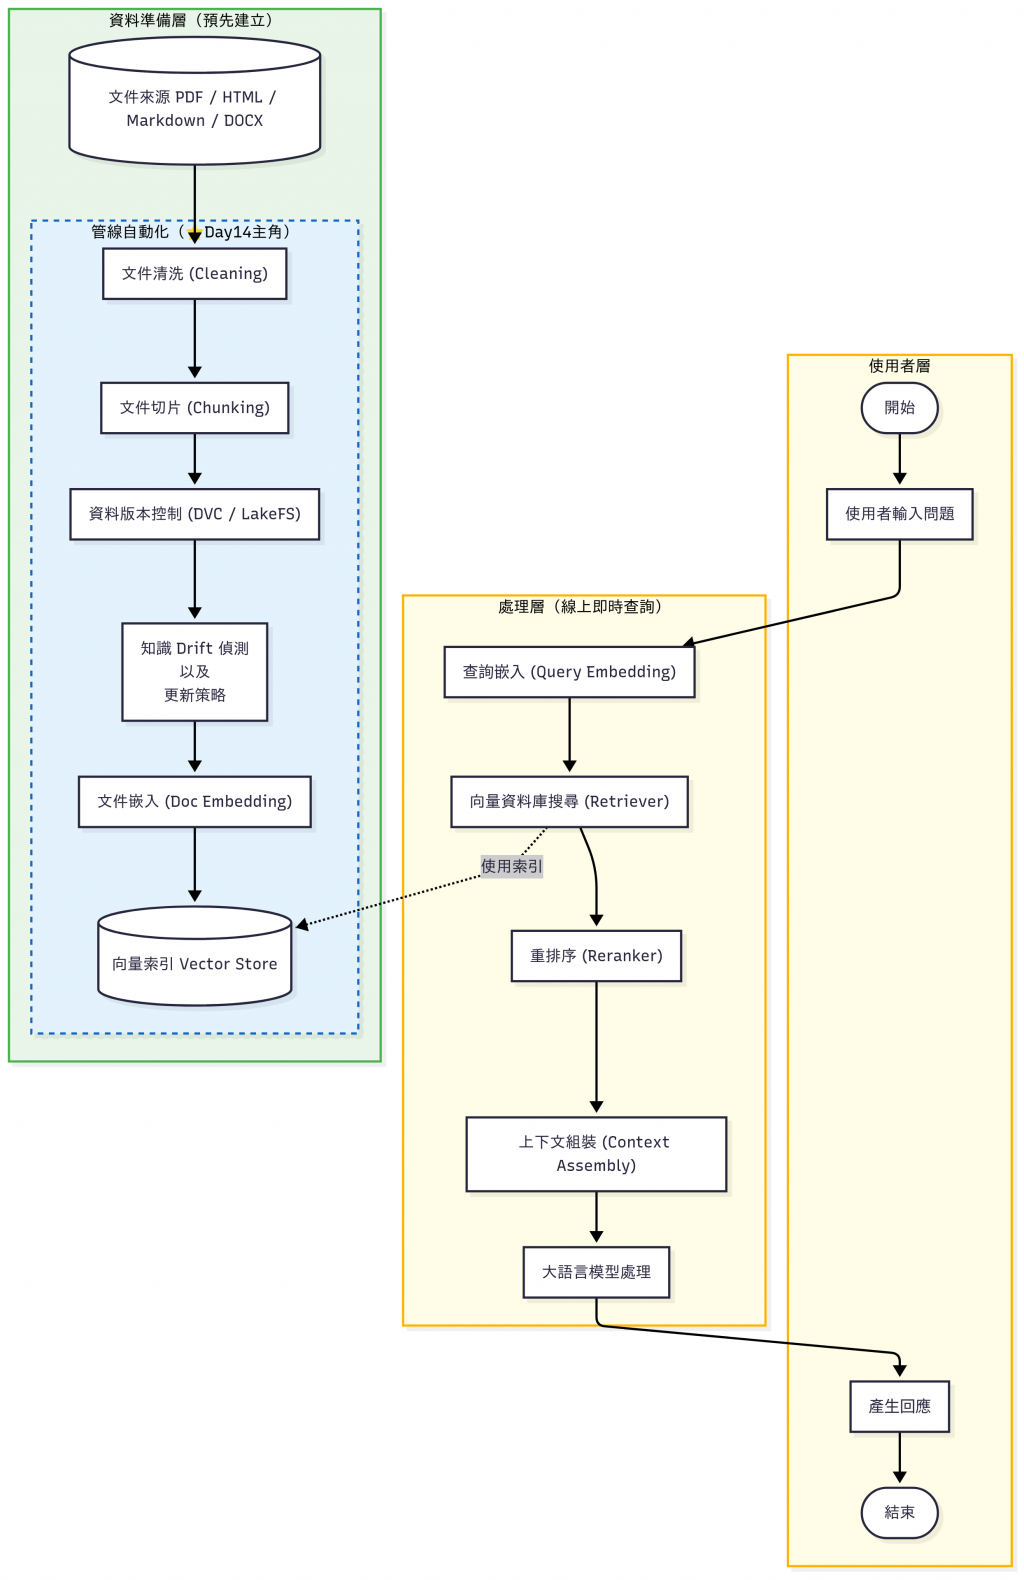
在 RAG 系統裡,我們需要週期性地做很多「重複又必要」的工作來讓知識庫持續更新:
如果這些流程靠工程師手動操作,不僅容易出錯,也無法長期維護。 這就是 DevOps / SRE 們要介入的地方:Pipeline 自動化、可觀測性、責任分離。
這時候,就會需要 Pipeline 自動化工具 來幫忙排程、監控、重試與管理工作流程。
當我想到跟 ML 有關的自動化工具時,我第一個會想到的是 Apache Airflow。
在資料工程領域,最有名的 Workflow Orchestration 工具就是 Apache Airflow。
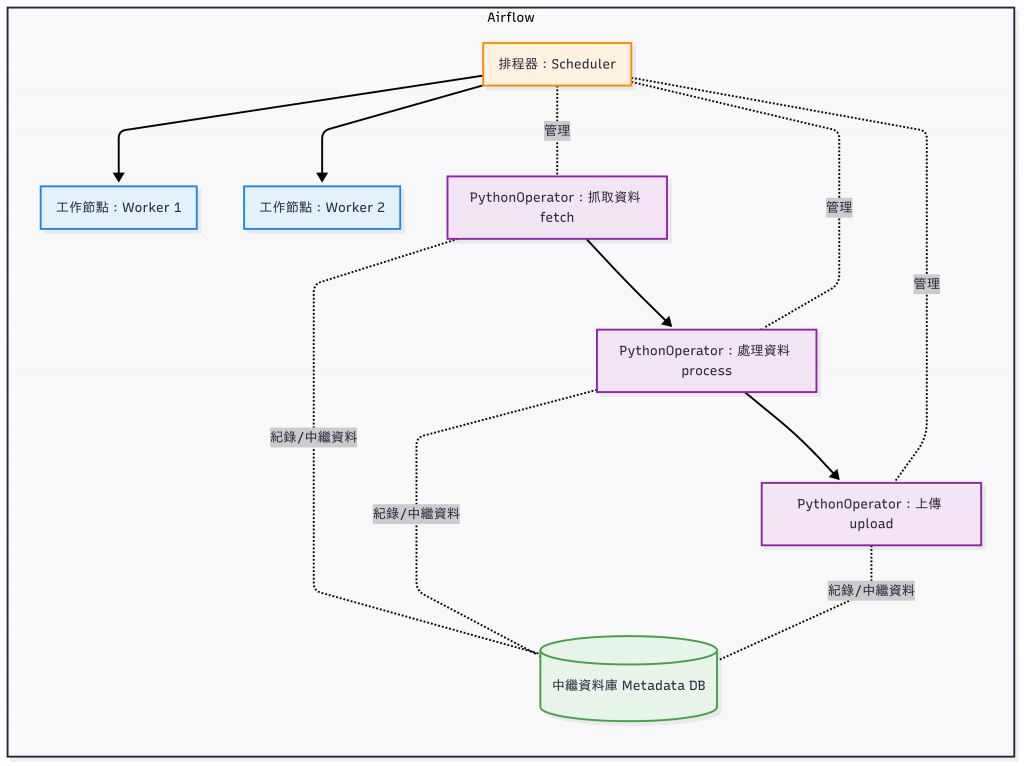
這次為什麼我們不選它來 Demo?
➡️ 在企業資料平台中它仍是王者,但如果要用在本文的 LLMOps pipeline demo,Airflow 顯得過於笨重。
如果你想要「像寫 Python 一樣簡單地寫 pipeline」,Prefect 是很好的選擇。
@task 和 @flow,就能定義一個 workflow。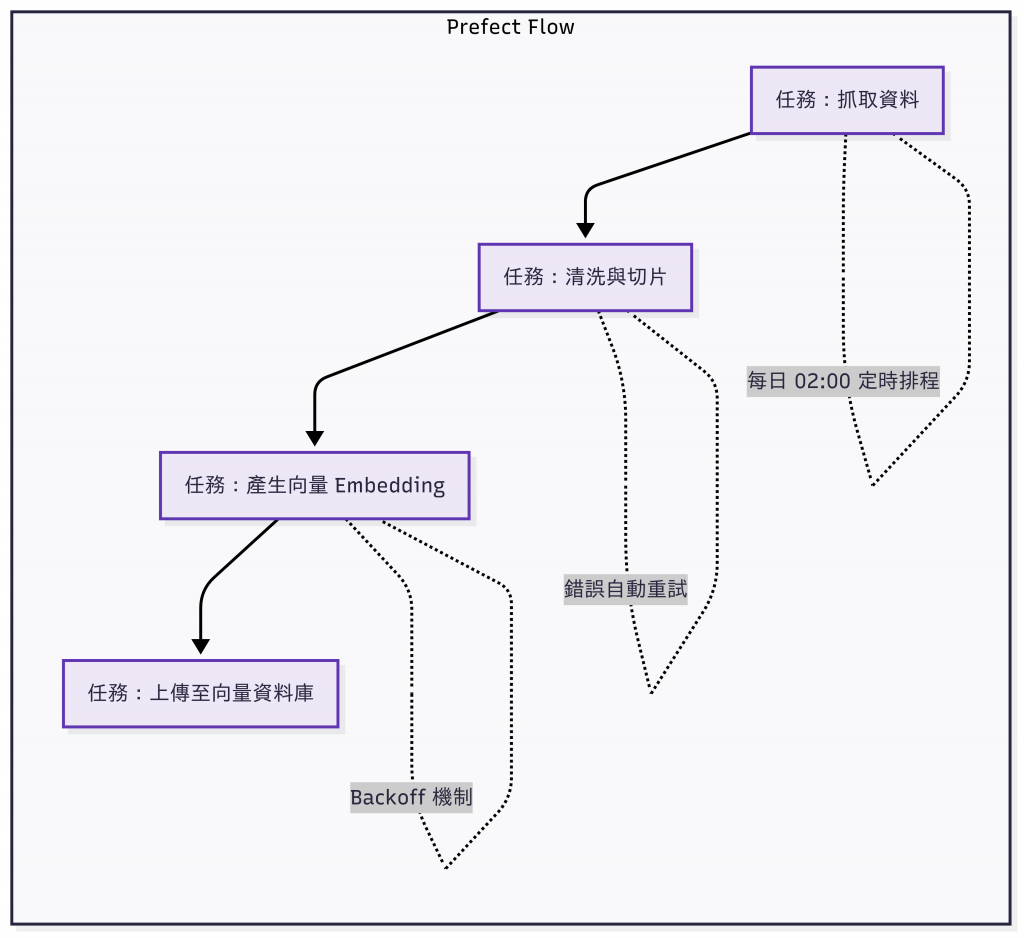
這個範例把 「員工手冊 → 清洗 → Chunk → Embedding →(模擬)向量索引」做成一條 Prefect Flow,程式碼等細節都放在 GitHub - day14_prefect_demo,有興趣的讀者可以自行拉下來研究。
day14_prefect_demo/
├─ flows/                 # 流程定義:包含每日更新的 pipeline 與 Prefect Deployment
├─ scripts/               # 輔助腳本:查詢向量、監控檔案變動並自動觸發流程
├─ utils/                 # 工具函式:文件清洗、切片、產生 Embedding
├─ data/                  # 測試資料與輸出:員工手冊 (輸入) / 向量索引 (輸出)
└─ README.md              # 專案說明文件(安裝方式、使用方式)
直接走一次「員工手冊 → 清洗 → Chunk → Embedding →(模擬)向量索引」這個流程:
python -m flows.daily_pipeline
# 成功後會產生 data/vector_index.json
執行結果:
❯ python -m flows.daily_pipeline
13:46:50.749 | INFO    | prefect.engine - Created flow run 'whimsical-guppy' for flow 'daily_rag_update'
13:46:50.750 | INFO    | Flow run 'whimsical-guppy' - View at http://127.0.0.1:4200/flow-runs/flow-run/d28ddf21-010f-41ef-99f6-066a6c3db4e1
13:46:50.771 | INFO    | Flow run 'whimsical-guppy' - Created task run 'fetch_data-0' for task 'fetch_data'
13:46:50.772 | INFO    | Flow run 'whimsical-guppy' - Executing 'fetch_data-0' immediately...
13:46:50.791 | INFO    | Task run 'fetch_data-0' - Reading file: /Users/hazel/Documents/github/2025-ironman-llmops-demo/day14_prefect_demo/data/worker_manual.txt
13:46:50.798 | INFO    | Task run 'fetch_data-0' - Finished in state Completed()
13:46:50.806 | INFO    | Flow run 'whimsical-guppy' - Created task run 'process_text-0' for task 'process_text'
13:46:50.806 | INFO    | Flow run 'whimsical-guppy' - Executing 'process_text-0' immediately...
13:46:50.826 | INFO    | Task run 'process_text-0' - Finished in state Completed()
13:46:50.834 | INFO    | Flow run 'whimsical-guppy' - Created task run 'build_embeddings-0' for task 'build_embeddings'
13:46:50.835 | INFO    | Flow run 'whimsical-guppy' - Executing 'build_embeddings-0' immediately...
13:46:52.143 | INFO    | Task run 'build_embeddings-0' - Finished in state Completed()
13:46:52.189 | INFO    | Flow run 'whimsical-guppy' - Created task run 'upload-0' for task 'upload'
13:46:52.190 | INFO    | Flow run 'whimsical-guppy' - Executing 'upload-0' immediately...
13:46:52.253 | INFO    | Task run 'upload-0' - Finished in state Completed()
13:46:52.265 | INFO    | Flow run 'whimsical-guppy' - Finished in state Completed('All states completed.')
執行完成會在 data 目錄下生成 vector_index.json 這個檔案。
python scripts/query.py "加班規則"
執行結果:
❯ python scripts/query.py "加班規則"
🔎 Query: 加班規則

[1] score=0.0706 | id=0
公司員工手冊 v1.0 第一章:出勤規範 1. 上班時間:上午 9 點至下午 6 點。 2. 請假規則:需提前一天提出申請,緊急情況可事後補辦。 3. 遲到超過 15 分鐘需登記並扣考勤分。 第二章:加班與補休 1. 加班需事前提出申請,經主管核准後方可進行。 2. 加班工時可折換補休,需於一個月內使用完畢。 3. 連續加班超過三日,主管需評估員工狀況。

[2] score=0.0620 | id=1
可折換補休,需於一個月內使用完畢。 3. 連續加班超過三日,主管需評估員工狀況。 第三章:出差與報銷 1. 出差需填寫出差單,並附上詳細行程與預算。 2. 報銷需提供正式發票,金額超過 1000 元需經理簽核。 3. 出差結束後需提交出差報告,三日內完成。 第四章:福利制度 1. 每年提供三天帶薪病假。 2. 員工旅遊每兩年舉辦一次,由公司補助部分費用。

[3] score=0.0556 | id=2
1. 每年提供三天帶薪病假。 2. 員工旅遊每兩年舉辦一次,由公司補助部分費用。 3. 員工可申請教育訓練補助,每年上限 5000 元。 第五章:獎懲制度 1. 表現優異者可獲得年度獎金或晉升機會。 2. 違反公司規範者,視情節輕重給予警告或處分。 3. 貪污、洩密等重大違規行為將直接解僱。
python scripts/query_with_openai.py "加班規則"
執行結果:
❯ python scripts/query_with_openai.py "加班規則"
🔎 Query: 加班規則
🔧 Query embedding using: text-embedding-3-small

[1] score=0.5728 | id=0
公司員工手冊 v1.0 第一章:出勤規範 1. 上班時間:上午 9 點至下午 6 點。 2. 請假規則:需提前一天提出申請,緊急情況可事後補辦。 3. 遲到超過 15 分鐘需登記並扣考勤分。 第二章:加班與補休 1. 加班需事前提出申請,經主管核准後方可進行。 2. 加班工時可折換補休,需於一個月內使用完畢。 3. 連續加班超過三日,主管需評估員工狀況。

[2] score=0.4492 | id=1
可折換補休,需於一個月內使用完畢。 3. 連續加班超過三日,主管需評估員工狀況。 第三章:出差與報銷 1. 出差需填寫出差單,並附上詳細行程與預算。 2. 報銷需提供正式發票,金額超過 1000 元需經理簽核。 3. 出差結束後需提交出差報告,三日內完成。 第四章:福利制度 1. 每年提供三天帶薪病假。 2. 員工旅遊每兩年舉辦一次,由公司補助部分費用。

[3] score=0.3585 | id=2
1. 每年提供三天帶薪病假。 2. 員工旅遊每兩年舉辦一次,由公司補助部分費用。 3. 員工可申請教育訓練補助,每年上限 5000 元。 第五章:獎懲制度 1. 表現優異者可獲得年度獎金或晉升機會。 2. 違反公司規範者,視情節輕重給予警告或處分。 3. 貪污、洩密等重大違規行為將直接解僱。
Prefect 的畫面:
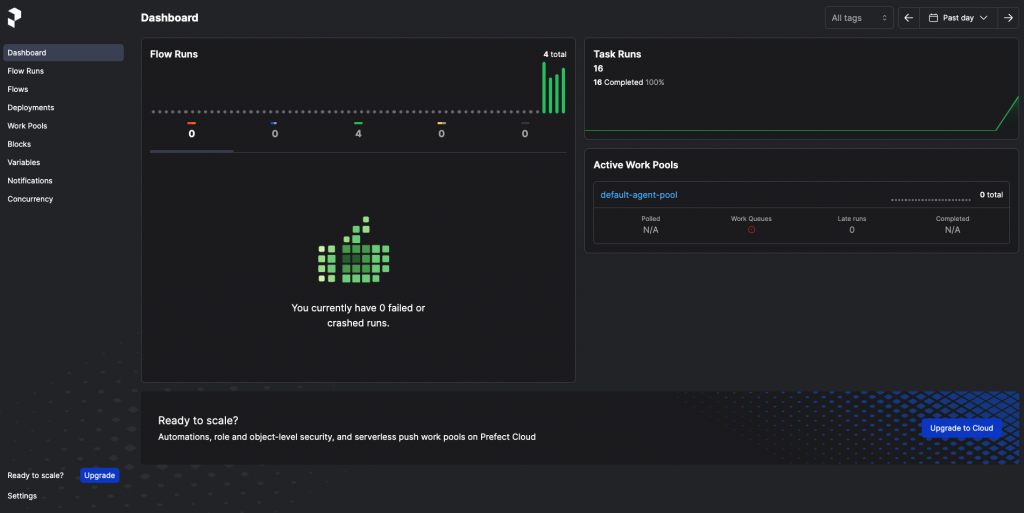
接下來我們要把 Prefect 的本機 server 跑起來,使用介面來管理流程(適用 Prefect Cloud):
prefect config set PREFECT_API_URL=http://127.0.0.1:4200/api
prefect server start
然後部署 Deployment 和 schedule:
"""
flows/deploy.py

這支程式的用途:
1. 匯入 daily_pipeline(主要的 Prefect Flow)。
2. 建立一個 Deployment,將 daily_pipeline 綁定到 Prefect 的工作排程。
3. 設定 Cron 排程:每天 02:00 (Asia/Taipei) 自動執行。
4. 指定 work_queue_name="default",方便 Agent 撿取任務。
5. 套用 Deployment → 註冊到 Prefect Server/Cloud。
   - 之後只要有 Prefect Agent 在跑,流程就會每天 02:00 自動觸發。

流程說明:
    deploy.py → 建立 Deployment → Prefect Server 記錄排程 → Agent 撿取 → 執行 daily_pipeline

使用方式:
    python -m flows.deploy
    # 建立 Deployment 後,可用以下指令確認:
    prefect deployment ls
    # 啟動 Agent(確保有 worker 來執行 flow):
    prefect agent start -q default
"""
from prefect.deployments import Deployment
from prefect.server.schemas.schedules import CronSchedule

# 相對匯入:在套件語境下正確
from .daily_pipeline import daily_pipeline

if __name__ == "__main__":
    dep = Deployment.build_from_flow(
        flow=daily_pipeline,
        name="daily-2am",
        schedule=CronSchedule(cron="0 2 * * *", timezone="Asia/Taipei"),
        work_queue_name="default",
    )
    dep.apply()
    print("✅ Deployment created: daily-2am (02:00 Asia/Taipei)")
python -m flows.deploy
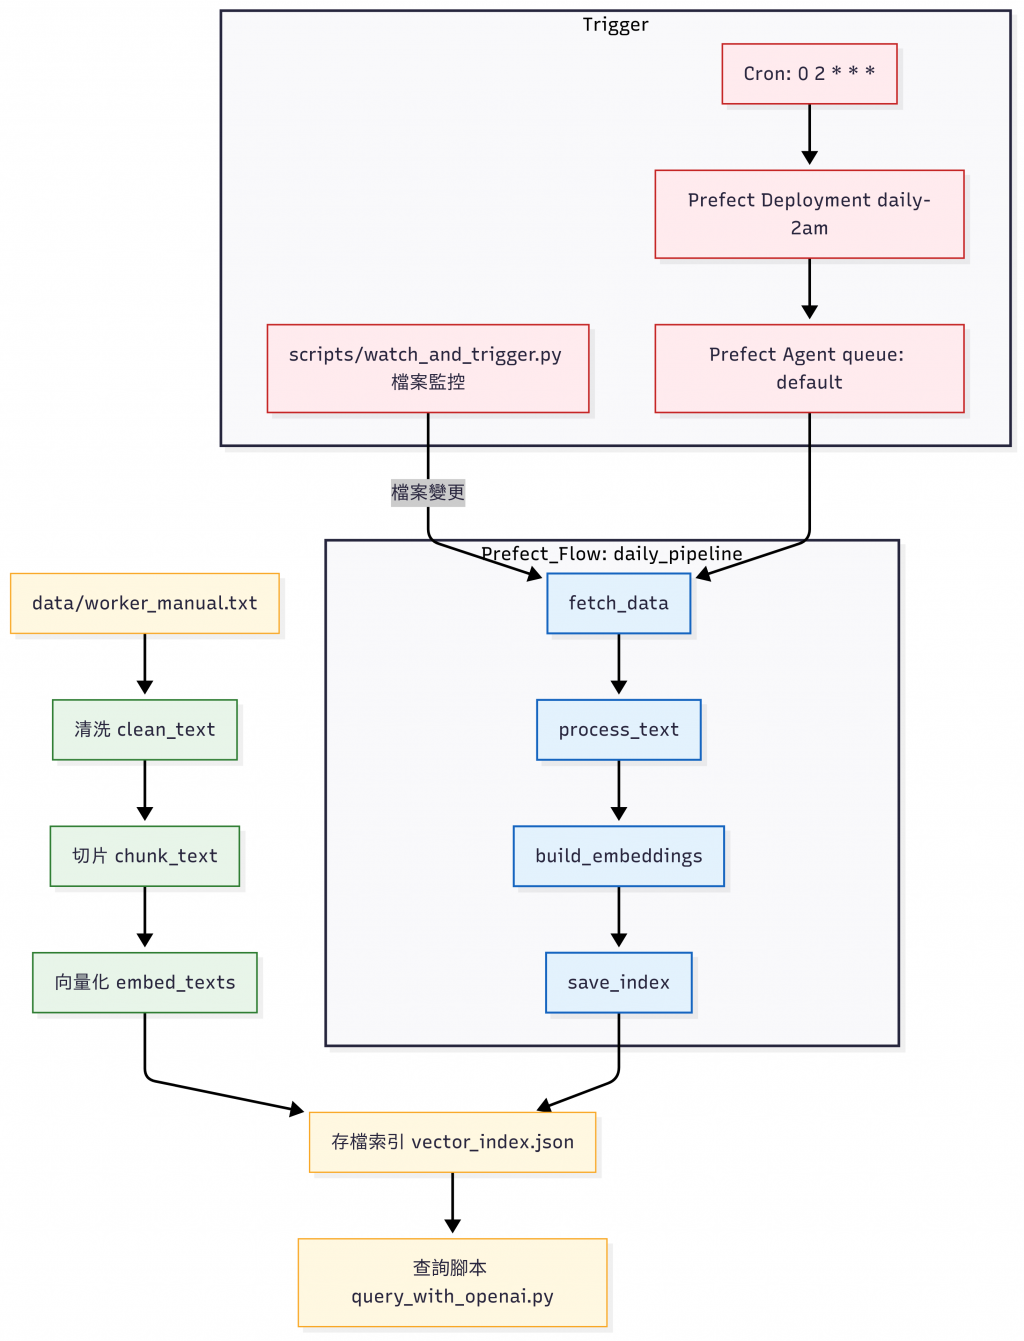
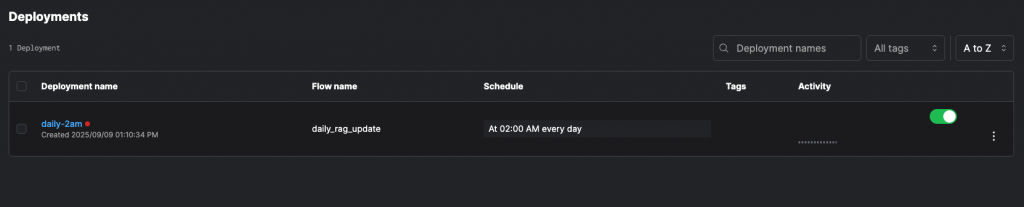
在瀏覽器輸入 http://127.0.0.1:4200,接著就可以在 UI 畫面看到:
Flows tab 中的 daily_rag_update:「員工手冊 → 清洗 → Chunk → Embedding →(模擬)向量索引」的 RAG Flow。Deployments tab : daily_rag_update (Flow name) / daily-2am (Deployment name),這個 Deployment 會在每天台北時間 02:00 自動執行該 RAG Flow。
除了排程,你也可以在 修改 data/worker_manual.txt 後自動觸發流程。
pip install watchdog
python scripts/watch_and_trigger.py
data/worker_manual.txt
flows/daily_pipeline.py
如果已經有 deployment(例如 daily_rag_update/daily-2am),可以改成用 deployment 方式觸發:
export USE_PREFECT_DEPLOYMENT=true
export PREFECT_DEPLOYMENT_NAME="daily_rag_update/daily-2am"

python scripts/watch_and_trigger.py
# 修改監控的檔案路徑
export WATCH_FILE="data/worker_manual.txt"
# 設定去彈跳秒數 (避免一次儲存多次觸發)
export DEBOUNCE_SEC=1
➡️ 對於 LLMOps side-project / demo,非常適合用 Prefect 開始專案自動化。
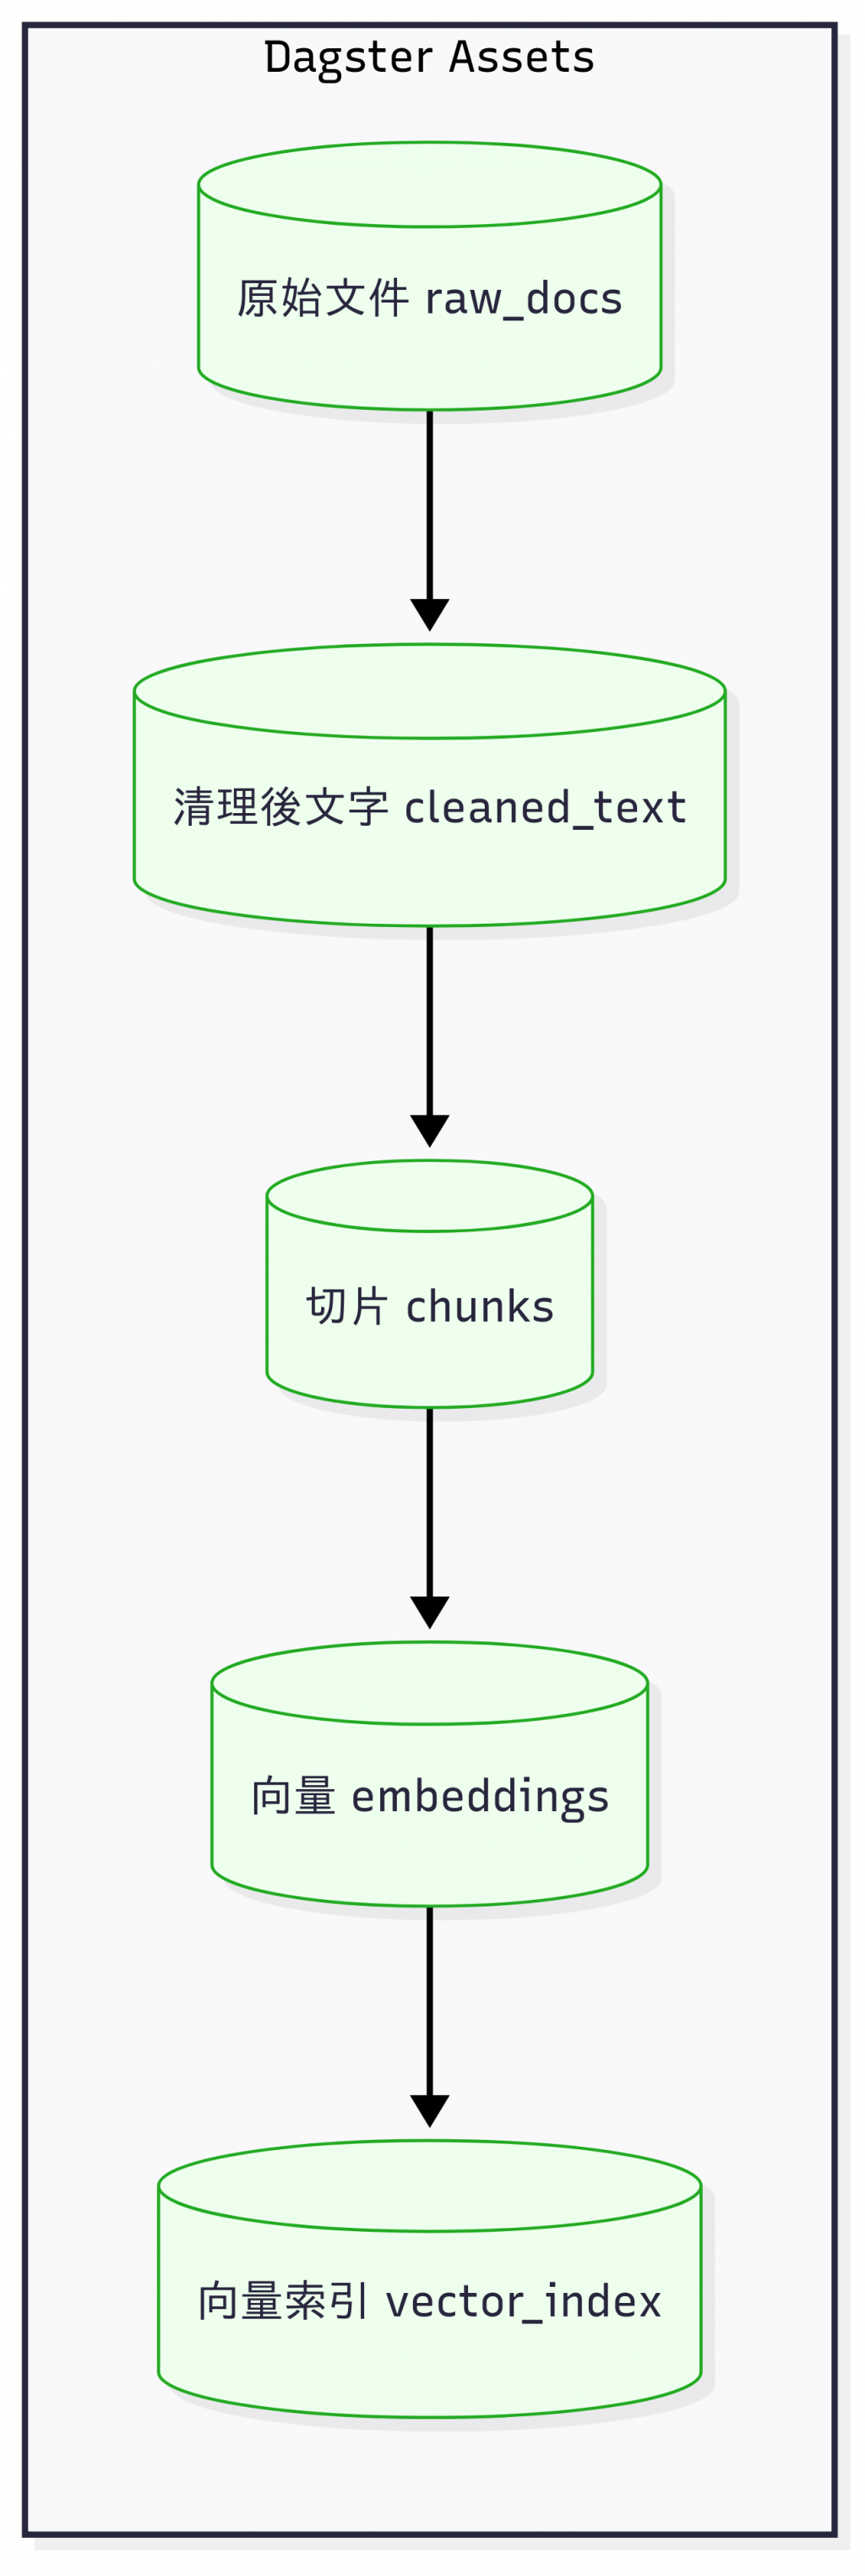
Dagster 和 Prefect 最大的不同是:它不是任務導向,而是 資料資產 (Data Asset) 導向。
每個步驟產出的結果(cleaned_text、chunks、embedding)都被視為一個資產。
Dagster 會自動幫你建立「資料血緣 (lineage)」,能清楚追蹤:
內建型別檢查,避免髒資料流入下游。
Dagit UI 提供漂亮的資料血緣圖。
這是一個使用 Dagster 的 Asset 驅動設計 來管理 RAG 知識庫 Pipeline Demo 的資料轉換流程。本文會省略較多專案的細節,細節等資訊會寫在 GitHub Repo 的 README.md 裡面,有興趣的讀者可以自行拉下來研究。
data/worker_manual.txt
最終產物是 data/vector_index.json,可以直接拿來做檢索。此外,這個 demo 也示範了 定時排程(每日 02:00) 與 檔案變更觸發(Sensor),讓知識庫能自動更新。
worker_manual.txt 會自動觸發重新產生 index)day14_dagster_demo/
├── assets/ # 資產定義:raw_text、cleaned_text、chunks、vectors、vector_index
├── data/ # 測試檔案(員工手冊)
├── defs.py # 資產組裝、Schedule、Sensor
└── README.md
dagster dev -m defs
執行結果:
❯ conda activate day14_dagster_demo
❯ dagster dev -m defs
2025-09-09 15:24:04 +0800 - dagster - INFO - Loaded environment variables from .env file: OPENAI_API_KEY,QUERY_EMBEDDING_MODEL
2025-09-09 15:24:04 +0800 - dagster - INFO - Using temporary directory /Users/hazel/Documents/github/2025-ironman-llmops-demo/day14_dagster_demo/tmp6oa6slnb for storage. This will be removed when dagster dev exits.
2025-09-09 15:24:04 +0800 - dagster - INFO - To persist information across sessions, set the environment variable DAGSTER_HOME to a directory to use.
2025-09-09 15:24:04 +0800 - dagster - INFO - Launching Dagster services...
2025-09-09 15:24:05 +0800 - dagster-webserver - INFO - Loaded environment variables from .env file: OPENAI_API_KEY,QUERY_EMBEDDING_MODEL
2025-09-09 15:24:05 +0800 - dagster - WARNING - /Users/hazel/Documents/github/2025-ironman-llmops-demo/day14_dagster_demo/defs.py:57: ExperimentalWarning: Parameter `target` of initializer `SensorDefinition.__init__` is experimental. It may break in future versions, even between dot releases. To mute warnings for experimental functionality, invoke warnings.filterwarnings("ignore", category=dagster.ExperimentalWarning) or use one of the other methods described at https://docs.python.org/3/library/warnings.html#describing-warning-filters.
  file_change_sensor = SensorDefinition(

2025-09-09 15:24:05 +0800 - dagster.daemon - INFO - Instance is configured with the following daemons: ['AssetDaemon', 'BackfillDaemon', 'SchedulerDaemon', 'SensorDaemon']
2025-09-09 15:24:05 +0800 - dagster - WARNING - /Users/hazel/Documents/github/2025-ironman-llmops-demo/day14_dagster_demo/defs.py:57: ExperimentalWarning: Parameter `target` of initializer `SensorDefinition.__init__` is experimental. It may break in future versions, even between dot releases. To mute warnings for experimental functionality, invoke warnings.filterwarnings("ignore", category=dagster.ExperimentalWarning) or use one of the other methods described at https://docs.python.org/3/library/warnings.html#describing-warning-filters.
  file_change_sensor = SensorDefinition(

2025-09-09 15:24:06 +0800 - dagster-webserver - INFO - Serving dagster-webserver on http://127.0.0.1:3000 in process 3446
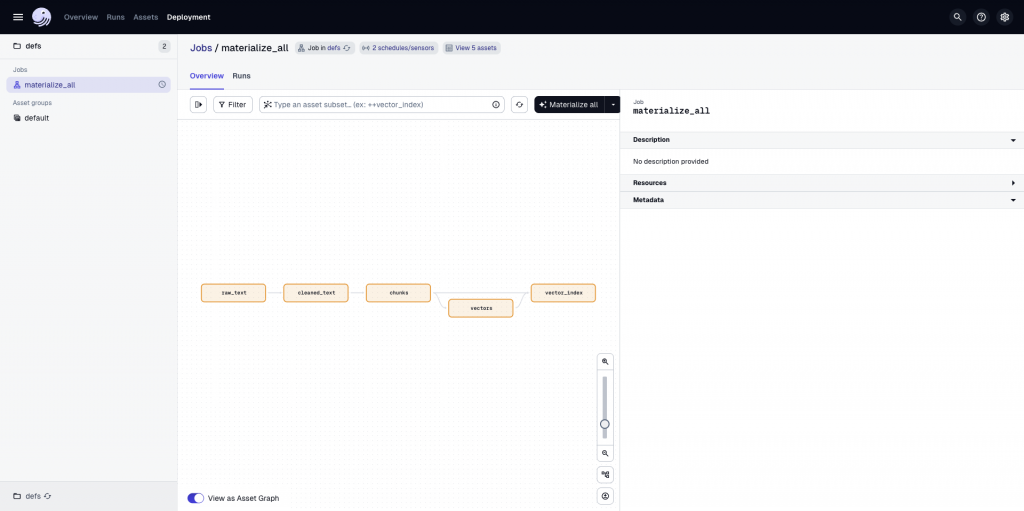
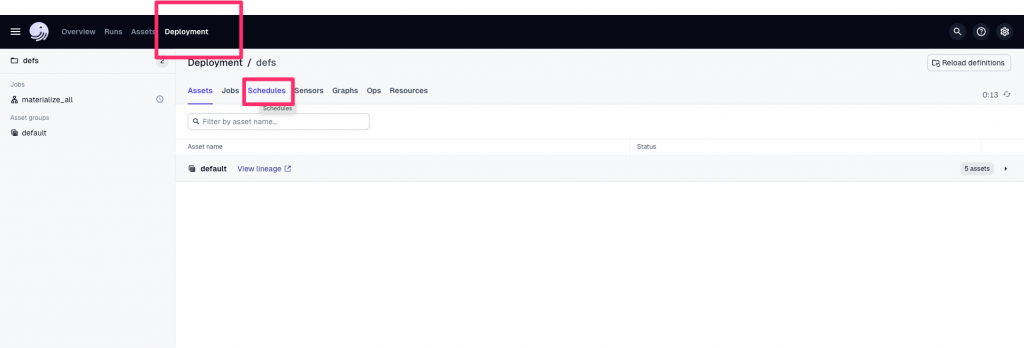
打開 UI 入口: http://127.0.0.1:3000 介面長這樣:
dagster asset materialize -m defs --select "*"
會自動跑完整流程,並在 data/vector_index.json 產生最新索引。
dagster dev -m defs
Deployment -> Schedules
daily_2am_taipei → 切換 Running 為 ON: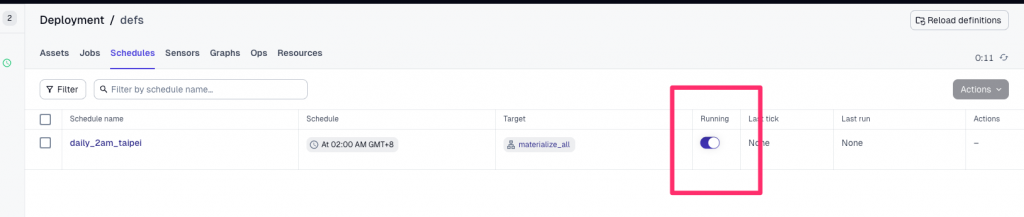
只要這個 Process 在跑,Dagster Daemon 就會在每天 02:00 (Asia/Taipei) 自動觸發 pipeline。
⚠️ 若用 CLI,需要額外啟動 daemon:
README.md 裡面有寫一些前置設定,一定要看才跑得起來 !
dagster-daemon run
# 啟用每日 02:00 schedule
dagster schedule start -m defs daily_2am_taipei
# 確認啟用成功
dagster schedule list -m defs
如果要在 worker_manual.txt 修改後自動重跑:
Deployment -> Sensors
on_worker_manual_change → 切換 Running 為 ON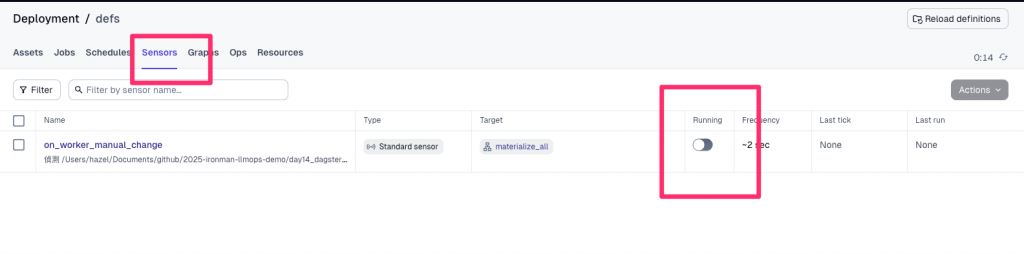
dagster sensor start -m defs on_worker_manual_change
同樣需要 dagster-daemon run 來常駐執行。
➡️ 對於需要 資料可追溯性、型別驗證、法規合規 的 LLMOps(金融、醫療、企業級 RAG pipeline),Dagster 的價值非常大,我會用 3 個案例展示 Dagster 的不同之處:

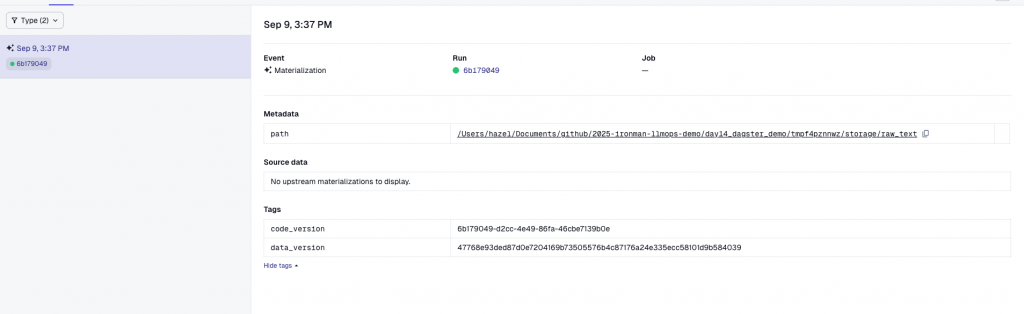
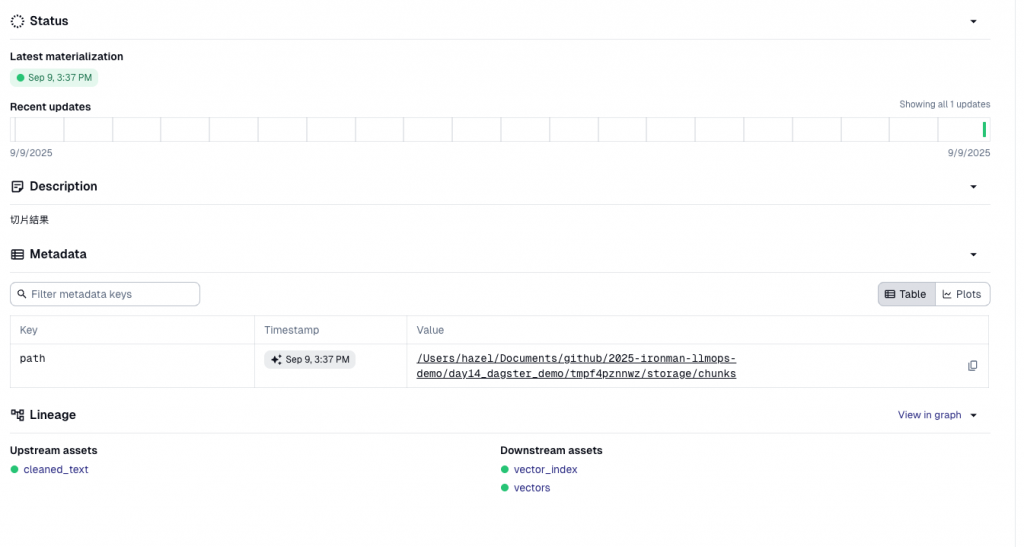
在這個分頁可以看到資產依賴圖(Asset Lineage Graph),讓我們一眼看到數據是如何一步步從原始檔案流動到最後的索引檔:

如果手動修改了 worker_manual.txt,會顯示 文件有更新
打開 assets/vectors.py,找到 vectors 資產:
@asset
def vectors(chunks: list[str]) -> list[list[float]]:
    ...
嘗試把回傳型別故意改錯,例如回傳 str:
context.log.info(f"嵌入完成:{len(vecs)} 向量,模型={model}")
# return vecs
return "not a vector"
再次 materialize pipeline 會立刻顯示錯誤,指出回傳的型別不符合:

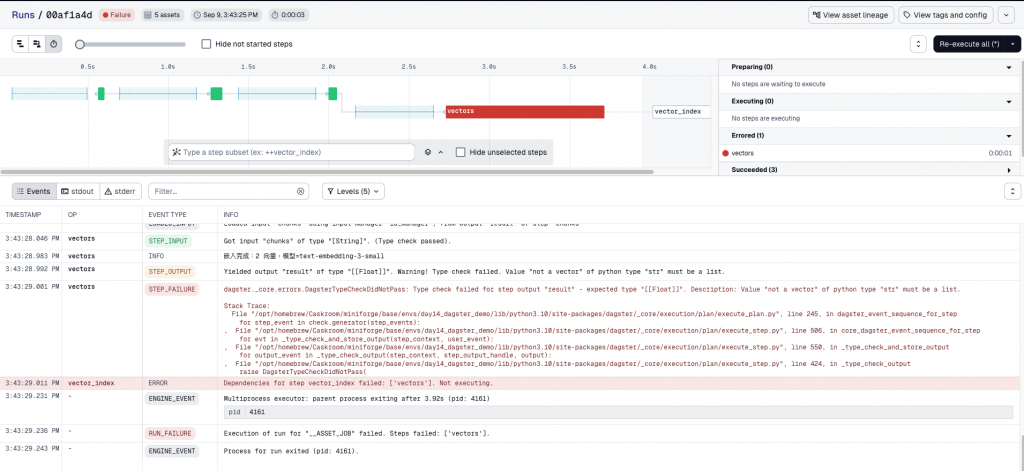
這就是 Dagster 的價值:不只跑流程,還能守住資料品質。
| 面向 | Airflow | Prefect | Dagster |
|---|---|---|---|
| 核心概念 | DAG (Task 依賴) | Flow (Pythonic 任務流) | Data Asset (資料驅動) |
| 定位 | 傳統 ETL / 企業級排程 | 輕量、自動化快 | 資料工程 / ML pipeline |
| UI / 監控 | 任務監控強大 | Prefect Cloud → 直觀 | Dagit → lineage、型別 |
| 型別支持 | 幾乎沒有 | 基本 | 內建完整型別驗證 |
| 上手難度 | 高 | 中(熟 Python 即可) | 中偏高(需理解 asset 思維) |
| 適合情境 | 大型企業 Data Platform(有專門維護團隊) | Side-project、個人專案,或是小企業想快速自動化 | 若專案需要資料血緣(lineage)與治理能力,就選 Dagster。 |
| 對 LLMOps 的幫助 | 排程 OK,但缺乏資料追蹤 | 快速更新知識庫 pipeline,適合中小型專案 | 最適合追蹤 embedding lineage 與資料版本 |
| 實務案例 | 每晚抽取交易資料 → 清理轉換 → 載入數據倉庫,生成月度報表 | 每日 02:00 自動更新 FAQ Bot 知識庫 | 每次文件改動觸發,重新產生向量索引 |
Day 14 的重點:讓 LLMOps 做到 Pipeline 自動化,並且融合 DevOps 三大基礎概念:
明天(Day 15),我們會深入探討 Prompt Engineering 系統化,從零散的 Prompt 試驗走向可維護的 Prompt 管理。