
在我之前發表於 Dev.to 平台 的文章中,我示範了如何使用 Gemini 與 Firebase Cloud Functions 建構富有表現力的文字轉語音(Text-to-Speech,TTS)。雖然該架構運作良好,但它需要建置與部署自訂的後端端點。Firebase AI Logic 讓我們能夠在用戶端直接執行 Gemini TTS,同時具備生產等級的安全性、無需自訂後端程式碼,並能透過 Git 整合實現自動化部署。
專案技術堆疊:
公開的 Google Gemini Developer API 在我所在的地區(香港)受到限制。然而,Agent Platform Gemini API (Google Cloud) 提供了在此處穩定運作的企業級存取權限,因此我選擇在本次 Firebase AI Logic 示範中使用 Agent Platform Gemini API。
npm install -g firebase-tools
使用 npm 全域安裝或更新 firebase-tools。
firebase logout
firebase login
登出並重新驗證 Firebase。
npm i --save-exact firebase
npm i --save-exact --save-dev firebase-tools serve
安裝呼叫 Firebase AI Logic API、使用 Firebase CLI 產生檔案以及提供正式建置版本所需之相依套件。
firebase init
執行 firebase init 並依照提示設定 Firebase AI Logic、模擬器(Emulators)、App Hosting 與 Remote Config。
若您已有現有專案或多個專案,可以在命令列中指定專案 ID。
firebase init --project <PROJECT_ID>
完成設定步驟後,Firebase 工具會產生設定檔(例如 .firebaserc 與 firebase.json)。您可以在 GitHub 存放庫中檢視 .firebaserc 設定檔 與 firebase.json 設定檔。
我們請 antigravity-cli(由 Google 推出的終端機優先 AI 程式碼編寫代理)與 Gemini Flash 模型建立了兩個 Node.js 指令碼來執行以下操作:
public/remote-config-defaults.json。您可以閱讀指令碼的完整內容。public/firebase.config.json。如果我們寫死公開金鑰並推送到 GitHub,GitHub 會觸發誤報警示。您可以閱讀指令碼的完整內容以及環境變數範本。# generated firebase configuration
firebase.config.json
將 firebase.config.json 加入 .gitignore 以防止意外提交。
在建置期間,Angular 會將這兩個 JSON 檔案打包至 dist 目錄中,以提供初始設定值。
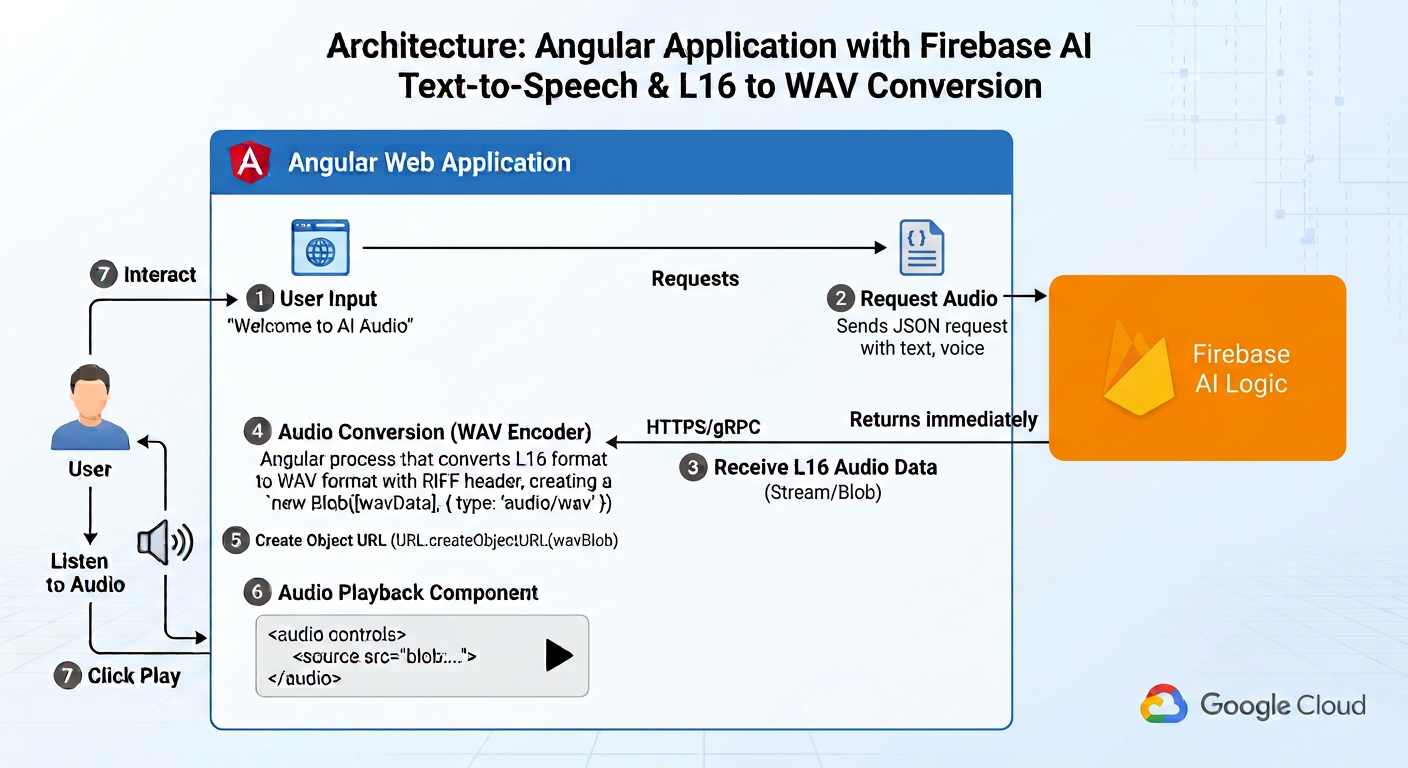
使用者提交文字至 Firebase AI Logic 以合成語音。Firebase 會產生完整的 L16 音訊酬載並回傳給用戶端。由於 HTML 音訊元素不支援 L16 格式,因此應用程式會先將音訊轉換為 WAV Blob,然後再將 Blob URL 繫結至元素的來源。
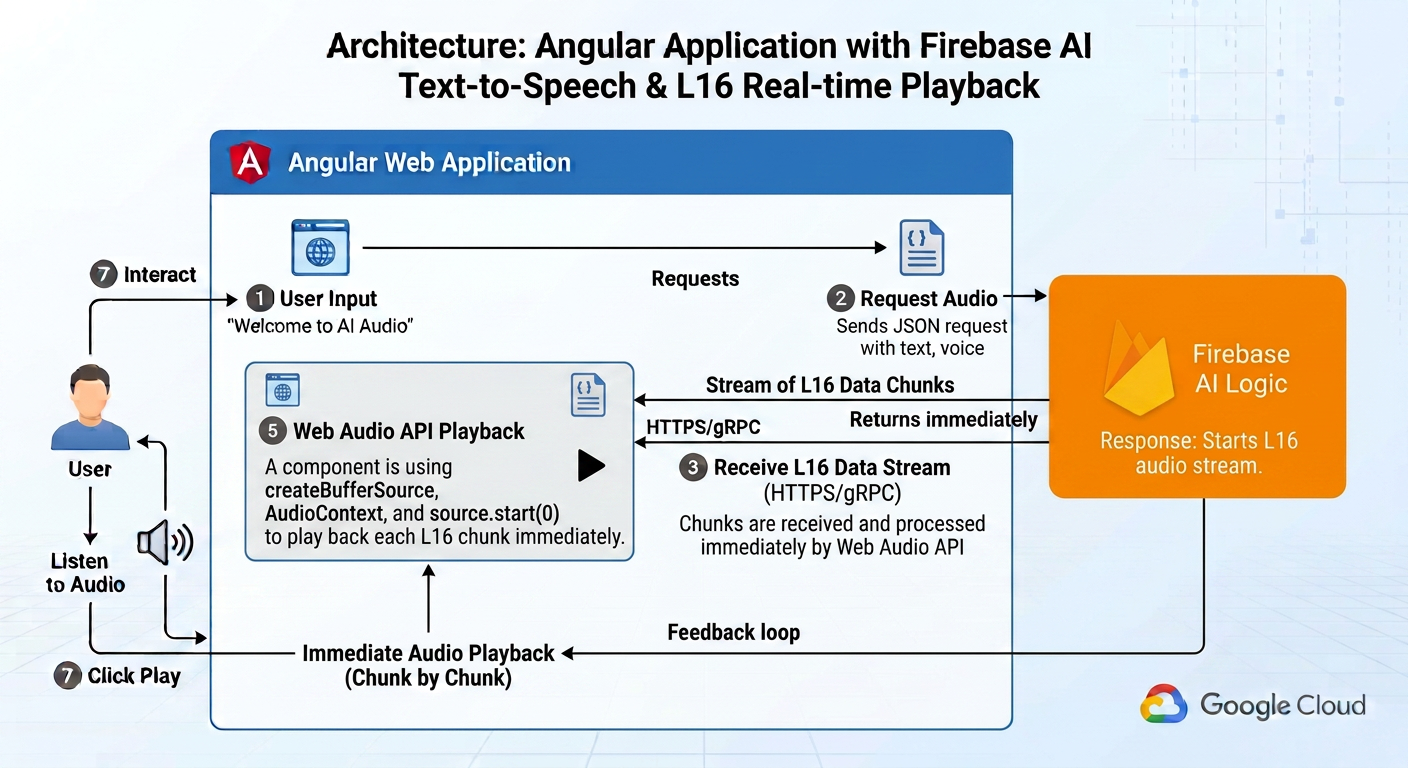
第二個流程會串流傳輸音訊,並將 L16 資料區塊傳送給 Angular 應用程式。音訊播放器會建立 AudioBufferSourceNode 來播放區塊資料,並在完成後清理資源以防止記憶體流失。
雖然完整的程式碼庫可在 ng-firebase-tts 專案存放庫中取得,但本應用程式仰賴 Firebase Remote Config 來管理設定、App Check 來防止濫用,以及 App Hosting 來部署 Angular 應用程式。
以下各節將說明如何初始化 Firebase 應用程式與 App Check,以及如何啟用 Remote Config 數值。
public/firebase.config.json 檔案包含公開的 Firebase API 金鑰、機密的 reCAPTCHA Enterprise 金鑰,以及用於在本機開發環境中略過裝置認證的 App Check 偵錯權杖。這些數值對於 Firebase 應用程式與 App Check 的初始化至關重要。
@Service()
export class ConfigService {
  #app: FirebaseApp | undefined = undefined;
  #remoteConfig: RemoteConfig | undefined = undefined;

  /*... getter methods are omitted... */

  get appConfig(): AppRemoteConfig {
    return this.#appConfig;
  }

  get aiBackend(): AI {
    return this.#aiBackend;
  }

  async initialize(): Promise<void> {
    this.#app = initializeApp(firebaseConfig.app);

    (globalThis as any).FIREBASE_APPCHECK_DEBUG_TOKEN = firebaseConfig.appCheckDebugToken || true;

    initializeAppCheck(this.#app, {
      provider: new ReCaptchaEnterpriseProvider(firebaseConfig.recaptchaEnterpriseKey),
      isTokenAutoRefreshEnabled: true,
    });

    this.#remoteConfig = getRemoteConfig(this.#app);
    this.#remoteConfig.defaultConfig = remoteConfigDefaults;
    await fetchAndActivate(this.#remoteConfig);

    this.#appConfig = {
      vertexAILocation: getValue(this.#remoteConfig, 'vertexAILocation').asString(),
      useLimitedUseAppCheckTokens: getValue(
        this.#remoteConfig,
        'useLimitedUseAppCheckTokens',
      ).asBoolean(),
      geminiTTSModelName: getValue(this.#remoteConfig, 'geminiTTSModelName').asString(),
    };

    this.#aiBackend = getAI(this.#app, {
      backend: new AgentPlatformBackend(this.#appConfig.vertexAILocation),
      useLimitedUseAppCheckTokens: this.#appConfig.useLimitedUseAppCheckTokens,
    });
  }
}
initialize 方法會初始化 Firebase App、設定 App Check、建立 Firebase AI,並將 Remote Config 數值指派給 appConfig。
appConfig 物件包含位置資訊、Gemini TTS 模型名稱以及 limited-use App Check 權杖旗標。
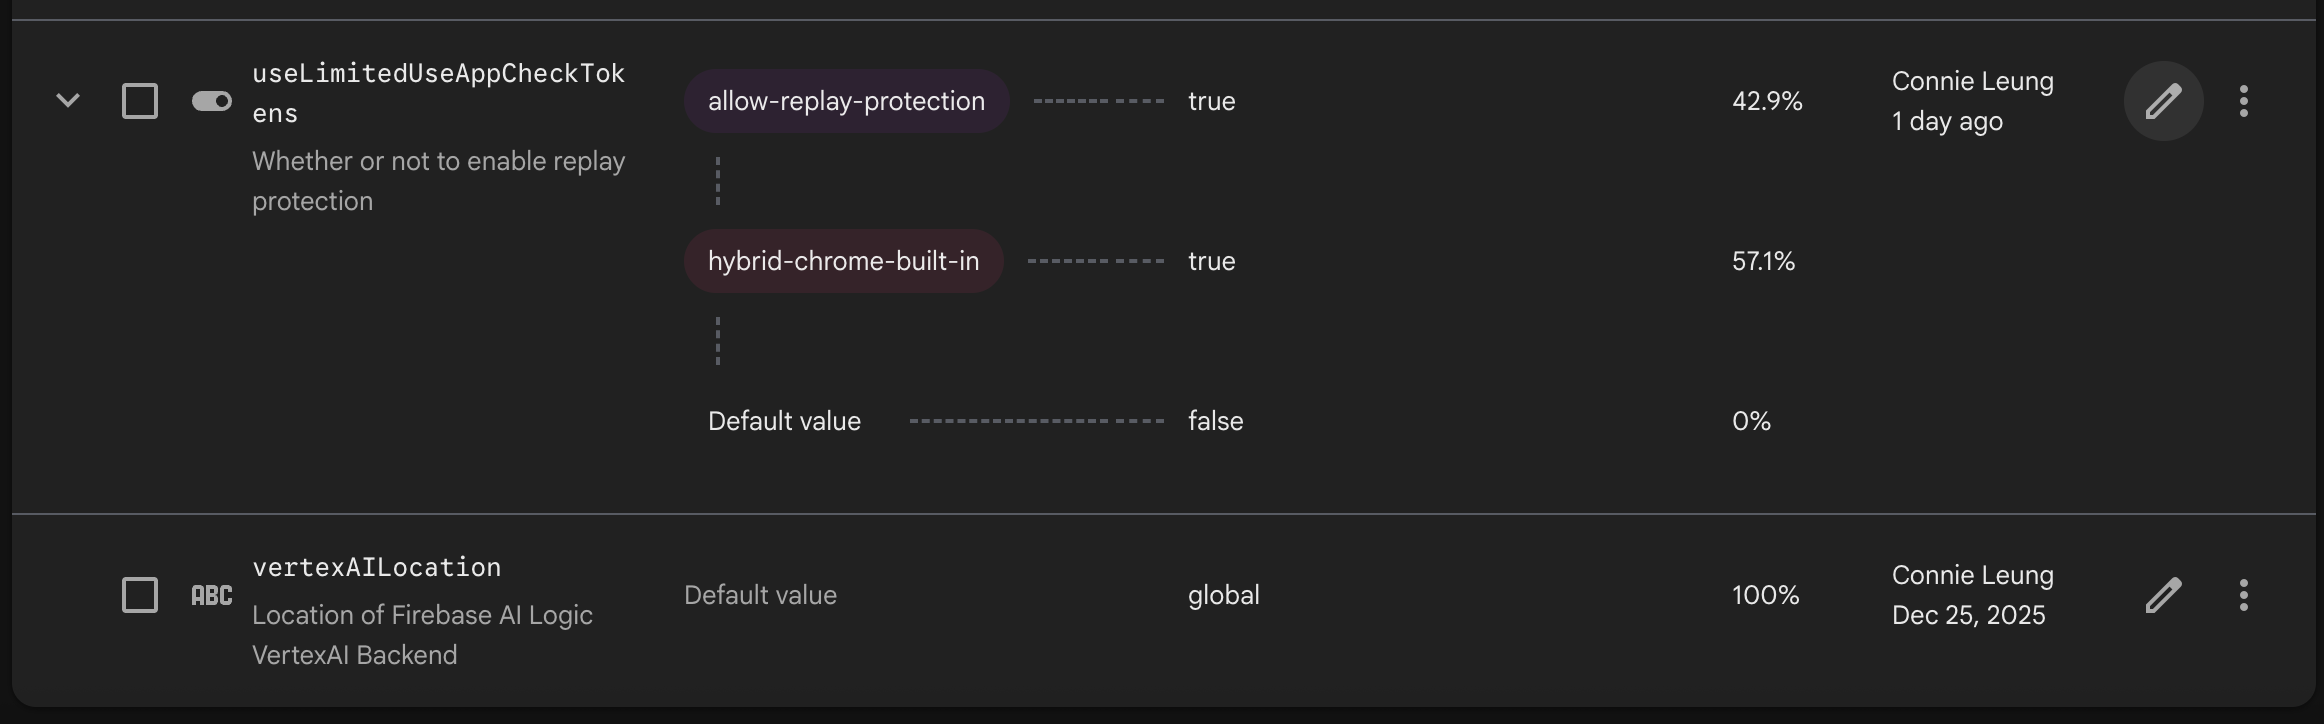
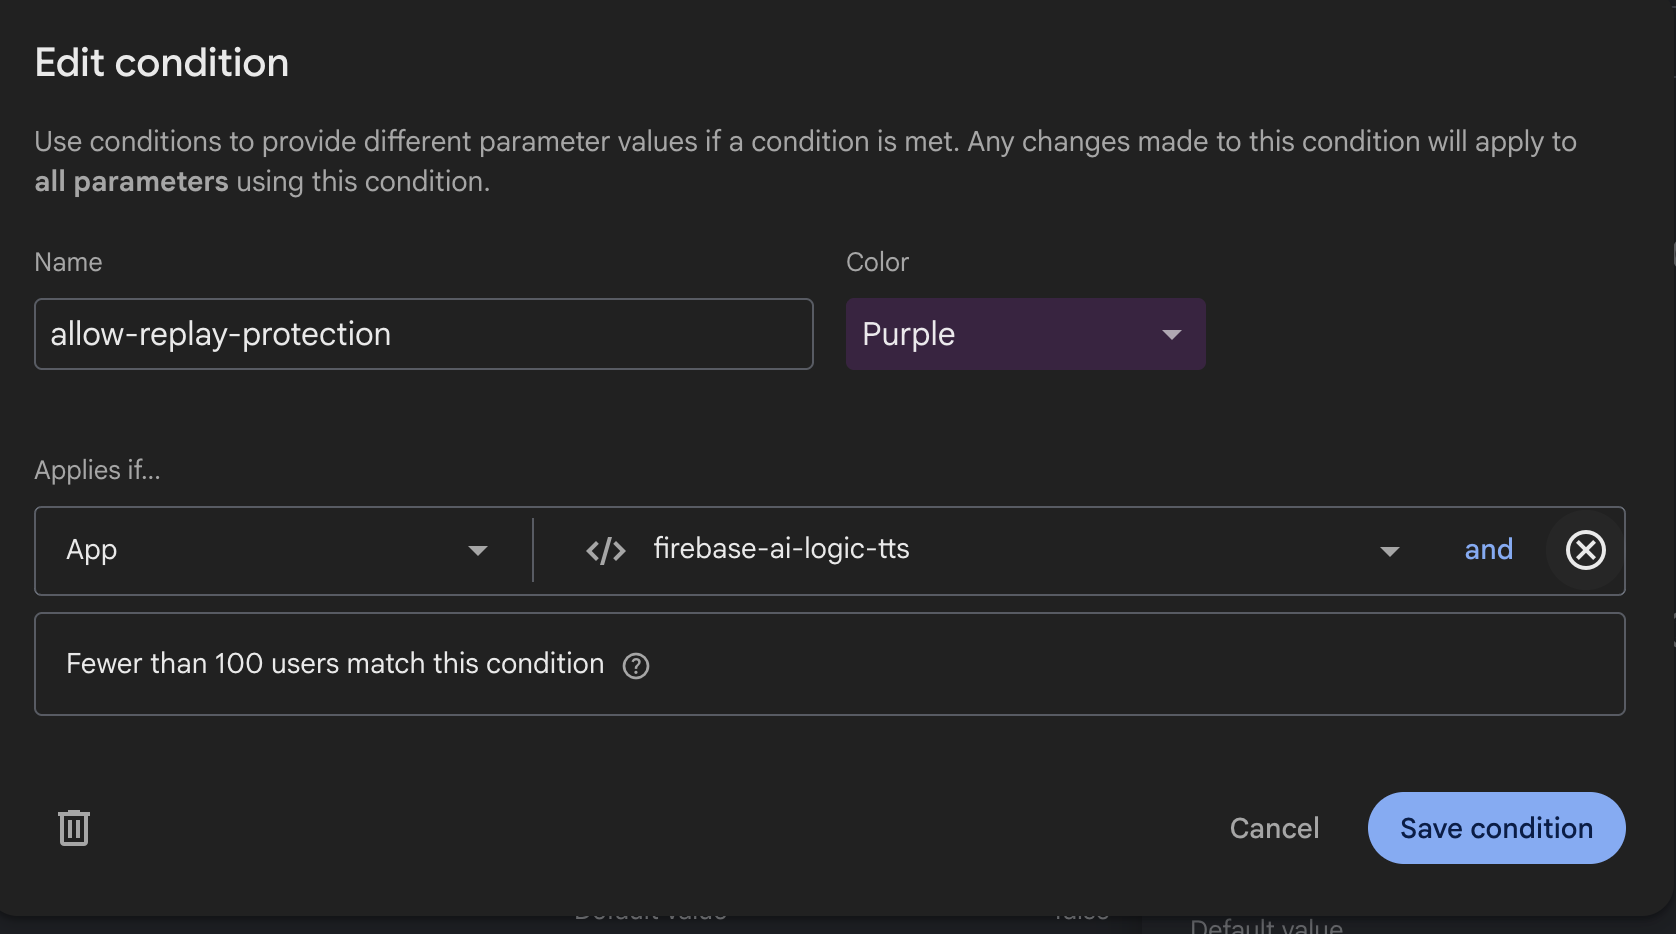
在 Firebase Remote Config 中設定 TTS 模型名稱與 limited-use App Check 權杖參數。這兩個參數皆具有條件式數值。當 Firebase 網路應用程式為 firebase-ai-logic-tts 時,TTS 模型為 gemini-3.1-flash-tts-preview,且 limited-use App Check 權杖旗標會設為 true。

export const AI_BACKEND = new InjectionToken<AI>('AI_BACKEND');

export function provideFirebase() {
  return makeEnvironmentProviders([
    {
      provide: AI_BACKEND,
      useFactory: () => inject(ConfigService).aiBackend,
    },
  ]);
}
AI_BACKEND 注入權杖提供了一個處理站函式,用以從 ConfigService 回傳 Firebase AI。
export const appConfig: ApplicationConfig = {
  providers: [
    ... other providers ...
    provideAppInitializer(async () => await inject(ConfigService).initialize()),
    provideFirebase(),
  ],
};
provideAppInitializer 與 provideFirebase 可確保在應用程式啟動期間成功執行 Firebase 初始化與 Firebase AI 設定。
私有 createModel 方法會呼叫 getGenerativeModel 來建立已設定 speechConfig 的生成式模型。後續的工作流程會使用此模型將 L16 音訊轉換為 WAV,或直接串流播放 L16 音訊。
@Service()
export class TextToSpeechService {
  readonly #configService = inject(ConfigService);
  readonly #modelName = this.#configService.appConfig.geminiTTSModelName;

  private createModel(voiceName: string) {
    return getGenerativeModel(this.#aiBackend, {
      model: this.#modelName,
      generationConfig: {
        responseModalities: [ResponseModality.AUDIO],
        speechConfig: {
          voiceConfig: {
            prebuiltVoiceConfig: { voiceName },
          },
          languageCode: 'en-US',
        },
      },
    });
  }
}
async synthesize(text: string, voiceName: string): Promise<Blob> {
  const model = this.createModel(voiceName);
  const result = await model.generateContent([text]);
  const chunk = this.extractValidChunkData(result.response);
  const { data, mimeType } = chunk;
  return convertToWav(decodeBase64(data), mimeType);
}
extractValidChunkData 方法會從回應酬載中擷取二進位音訊資料與 MIME 類型。
synthesize 方法會擷取 L16 格式的完整音訊酬載。然而,HTML 音訊元素不支援 L16,因此應用程式必須先將資料轉換為 WAV 格式,然後再將 Blob URL 指派給元素來源。
如需完整實作細節,請參閱 WAV 轉換程式碼。
此實作方式較為簡單,因為它避免了處理回應串流與遞增的音訊資料區塊。然而,當文字較長並產生較長的音訊串流時,使用者會面臨延遲。為了消除播放延遲,下一節將探討如何直接透過 Web Audio API 的 AudioContext 來串流播放資料區塊。
async *synthesizeStream(text: string, voiceName: string): AsyncGenerator<RawAudioBinary | undefined> {
    const model = this.createModel(voiceName);
    let firstMimeType = '';
    let sampleRate = DEFAULT_SAMPLE_RATE;

    const responseStream = await model.generateContentStream([text]);
    for await (const chunk of responseStream.stream) {
      const chunkData = this.extractValidChunkData(chunk);
      if (chunkData) {
        const { data, mimeType } = chunkData;
        const decodedData = decodeBase64(data);
        if (!firstMimeType && mimeType) {
          firstMimeType = mimeType;
          sampleRate = parseMimeType(firstMimeType).sampleRate;
        }

        yield { decodedData, sampleRate };
      }
    }

    yield undefined;
}
synthesizeStream 方法會回傳一個非同步產生器,用以產出原始二進位資料與取樣率。MIME 類型為 audio/l16; rate=24000; channels=1,因此 parseMimeType 會擷取取樣率以供音訊播放器的 AudioContext 使用。
雖然 AudioPlayerService 超出了本文的討論範圍,但播放器服務原始碼示範了如何在不使用 HTML 音訊元素的情況下播放音訊。
接下來,我們將在 Angular 中建構一個響應式使用者介面,以呈現 HTML 音訊元素來播放音訊。
TextToSpeechComponent 將音訊管理工作委派給視圖服務,以維持關注點分離。
TextToSpeechComponent 顯示三個按鈕,用以在三種不同情境下從文字產生語音:
@Component({
  selector: 'app-text-to-speech',
  templateUrl: './text-to-speech.component.html',
  styleUrl: './text-to-speech.component.css',
  imports: [SpinnerIconComponent, NgTemplateOutlet],
  providers: [TextToSpeechViewService],
})
export class TextToSpeechComponent {
  private readonly speechService = inject(TextToSpeechViewService);

  interestingFact = input<string | undefined>(undefined);
  audioPrompt = input.required<string>();
  voice = input.required<string>();

  async generateSpeech(mode: GenerateSpeechMode) {
    const fact = this.interestingFact();
    await this.speechService.generateSpeech(mode, {
      prompt: this.audioPrompt(),
      voice: this.voice(),
      fact: this.interestingFact(),
    });
  }
}
TextToSpeechViewService 封裝了 TextToSpeechService 與 AudioPlayerService,以協調語音合成與音訊播放。
@Injectable()
export class TextToSpeechViewService {
  private readonly speechService = inject(TextToSpeechService);
  private readonly audioPlayerService = inject(AudioPlayerService);

  #audioUrl = signal<string | undefined>(undefined);
  audioUrl = this.#audioUrl.asReadonly();

  private processStreamChunk(isInitialized: boolean, playbackRate: number, chunk: RawAudioBinary) {
    if (!isInitialized) {
      this.audioPlayerService.initialize(chunk.sampleRate, playbackRate);
      isInitialized = true;
    }
    this.audioPlayerService.processChunk(chunk.decodedData);
    return isInitialized;
  }

  private async handleSync(promptArgs: FactConfig) {
    const blob = await this.speechService.synthesize(promptArgs.prompt, promptArgs.voice);
    this.setAudioUrl(blob);
  }

  private async handleStream(promptArgs: FactConfig) {
    let isInitialized = false;
    const { prompt, voice } = promptArgs;

    for await (const chunk of this.speechService.synthesizeStream(prompt, voice)) {
      isInitialized = this.processStreamChunk(isInitialized, 1, chunk);
    }
  }

  private setAudioUrl(finalBlob: Blob | undefined) {
    if (finalBlob) {
      const createdUrl = URL.createObjectURL(finalBlob);
      this.#audioUrl.set(createdUrl);
      return createdUrl;
    }
    return undefined;
  }

  async generateSpeech(mode: GenerateSpeechMode, promptArgs: FactConfig) {
    revokeBlobURL(this.#audioUrl());
    this.#audioUrl.set(undefined);

    switch (mode) {
      case 'sync':
        await this.handleSync(promptArgs);
        break;
      case 'web_audio_api':
        await this.handleStream(promptArgs);
        break;
    }
  }
}
handleSync 會叫用 Firebase SDK 使用 Gemini TTS 模型合成音訊、產生 Blob URL、更新 #audioUrl,並呈現 HTML 音訊元素。
handleStream 則會呼叫 Firebase SDK 使用 Gemini TTS 模型進行串流音訊。音訊內容接收到區塊資料後會立即播放,並且不會呈現 HTML 音訊元素。
將文字轉語音與 Firebase AI Logic 整合,讓 Angular 應用程式具備即時音訊生成能力。
Angular 應用程式完全在用戶端處理文字轉語音。將變更推送至 Git 即會自動觸發部署至 Firebase App Hosting。
歡迎嘗試複製 GitHub 存放庫、上傳圖片以產生冷門知識,並使用 Gemini 3.1 Flash TTS preview 模型搭配指定的場景、情緒與語速朗讀出來。

 Connie

 iThome鐵人賽
 看影片追技術