

終於來到 Day4 拉,今天的內容也是整個我展開這三十天的契機,也就是 DRA,全名 Dynamic Resource Allocation。DRA 在 Kubernetes v1.34 GA,並且這兩年在各種 conference 被提及,像是 KubeCon,幾乎每一場跟 AI 基礎建設沾得上邊的議程都會出現它。
昨天 Device Plugin 的結論還記得嗎? Devices cannot be shared between containers。
nvidia.com/gpu: 1 這個寫法,能表達的只有「幾個」。它表達不了「哪一個」、「多大」、「什麼型號」、「能不能分你一半」。但別覺得心灰意冷,DRA 我的超人就是幫你解決這件事情。
除了繼承 Device Plugin 的「兩個不同的 Pod 各拿一張卡」的能力之外,它還可以做到「兩個不同的 Pod 共用一張卡」、「同個 Pod 兩容器共用一張卡」、「按照型號、容量來挑選卡」。
這些都還只是基本款。如果要說更進階的,它可以在同一個請求裡寫一串備案:「H100 最好,A100 也行,真的沒有給我一張普通的就算了」。或者是這張卡壞掉了,DRA 可以自動驅逐已經跑在壞掉裝置上的 Pod。
功能可以說是五花八門,有些 feature 甚至還沒 GA。而且 DRA 申請的也不一定是 GPU,網卡、甚至 CPU 都可以交給它管。但今天不會帶完所有功能,今天主要是看 DRA 解決了 Device Plugin 的什麼痛點。
DRA 的 API 物件分成四個,各自有明確的分工:
| 物件 | 誰建立的 | 做什麼 |
|---|---|---|
| ResourceSlice | 裝置 driver | 告訴叢集「哪些節點上有哪些裝置」 |
| DeviceClass | 叢集管理員或 driver | 定義一類裝置,以及可以怎麼挑 |
| ResourceClaim | 使用者或由 Kubernetes 從 template 產生 | 一份「我要用某個裝置」的請求 |
| ResourceClaimTemplate | 使用者 | 讓 Kubernetes 幫每個 Pod 各產一份 claim |
每個 ResourceSlice 代表一個 resource pool 中的一個或多個裝置,由 driver 負責建立和維護。一個
pool 可以由單一 ResourceSlice 表示,也可以分散在多個 ResourceSlice 中。driver 會用 controller 持續同步 ResourceSlice 的內容,任何人手動建立或修改都會被覆寫。
DeviceClass 讓叢集管理員或 driver 定義叢集中的裝置類別,告訴使用者可以請求哪些裝置、以及如何請求。DeviceClass 可以使用 CEL(common expression language)依據裝置屬性篩選裝置,參照該 DeviceClass 的 ResourceClaim,則可以在類別範圍內進一步請求特定設定,也就是我們前面提到的可以「按照型號、容量來挑選卡」。
ResourceClaim 描述的是「我需要叢集裡什麼樣的裝置」這個請求本身。它不只記錄請求,也記錄結果:排程器挑好裝置後,會把資源分配給這個 claim,並記下它保留給哪個 Pod。Pod 透過參照這個 claim,取得分配到的裝置。換句話說,它讓「我要一張卡」這件事變成了叢集裡的一個物件。
這是和 Device Plugin 最根本的差別。在 Device Plugin 模型裡,「我要一張卡」只是寫在容器 resources 欄位裡的一個數字,附屬於那個容器,沒有自己的身分。ResourceClaim 則是獨立的 API 物件,有名稱、屬於某個 namespace、有自己的生命週期。
也正因為它是獨立物件,共用才有了著力點:兩個容器只要參照同一個 ResourceClaim,就能使用同一份資源。如果請求只是容器上的一個數字,就沒有東西可以讓兩個容器共同指向。
ResourceClaimTemplate 是產生 ResourceClaim 的範本。它本身不代表任何請求,而是描述「每一份請求應該長什麼樣子」,由 Kubernetes 依照它為每個 Pod 各自產生一個 ResourceClaim。
它要解決的,是 ResourceClaim 帶來的一個新問題:
ResourceClaim 是獨立物件,這讓共用變得容易:多個 Pod 參照同一個 claim 名稱,就會使用同一份資源。但反過來說,如果每個 Pod 都需要自己的一張卡,就不能讓它們參照同一個 claim。
對單一 Pod 來說,手動建立一個 claim 還算簡單。可是 Deployment 裡的 Pod 是由控制器建立的,數量會隨擴縮容變化,名稱也事先無從得知。
ResourceClaimTemplate 把這件事交給 Kubernetes:Pod 參照的是範本,而不是某個 claim。每當有 Pod 建立,Kubernetes 就依範本為它產生一個專屬的 ResourceClaim,並把產生的 claim 名稱記錄在 Pod 的 status.resourceClaimStatuses。
這些產生出來的 claim 與對應的 Pod 綁定:Pod 終止,claim 也會被刪除,裝置隨之釋出。所以兩者的分工很清楚:
| ResourceClaim | ResourceClaimTemplate | |
|---|---|---|
| 適用情境 | 多個 Pod 共用同一份裝置 | 每個 Pod 各自使用獨立、設定相似的裝置 |
| Pod 參照的對象 | 一個已存在的 claim | 一個範本 |
| claim 由誰建立 | 使用者 | Kubernetes |
| 生命週期 | 使用者自行管理 | 跟著對應的 Pod |
讀到這裡,如果你覺得有點 deja vu,那不是你的錯覺。沒錯,正是 Kubernetes PV/PVC 那套做法,不敢說完全一樣,但整體有著高度相似,下面這張表整理了 DRA 與 storage 的對應關係:
| 儲存 | DRA | 角色 | 範圍 |
|---|---|---|---|
| StorageClass | DeviceClass | 管理員定義「有哪一類資源可以請求」 | 叢集 |
| PersistentVolume | ResourceSlice 中的一個裝置 | 實際存在的東西 | 叢集 |
| PersistentVolumeClaim | ResourceClaim | 使用者的請求,Pod 參照它 | namespace |
Generic ephemeral volume 的 volumeClaimTemplate |
ResourceClaimTemplate | 為每個 Pod 產生專屬的 claim,隨 Pod 刪除 | namespace |
| CSI driver | DRA driver | 廠商實作,負責提供資源並接進容器 | — |
Day 4 跟 Day 5 的實驗我們會在 fake gpu 的那個環境另外起一個叢集,這次用的是 Kubernetes SIG 官方的 dra-example-driver。它跟 fake-gpu-operator 一樣提供一組假的 GPU,同時本身就是一支 DRA driver,把那些假卡用 ResourceSlice 發布出來。
git clone --depth 1 --branch v0.4.0 \
  https://github.com/kubernetes-sigs/dra-example-driver.git

cd dra-example-driver
./demo/clusters/kind/create-cluster.sh
helm upgrade -i \
  --create-namespace \
  --namespace dra-example-driver \
  dra-example-driver \
  deployments/helm/dra-example-driver
驗證 DRA driver 是 running 的狀態:
kubectl get pods -n dra-example-driver
NAME                                     READY   STATUS    RESTARTS   AGE
dra-example-driver-kubeletplugin-nwxgd   1/1     Running   0          91m
driver 裝好之後,先看它建了什麼 DeviceClass:
kubectl get deviceclass --context kind-dra-example-driver-cluster
NAME              AGE
gpu.example.com   29m
DeviceClass 可以由管理員或 driver 建立,實務上廠商通常會附一個預設的,讓你裝完就有東西可以用。而這個 DeviceClass 就是由 driver 建立的。
接著查看它發布的 ResourceSlice:
kubectl get resourceslice --context kind-dra-example-driver-cluster
得到結果:driver gpu.example.com 宣告了 dra-example-driver-cluster-worker 這個 Node 上有一批裝置。
NAME                                                            NODE                                DRIVER            POOL                                AGE
00000-gpu.example.com-dra-example-driver-cluster-worker-wp657   dra-example-driver-cluster-worker   gpu.example.com   dra-example-driver-cluster-worker   29m
展開來可以看到這個 driver 所宣告的裝置裡面模擬了八張 GPU。
kubectl get resourceslice -o custom-columns='NODE:.spec.nodeName,POOL:.spec.pool.name,DEVICES:.spec.devices[*].name'
NODE                                POOL                                DEVICES
dra-example-driver-cluster-worker   dra-example-driver-cluster-worker   gpu-0,gpu-1,gpu-2,gpu-3,gpu-4,gpu-5,gpu-6,gpu-7
---
apiVersion: v1
kind: Namespace
metadata:
  name: gpu-test1

---
apiVersion: resource.k8s.io/v1
kind: ResourceClaimTemplate
metadata:
  namespace: gpu-test1
  name: single-gpu
spec:
  spec:
    devices:
      requests:
      - name: gpu
        exactly:
          deviceClassName: gpu.example.com

---
apiVersion: v1
kind: Pod
metadata:
  namespace: gpu-test1
  name: pod1
  labels:
    app: pod
spec:
  containers:
  - name: ctr
    image: ubuntu:22.04
    command: ["bash", "-c"]
    args: ["export; trap 'exit 0' TERM; sleep 9999 & wait"]
    resources:
      claims:
      - name: gpu
  resourceClaims:
  - name: gpu
    resourceClaimTemplateName: single-gpu

---
apiVersion: v1
kind: Pod
metadata:
  namespace: gpu-test1
  name: pod2
  labels:
    app: pod
spec:
  containers:
  - name: ctr
    image: ubuntu:22.04
    command: ["bash", "-c"]
    args: ["export; trap 'exit 0' TERM; sleep 9999 & wait"]
    resources:
      claims:
      - name: gpu
  resourceClaims:
  - name: gpu
    resourceClaimTemplateName: single-gpu
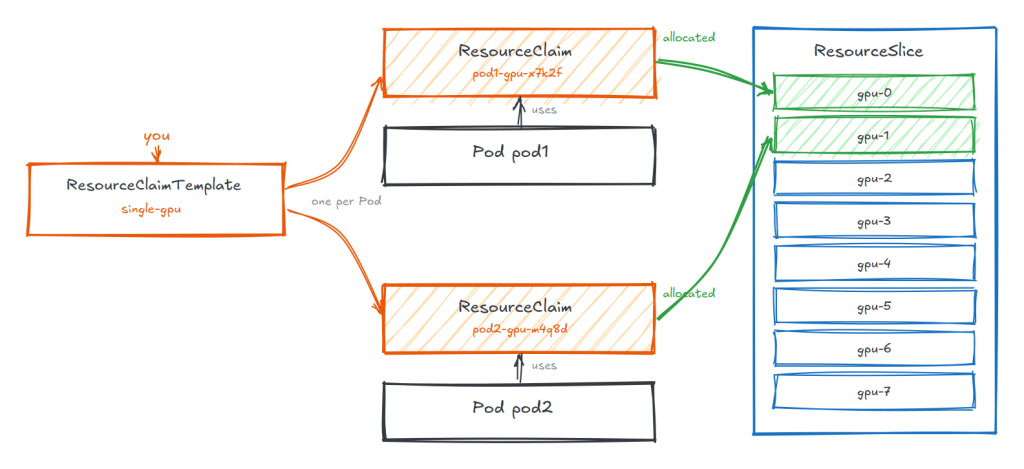
兩份 claim 是 Pod 自己生的:
kubectl -n gpu-test1 get resourceclaims
NAME             STATE                AGE
pod1-gpu-2v5w2   allocated,reserved   15s
pod2-gpu-x4xs6   allocated,reserved   15s
兩個 Pod 拿到的是不同的卡:
kubectl -n gpu-test1 get resourceclaim \
  -o custom-columns='CLAIM:.metadata.name,DEVICE:.status.allocation.devices.results[*].device,USED-BY:.status.reservedFor[*].name'
CLAIM            DEVICE   USED-BY
pod1-gpu-2v5w2   gpu-1    pod1
pod2-gpu-x4xs6   gpu-0    pod2
確認容器裡真的收到東西了:
kubectl -n gpu-test1 logs pod1 | grep GPU_DEVICE
declare -x GPU_DEVICE_1="gpu-1"
declare -x GPU_DEVICE_1_SHARING_STRATEGY="TimeSlicing"
declare -x GPU_DEVICE_1_TIMESLICE_INTERVAL="Default"
declare -x GPU_DEVICE_GPU_1_RESOURCE_CLAIM="4c9ced6a-0bba-4dd8-8a48-7c7db18253ed"
---
apiVersion: v1
kind: Namespace
metadata:
  name: gpu-test2

---
apiVersion: resource.k8s.io/v1
kind: ResourceClaimTemplate
metadata:
  namespace: gpu-test2
  name: single-gpu
spec:
  spec:
    devices:
      requests:
      - name: gpu
        exactly:
          deviceClassName: gpu.example.com

---
apiVersion: v1
kind: Pod
metadata:
  namespace: gpu-test2
  name: pod
  labels:
    app: pod
spec:
  containers:
  - name: ctr0
    image: ubuntu:22.04
    command: ["bash", "-c"]
    args: ["export; trap 'exit 0' TERM; sleep 9999 & wait"]
    resources:
      claims:
      - name: shared-gpu
  - name: ctr1
    image: ubuntu:22.04
    command: ["bash", "-c"]
    args: ["export; trap 'exit 0' TERM; sleep 9999 & wait"]
    resources:
      claims:
      - name: shared-gpu
  resourceClaims:
  - name: shared-gpu
    resourceClaimTemplateName: single-gpu
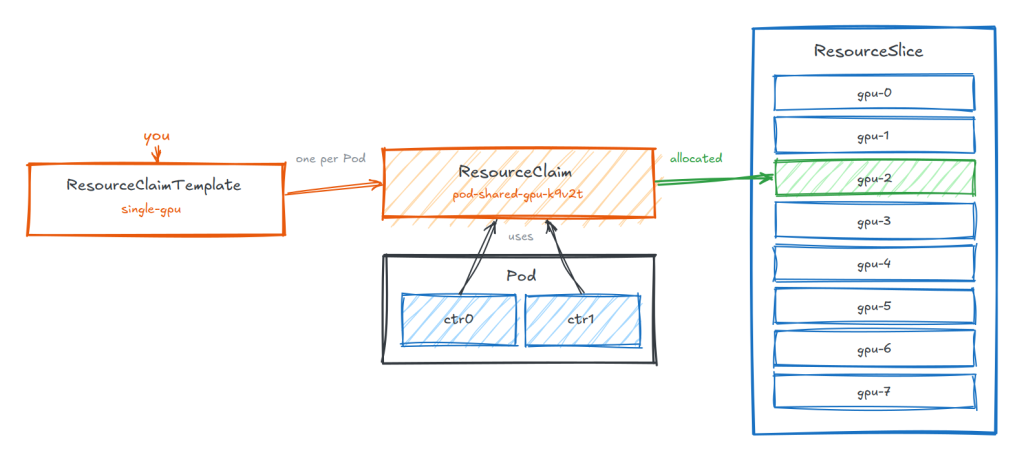
只產生一份 ResourceClaim:
kubectl -n gpu-test2 get resourceclaim \
  -o custom-columns='CLAIM:.metadata.name,DEVICE:.status.allocation.devices.results[*].device,USED-BY:.status.reservedFor[*].name'
CLAIM                  DEVICE   USED-BY
pod-shared-gpu-7bszr   gpu-2    pod
分別看這個 Pod 的兩個容器,確認拿到同一張卡:
kubectl -n gpu-test2 logs pod -c ctr0 | grep GPU_DEVICE
declare -x GPU_DEVICE_2="gpu-2"
declare -x GPU_DEVICE_2_SHARING_STRATEGY="TimeSlicing"
declare -x GPU_DEVICE_2_TIMESLICE_INTERVAL="Default"
declare -x GPU_DEVICE_GPU_2_RESOURCE_CLAIM="740b92dd-6204-4f53-aa93-a262cccc2c1c"
kubectl -n gpu-test2 logs pod -c ctr1 | grep GPU_DEVICE
declare -x GPU_DEVICE_2="gpu-2"
declare -x GPU_DEVICE_2_SHARING_STRATEGY="TimeSlicing"
declare -x GPU_DEVICE_2_TIMESLICE_INTERVAL="Default"
declare -x GPU_DEVICE_GPU_2_RESOURCE_CLAIM="740b92dd-6204-4f53-aa93-a262cccc2c1c"
---
apiVersion: v1
kind: Namespace
metadata:
  name: gpu-test3

---
apiVersion: resource.k8s.io/v1
kind: ResourceClaim
metadata:
  namespace: gpu-test3
  name: single-gpu
spec:
  devices:
    requests:
    - name: gpu
      exactly:
        deviceClassName: gpu.example.com

---
apiVersion: v1
kind: Pod
metadata:
  namespace: gpu-test3
  name: pod1
  labels:
    app: pod
spec:
  containers:
  - name: ctr
    image: ubuntu:22.04
    command: ["bash", "-c"]
    args: ["export; trap 'exit 0' TERM; sleep 9999 & wait"]
    resources:
      claims:
      - name: shared-gpu
  resourceClaims:
  - name: shared-gpu
    resourceClaimName: single-gpu

---
apiVersion: v1
kind: Pod
metadata:
  namespace: gpu-test3
  name: pod2
  labels:
    app: pod
spec:
  containers:
  - name: ctr
    image: ubuntu:22.04
    command: ["bash", "-c"]
    args: ["export; trap 'exit 0' TERM; sleep 9999 & wait"]
    resources:
      claims:
      - name: shared-gpu
  resourceClaims:
  - name: shared-gpu
    resourceClaimName: single-gpu
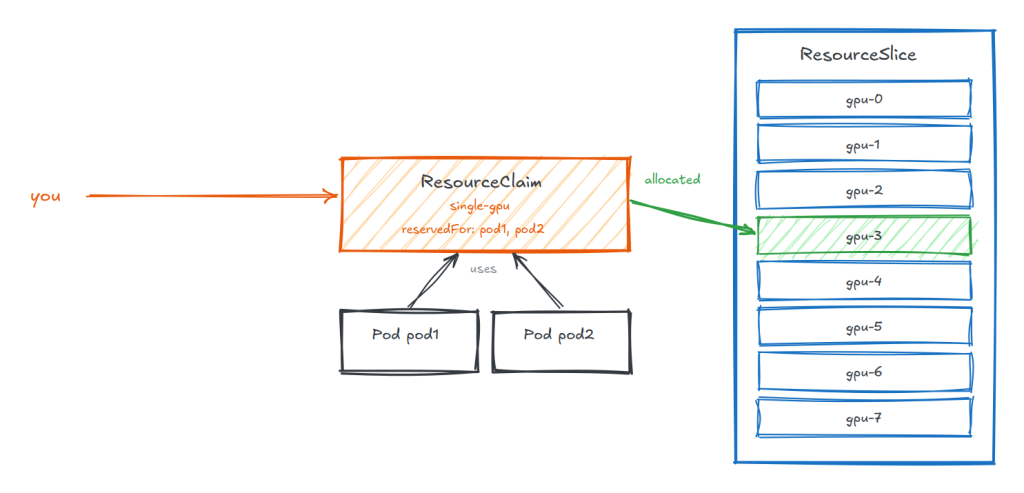
確認兩個 Pod 都拿到 gpu-3:
kubectl -n gpu-test3 get resourceclaim single-gpu \
  -o custom-columns=NAME:.metadata.name,DEVICE:.status.allocation.devices.results[*].device,RESERVED_FOR:.status.reservedFor[*].name
NAME         DEVICE   RESERVED_FOR
single-gpu   gpu-3    pod1,pod2
reservedFor 列出目前保留這個 claim 的對象,這裡可以看到 pod1 和 pod2 都在清單中。排程器每把一個參照此 claim 的 Pod 排上節點,就在這裡加一筆。
不過這份清單最多只能有 256 筆。由於 kube-scheduler 以個別 Pod 為單位記錄,一個 ResourceClaim 最多只能同時被 256 個 Pod 共用。
對大多數情境來說這已經足夠,但大規模的分散式工作負載可能會碰到上限。Kubernetes 的解法是讓 reservedFor 可以記錄 PodGroup,而不只是個別 Pod:整個 PodGroup 只佔一筆,組內有多少 Pod 都不受 256 的限制。此功能需要啟用 DRAWorkloadResourceClaims feature gate。
用剛剛的實驗二以及實驗三來做比對。
我們先把實驗三的兩個 Pod 都刪掉:
kubectl -n gpu-test3 delete pod pod1 pod2
再查看兩個 Pod 共用的 ResourceClaim:
kubectl -n gpu-test3 get resourceclaim single-gpu
NAME         STATE     AGE
single-gpu   pending   14m
Pod 都已經刪除,但 single-gpu 這個 claim 仍然存在。因為它是我們手動建立的獨立物件,Kubernetes 不會因為參照它的 Pod 消失就把它刪掉。
值得注意的是 STATE 欄位變成了 pending,表示這個 claim 目前沒有分配到裝置。也就是說,物件還在,但卡已經釋放了。
接著刪除實驗二的 Pod:
kubectl -n gpu-test2 delete pod pod
查看 namespace 中的 ResourceClaim:
kubectl -n gpu-test2 get resourceclaim
No resources found in gpu-test2 namespace.
實驗二的 claim 是 Kubernetes 依照 ResourceClaimTemplate 為這個 Pod 產生的,生命週期與 Pod 綁定,所以 Pod 刪除後,claim 也跟著被刪除了。
再查看 resourceclaimtemplate 本身:
kubectl -n gpu-test2 get resourceclaimtemplate
NAME         AGE
single-gpu   37m
範本仍然存在。被刪除的只是由範本產生出來的 claim,範本本身不受影響。之後再建立參照這個範本的 Pod,Kubernetes 會重新產生一個新的 claim。
DRA 的基礎介紹差不多就到這,與昨天的 Device Plugin 相比,DRA 有著更強大的資源配置功能。它仿照 Kubernetes PV/PVC 那套做法,能夠對 GPU 提出更加人性化的申請。如今 DRA 也逐漸成熟,各位不妨也去玩玩看吧!
Kubernetes Documentation — Dynamic Resource Allocation
Kubernetes Documentation — DRA API Objects
Kubernetes Blog — Kubernetes v1.34: DRA has graduated to GA
[GitHub] ResourceClaim Support for Workloads
[GitHub] Kubernetes SIGs - DRA Driver for NVIDIA GPUs


 iThome鐵人賽
 看影片追技術