

當我最初為這個應用程式建置元件時,它們是在沒有正式設計系統的情況下建立的。當時,我不知道 Google 開發了 Stitch,也沒有意識到我可以將 Stitch MCP Server 直接註冊在 Antigravity CLI 中。
一旦我發現了 Stitch,我就想為專案採用現代 UI/UX 最佳實務。我的目標很簡單:
使用 Stitch MCP Server 產生乾淨的 UI 畫面並建立正式的 DESIGN.md。
將該 DESIGN.md 作為設計系統基礎,以便稍後建置全新的主畫面。
然而,我的體驗只能用「惡夢」來形容。
我已經要求 Angular MCP server 啟動開發伺服器,以便 Gemini 可以在瀏覽器中檢查 /dashboard 來建立 DESIGN.md。
我使用 grill-with-docs 技能陳述了以下需求來建立 DESIGN.md:
Inter 字型系列。DESIGN.md,涵蓋應用程式外殼(App Shell)、頁首(Header)、頁尾(Footer)、PWA 更新橫幅(PWA Update Banner)、儀表板(Dashboard)、相片面板(Photo Panel)及其子元件,以及分析器面板(Analyzer Panel)及其子元件。產生之後,DESIGN.md 成為了我們的設計系統、Stitch 畫面與 Angular 元件之間的正式協定規範。
我提示 Gemini 使用 Stitch MCP Server 建立一個新專案、上傳 DESIGN.md 並設計畫面。
stitch mcp: please create a new project named Firebase TTS and upload DESIGN.md to design the screen in both desktop and mobile viewports.
我們很快就遇到了幾個問題:
DESIGN.md 來產生畫面。http://localhost:4200 以觀察運行中的儀表板、更新 DESIGN.md 並編輯畫面。在重複了三次這個重設過程後,DESIGN.md 和 Stitch 畫面終於與我們的 Angular 元件保持一致。
在與 Stitch 一番搏鬥、對 DESIGN.md 進行多次修改以及重設了 3 次專案之後,我們終於將設計系統轉化為程式碼。在 Tailwind CSS v4 中,它直接位於 styles.css 之中,並使用 Tailwind CSS v4 的 @theme 指令。
DESIGN.md 包含顏色定義、排版級距(Typography scales)、間距網格(Spacing grid)以及嚴格的元件規格。
如果您對完整的 DESIGN.md 內容 感興趣,可以在我的 GitHub 存放庫中檢視詳細資訊。
以下是我們在 styles.css 中建立的基礎主題權杖(Theme tokens):
@theme {
  --font-sans: 'Inter', ui-sans-serif, system-ui, sans-serif;
  --font-mono: ui-monospace, SFMono-Regular, Menlo, Monaco, Consolas, monospace;

  --color-app-bg: #0f172a;
  --color-surface-card: rgba(30, 41, 59, 0.5);
  --color-surface-border: #334155;
  --color-surface-hover: #475569;

  --color-text-primary: #f1f5f9;
  --color-text-secondary: #cbd5e1;
  --color-text-muted: #94a3b8;

  --color-primary-indigo: #4f46e5;
  --color-primary-hover: #6366f1;

  --color-error-bg: #7f1d1d;
  --color-error-border: #b91c1c;
  --color-error-text: #fecaca;
}
在 Tailwind CSS v4 中,@theme 只會在建置(build)時期產生 utility classes(工具類別),並不會直接將 CSS 變數注入到瀏覽器中。
透過在 src/styles.css 中加入 :root {} 區塊,我們才能將顏色變數(例如 --color-primary-accent)真正提供給瀏覽器與 Chrome
開發者工具(DevTools)使用。這樣可以確保元件樣式中的自訂顏色與變數隨時都能正常運作,而不會出現 undefined(未定義)的情況。
:root {
  --color-app-bg: #0f172a;
  --color-surface-card: rgba(30, 41, 59, 0.5);
  --color-surface-border: #334155;
  --color-surface-hover: #475569;

  --color-text-primary: #f1f5f9;
  --color-text-secondary: #cbd5e1;
  --color-text-muted: #94a3b8;

  --color-primary-indigo: #4f46e5;
  --color-primary-hover: #6366f1;

  --color-error-bg: #7f1d1d;
  --color-error-border: #b91c1c;
  --color-error-text: #fecaca;
}
如果使用者的電腦上安裝了 Inter,--font-sans 將會使用它。否則,它會優雅地降級回退到原生系統的無襯線字型(ui-sans-serif、system-ui 和泛用的 sans-serif)。同樣地,--font-mono 會優先使用 ui-monospace,然後才回退到其他標準系統等寬字型。
在全域鎖定了我們的設計權杖之後,下一步就是提示 Gemini 使用這些新的主題變數來取代所有寫死的顏色。
我分三個獨立步驟更新了元件 CSS 檔案,以保持變更幅度小巧且易於審查。要求 Gemini 一次變更所有 15 個檔案會使檢查程式碼變得令人不堪負荷。
應用程式外殼、頁首、頁尾與 PWA 橫幅:
Replace the CSS styles of app shell, footer, header, and Pwa Update banner with the theme variables in styles.css
儀表板與相片面板:
Replace the CSS of Dashboard, Photo Panel and its child components with the theme variables in styles.css
分析器面板:
Replace the CSS of Analyzer Text Panel and its child components with the theme variables in styles.css
與其列出所有元件的 CSS 檔案,以下是所有檔案中發生的基本變更:
/* Before: Hardcoded colors */
.dashboard-main {
  @apply bg-slate-800/50 border border-slate-700 rounded-2xl p-6 md:p-8 shadow-2xl shadow-slate-950/50 backdrop-blur-sm;
}

/* After: Using CSS theme variables from styles.css */
.dashboard-main {
  @apply bg-(--color-surface-card) border border-(--color-surface-border) rounded-2xl p-6 md:p-8 shadow-2xl shadow-slate-950/50 backdrop-blur-sm;
}
更新顏色後,我們分兩個階段清理了 CSS 類別:
styles.css 中的全域工具類別(Global utilities)。我們提示 Gemini 尋找重複的 CSS 類別,並將它們遷移至 styles.css 作為可重複使用的工具類別。這樣一來,如果未來需要變更樣式,我只需要更新一個檔案,而不需要編輯多個元件 CSS 檔案。在此清理之前,有數個元件具有套用完全相同 Tailwind 工具類別清單的重複類別。
Please identify duplicated CSS classes and migrate them to styles.css
Gemini 識別出重複的 wrapper、title 和 card 類別,並將它們註冊為可重複使用的工具類別:
@utility section-wrapper {
  @apply w-full mt-6;
}

@utility section-title {
  @apply text-lg font-semibold text-(--color-text-primary) mb-3;
}

@utility surface-card {
  @apply bg-(--color-surface-card) p-4 rounded-lg border border-(--color-surface-border);
}

@utility empty-message {
  @apply text-center text-(--color-text-muted) italic;
}

@utility btn-primary {
  @apply gap-2 text-white font-semibold py-3 px-4 rounded-lg bg-(--color-primary-indigo) hover:bg-(--color-primary-hover) disabled:bg-slate-600 disabled:cursor-not-allowed transition-all;
}
接著,這些工具類別被套用至 HTML 範本。
/* Before: CSS class scoped to the component CSS file */
@defer (when hasTags) {
    <app-tags-display [tags]="tags" />
} @placeholder {
    <div class="tags-wrapper">
        <h2 class="tags-title">Suggested Tags</h2>
        <p class="empty-message">No tags were generated for this image.</p>
    </div>
}

/* After: Using reusable utilities from styles.css */
@defer (when hasTags) {
    <app-tags-display [tags]="tags" />
} @placeholder {
    <div class="section-wrapper">
        <h2 class="section-title">Suggested Tags</h2>
        <p class="empty-message">No tags were generated for this image.</p>
    </div>
}
為了避免改動 HTML 範本並破壞應用程式,Gemini 將區域 CSS 類別的內容替換為我們新的工具類別和主題權杖。
這產生了一種反模式(Anti-pattern):區域元件類別除了 @apply 單個工具類別之外什麼都沒做(例如 .display-title { @apply section-title; } 和 .display-card { @apply surface-card; })。這造成了不必要的間接層,並在元件樣式表中留下了無用程式碼(Dead code)。
我們提示 Gemini 在程式碼庫中全面搜尋這些代理別名。我們消除了冗餘的 CSS 規則,並直接在 HTML 範本中套用工具類別。
重構前:
.display-wrapper {
  @apply w-full mt-6;
}

.display-title {
  @apply text-lg font-semibold text-slate-300 mb-2;
}

.display-card {
  @apply bg-slate-700/50 p-4 rounded-lg border border-slate-600;
}
<div class="display-wrapper">
    <h3 class="display-title">Generated Alternative Text</h3>
    <div class="display-card">
        <p class="display-text">"{{ altText }}"</p>
    </div>
</div>
重構後:
冗餘的 wrapper 和 card 類別已從 alt-text-panel.css 中刪除,HTML 範本直接使用標準工具類別:
<div class="section-wrapper">
    <h3 class="section-title">Generated Alternative Text</h3>
    <div class="surface-card">
        <p class="display-text">"{{ altText }}"</p>
    </div>
</div>
元件 CSS 檔案變得更小,HTML 範本現在使用簡潔、統一的類別。
這次 CSS 重構還帶來了一個意想不到的好處:我們的正式環境打包大小(Production bundle size)明顯變小了!
當我執行 npm run build 時,我注意到 main.js 的打包大小減少了約 2 kB。想知道自己是否看錯了,我提示 Gemini 檢查 git commit 歷史紀錄,並比較重構前後的打包大小。
Did the bundle size got smaller after refactoring? it was smaller by 2 kBs
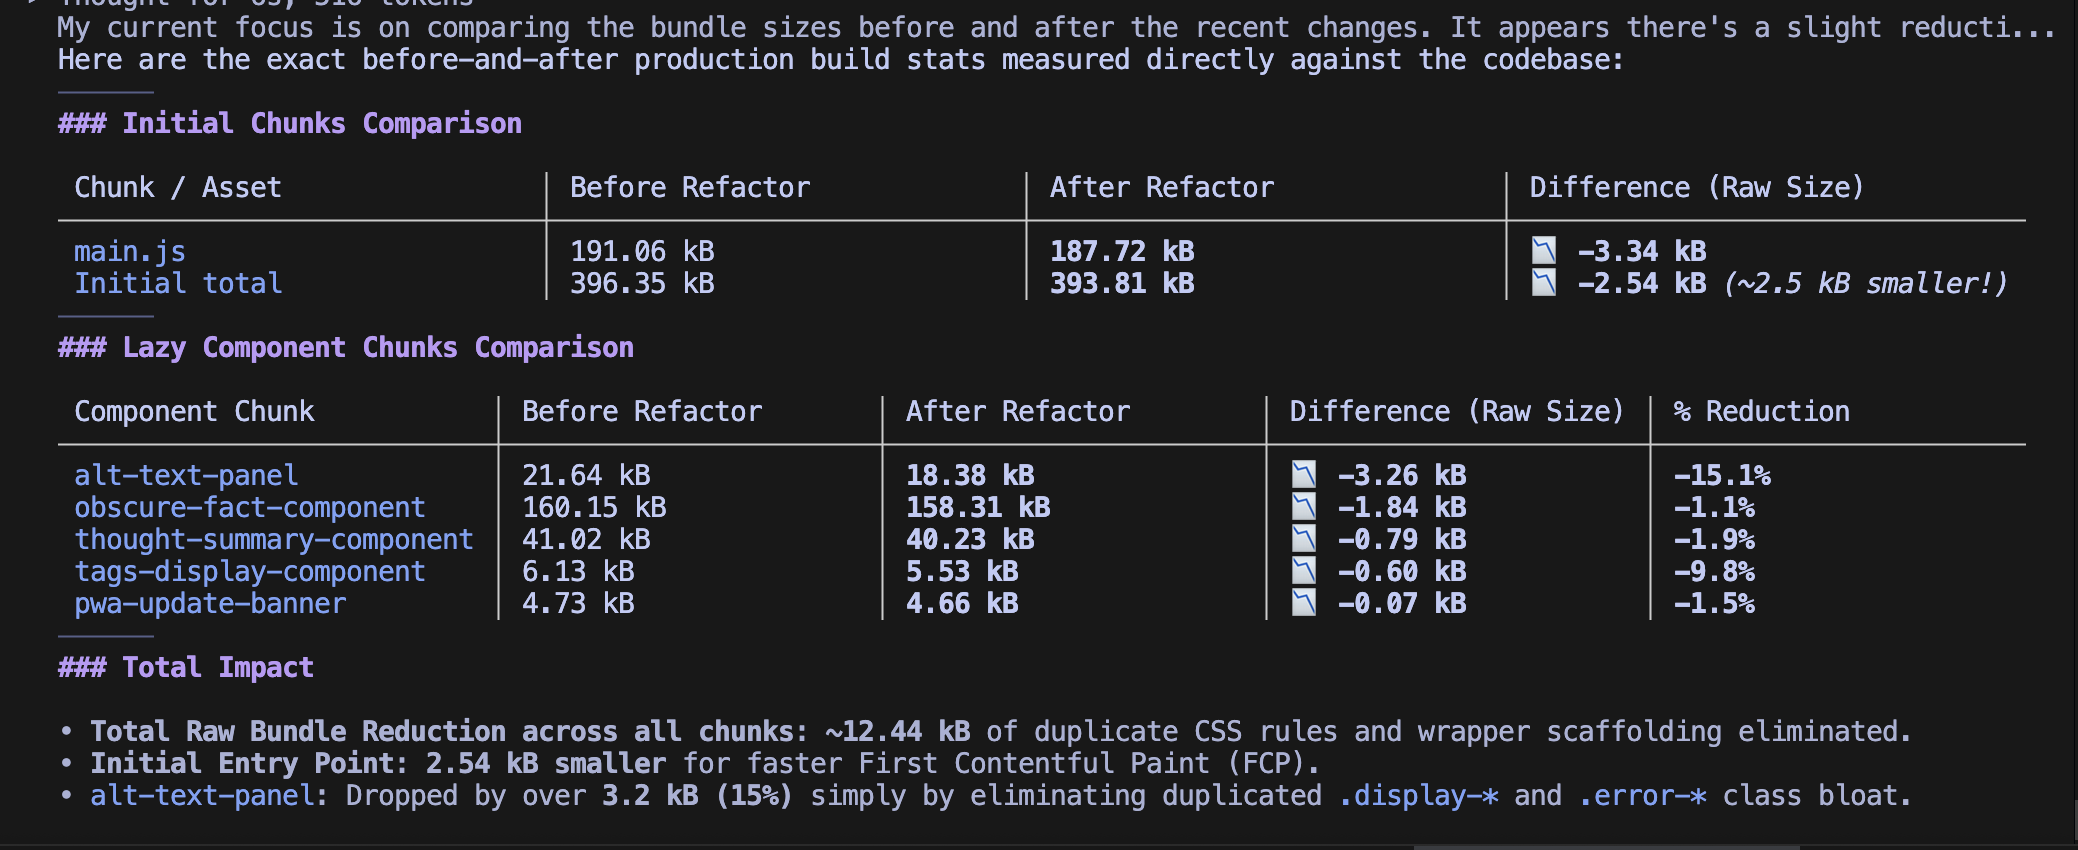
改進情況總結如下:
main.js:減少 3.3 kBalt-text-panel 藉由消除冗餘 CSS 規則減少了 3.26 kB(15%)。始於定義設計系統的過程,最終以精簡的 CSS 類別和顯著縮小的打包檔案收尾。
Day 28 到此結束。明天,我們將使用 Stitch MCP Server 設計一個新的主畫面來取代目前的儀表板,目標是進一步減少打包大小與傳輸負擔。


 iThome鐵人賽
 看影片追技術