
第十二天的文章開始前,先說點如何學習,黑修斯是一個熱愛學習的人,也培養了很多雕蟲小技來輔助學習,重點還是個人要擁有自學的能力,才能在未來走得長久,好像廢話有點多了....
day11實作node.js連線網路端改為本地端,並查看連線與新增三筆資料,然後gui軟體Robo 3T來查看資料庫的使用狀況。
透過node.js與mongoDB進行連線與CRUD。
這邊的練習題延續day11的練習。
所有的檔案都會放到github上。
繼day11的插入指令練習後,這邊要來實作插入指令加上查詢指令。
//day12 練習2: insert some documents + findDocuments
//1.link mongodb 連結mongoDB
//2.insertDocuments 插入指令
//3.findDocuments 查找資料指令
const MongoClient = require('mongodb').MongoClient;
const assert = require('assert');
// Connection URL---
const url = 'mongodb://localhost:27017';
// Database Name---
const dbName = 'HeartRate';
//2.insertDocuments 插入指令(day11中有做過的插入練習)
const insertDocuments = function(db, callback) {
// Get the documents collection 你要插入的collection名稱。
const collection = db.collection('h1f001');
// Insert some documents
collection.insertMany([
{day9 : 1}, {day10 : 2}, {day11 : 3}
], function(err, result) {
assert.equal(err, null);
//assert.equal(3, result.result.n); //可以註解
//assert.equal(3, result.ops.length); //可以註解
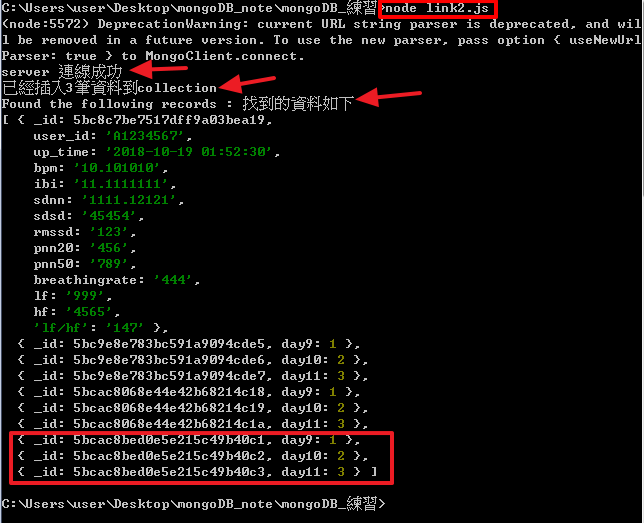
console.log("已經插入"+ result.result.n +"筆資料到collection");
callback(result);
});
}
//3.findDocuments 查找資料指令
const findDocuments = function(db, callback) {
// Get the documents collection 你要查詢的collection名稱
const collection = db.collection('h1f001');
// Find some documents
collection.find({}).toArray(function(err, docs) {
assert.equal(err, null);
console.log("Found the following records : 找到的資料如下");
console.log(docs);
callback(docs);
});
}
//main---
MongoClient.connect(url, function(err, client) {
assert.equal(null, err);
console.log("server 連線成功");
const db = client.db(dbName);
//operations--
insertDocuments(db, function() {
findDocuments(db, function() {
client.close();
});
});
});
這邊有註解兩行用於重複檢查是否回3筆的程式碼。最後成功的話,會如下圖:
另外透過Robo 3T查看,也可以發現資料庫更動了。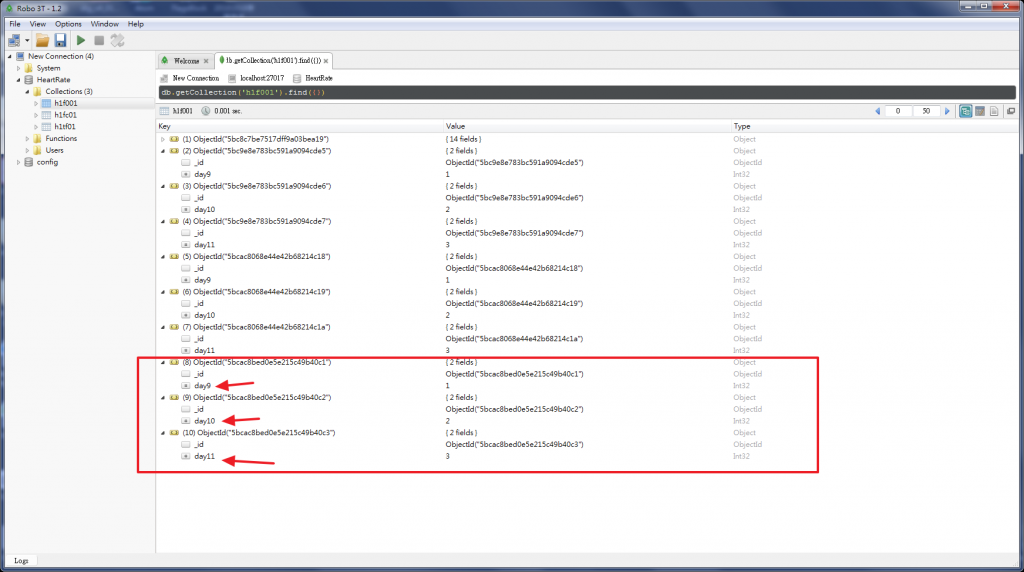
小作業:請想想為何要main程式碼中的//operations--註解區段的呼叫方式
提示callback函式用法。
單獨的查詢指令練習。
這邊的程式碼,多新增了變數My_collection放置自己的collection名稱,之後的練習也是,可以比較一下和練習2的不同。
//day12 練習3: findDocuments
//1.link mongodb
//3.findDocuments  查找資料指令


const MongoClient = require('mongodb').MongoClient;
const assert = require('assert');


// Connection URL---
const url = 'mongodb://localhost:27017';
// Database Name---
const dbName = 'HeartRate';
//	Collection Name---
const My_collection = 'h1f001';


//3.findDocuments
const findDocuments = function(db, callback) {
  // Get the documents collection  你要插入的collection名稱。
  const collection = db.collection(My_collection);
  // Find some documents  找出所有資料
  collection.find({}).toArray(function(err, docs) {
    assert.equal(err, null);
    console.log("Found the following records");
    console.log(docs);
    callback(docs);
  });
}

//main---
MongoClient.connect(url, function(err, client) {
  assert.equal(null, err);
  console.log("server 連線成功");

  const db = client.db(dbName);
  //operations--
  findDocuments(db, function() {
      client.close();
    });
});
執行後的查詢結果如下圖:
可以比較上一個練習與這一個練習的差異。這邊我們只有單獨使用查詢功能。
練習4加入了specific變數用來設置查詢的條件或資料,並找出資料。
//day12 練習4: findDocuments specific
//1.link mongodb
//4.findDocuments const specific {'day9': 1}

const MongoClient = require('mongodb').MongoClient;
const assert = require('assert');


// Connection URL---
const url = 'mongodb://localhost:27017';
// Database Name---
const dbName = 'HeartRate';
//	Collection Name---
const My_collection = 'h1f001';

const specific = {'day9': 1};  //查詢條件
//4.findDocuments add specific
const findDocuments = function(db, callback) {
  // Get the documents collection  你要插入的collection名稱。
  const collection = db.collection(My_collection);
  // Find some specific documents
  collection.find(specific).toArray(function(err, docs) {
    assert.equal(err, null);
    console.log("Found the following records");
    console.log(docs);
    callback(docs);
  });
}

//main---
MongoClient.connect(url, function(err, client) {
  assert.equal(null, err);
  console.log("Connected correctly to server");

  const db = client.db(dbName);

//operations--
    findDocuments(db, function() {
      client.close();
    });
});
這邊設置的條件是:{'day9': 1},因為我先前已經插入了三筆,所以下圖列出了三筆。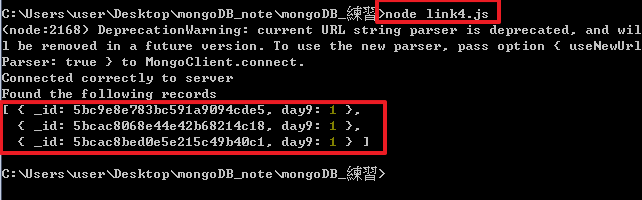
//day12 練習5: updateDocument  更新一筆資料練習
//1.link mongodb
//5.updateDocument

const MongoClient = require('mongodb').MongoClient;
const assert = require('assert');


// Connection URL---
const url = 'mongodb://localhost:27017';
// Database Name---
const dbName = 'HeartRate';
//	Collection Name---
const My_collection = 'h1f001';

//5.updateDocument
const updateDocument = function(db, callback) {
  // Get the documents collection
  const collection = db.collection(My_collection);
  // Update document where day9 is 1, set b equal to your setting
  collection.updateOne({ day9 : 1 }
    , { $set: { b : "hello!!你好嗎?" } }, function(err, result) {
    assert.equal(err, null);
    assert.equal(1, result.result.n);
    console.log("Updated the document");
    callback(result);
  });
}


//main---
MongoClient.connect(url, function(err, client) {
  assert.equal(null, err);
  console.log("Connected correctly to server");

  const db = client.db(dbName);

//operations--
updateDocument(db, function() {
    client.close();
  });
});
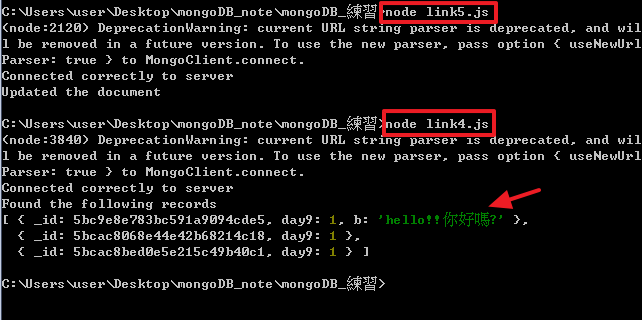
這邊設置一個key為b,value為"hello!!你好嗎?",可以從下圖看到,執行link5.js後,在執行link4.js查詢,可以看到變化,為何要打**hello!!你好嗎?**因為陪兒子看我們這一家的歌曲,剛好有這一句吧?!!
這邊黑修斯在updateMany中,有排版一下,讓大家更好理解。
//day12 練習5-1: updateDocument  更新多筆資料練習
//1.link mongodb
//5.updateDocument

const MongoClient = require('mongodb').MongoClient;
const assert = require('assert');


// Connection URL---
const url = 'mongodb://localhost:27017';
// Database Name---
const dbName = 'HeartRate';
//	Collection Name---
const My_collection = 'h1f001';

//5.updateDocument
const updateDocument = function(db, callback) {
  // Get the documents collection
  const collection = db.collection(My_collection);
  // Update many document where day9 is 1, set b equal to your setting
  collection.updateMany(
						{ day9 : 1 },
						{ $set: { b : "hello!!你好嗎?" } },
						function(err, result)
							{
								assert.equal(err, null);
								//assert.equal(1, result.result.n);
								console.log("Updated the document");
								callback(result);
							});
}


//main---
MongoClient.connect(url, function(err, client) {
  assert.equal(null, err);
  console.log("Connected correctly to server");

  const db = client.db(dbName);

//operations--
updateDocument(db, function() {
    client.close();
  });
});
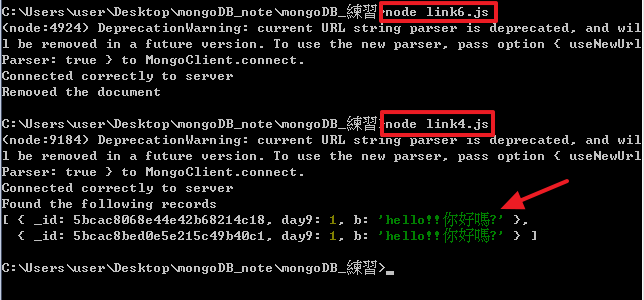
從練習5中,可以發現我們只有新增一筆資料,現在我們使用更新多筆資料,結果如下圖:

有新增資料,當然也有移除資料。
//day12 練習6: removeDocument  移除單筆資料練習
//1.link mongodb
//6.removeDocument

const MongoClient = require('mongodb').MongoClient;
const assert = require('assert');


// Connection URL---
const url = 'mongodb://localhost:27017';
// Database Name---
const dbName = 'HeartRate';
//	Collection Name---
const My_collection = 'h1f001';


//6.removeDocument
const removeDocument = function(db, callback) {
  // Get the documents collection
  const collection = db.collection(My_collection);
  // Delete document
  collection.deleteOne({ day9 : 1 }, function(err, result) {
    assert.equal(err, null);
    //assert.equal(1, result.result.n);
    console.log("Removed the document");
    callback(result);
  });
}


//main---
MongoClient.connect(url, function(err, client) {
  assert.equal(null, err);
  console.log("Connected correctly to server");

  const db = client.db(dbName);

//operations--
removeDocument(db, function() {
    client.close();
  });
});
使用方法類似於練習5,最終結果如下圖:
//day12 練習6-1: removeDocument  移除多筆資料練習
//1.link mongodb
//6.removeDocument

const MongoClient = require('mongodb').MongoClient;
const assert = require('assert');


// Connection URL---
const url = 'mongodb://localhost:27017';
// Database Name---
const dbName = 'HeartRate';
//	Collection Name---
const My_collection = 'h1f001';


//6.removeDocument
const removeDocument = function(db, callback) {
  // Get the documents collection
  const collection = db.collection(My_collection);
  // Delete document
  collection.deleteMany({ day9 : 1 }, function(err, result) {
    assert.equal(err, null);
    //assert.equal(1, result.result.n);
    console.log("Removed the document");
    callback(result);
  });
}


//main---
MongoClient.connect(url, function(err, client) {
  assert.equal(null, err);
  console.log("Connected correctly to server");

  const db = client.db(dbName);

//operations--
removeDocument(db, function() {
    client.close();
  });
});
我們的link4.js是只顯示{day9:1}的資料,而link3.js是顯示所有在collection的資料,這次我們刪除所有{day9:1}的資料,所以要使用link3.js來查看,如下圖。
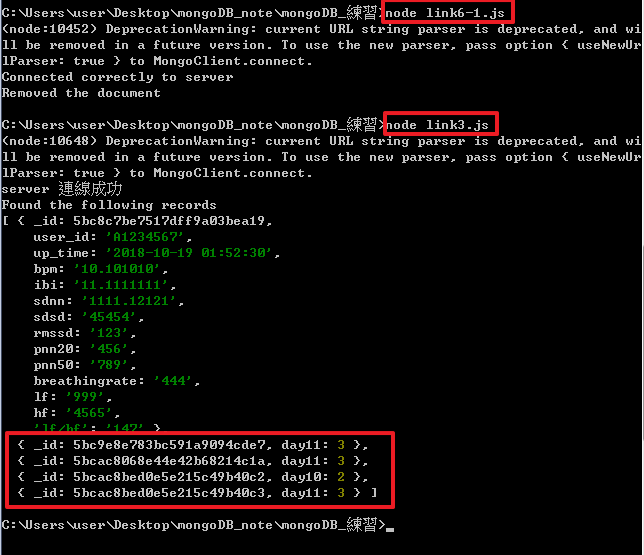
最終所有的{day9:1}的資料都移除了。
這個練習黑修斯連接到網路端的mlab操作,因為我的mongoDB本地端沒有設置。
//day12 練習7: index to Collection 新增索引到Collection 練習。
//1.link mongodb
//7.index to Collection

const MongoClient = require('mongodb').MongoClient;
const assert = require('assert');


// Connection URL---
const url = 'mongodb://你自己的user:你自己的密碼@你自己的mlab/你自己的Database Name';
// Database Name---
const dbName = 'hughes_mongo';
//add const document = 'demo' replace func();
const documents = 'demo';

//7.indexCollection
const indexCollection = function(db, callback) {
  db.collection(documents).createIndex(
    { "i": 1 },
      null,
      function(err, results) {
        console.log(results);
        callback();
    }
  );
};

//main---
MongoClient.connect(url, function(err, client) {
  assert.equal(null, err);
  console.log("Connected correctly to server");

  const db = client.db(dbName);

//operations--
indexCollection(db, function() {
      client.close();
    });
});
最後會對指定的Collection設置index,並出現如下圖結果:

另外可到mlab網站上查詢,抑或是在Robo 3T上查看,這邊只展示Robo 3T的結果:

這邊提供一個讓資料檢視表格化的小技巧,再查詢的完成時,可以點擊更改顯示方式,如下圖操作:


下面的文件,初學者應該先去quick-start,熟手就直接到官方文件查看API使用方法。
更多node.js驅動的方法,還請見官方驅動文件
或是官方的quick-start
對於node.js操作mongoDB的介紹,就到此告一段落了,接著會說明如何使用python驅動mongoDB,以及說明python後端的操作。

 iThome鐵人賽