
接下來是本日精選
或是熱門餐廳等
大約會有兩三排可以左右滑動的餐廳

這個可以使用tableview+collectionView完成
在tableview 客製化 cell
裡面再塞一個collectionViewcollectionView 裡面再塞一個 collectionView 客製化 cell
是不是之前實作的都可以運用到
來之前的OC寫的實作效果

這邊將tableView基本設置完畢
並且註冊自己創得客製化cell
還不會的同學可以參考我之前的文章
[Day 7] Swift 新增 tableview+ 客製化 cell
大概設置是這樣
class ViewController: UIViewController,UITableViewDelegate, UITableViewDataSource {
    override func viewDidLoad() {
        super.viewDidLoad()
        self.view.addSubview(self.tableView)
    }

    lazy var tableView: UITableView = {
        let tableView = UITableView()
        tableView.frame = CGRect(x: 0, y:  0, width: UIScreen.main.bounds.size.width, height: UIScreen.main.bounds.size.height)
        tableView.backgroundColor = UIColor.init(red: 1.0, green: 1.0, blue: 1.0, alpha: 0.2)
        tableView.delegate = self
        tableView.dataSource = self
        tableView.register(UINib(nibName:"CoverCell", bundle:nil),
                           forCellReuseIdentifier:"myCell")
        return tableView
    }()

    // 設置 cell 的高度
    func tableView(_ tableView: UITableView, heightForRowAt indexPath: IndexPath) -> CGFloat {
        return 300
    }

    // count
    func tableView(_ tableView: UITableView, numberOfRowsInSection section: Int) -> Int {
        return 5;
    }

    func tableView(_ tableView: UITableView, cellForRowAt indexPath: IndexPath) -> UITableViewCell {
        let cell:CoverCell = tableView.dequeueReusableCell(withIdentifier: "myCell")
            as! CoverCell
        return cell
    }
}
把collectionView 新增在你的cell上面
並且宣告collectionView
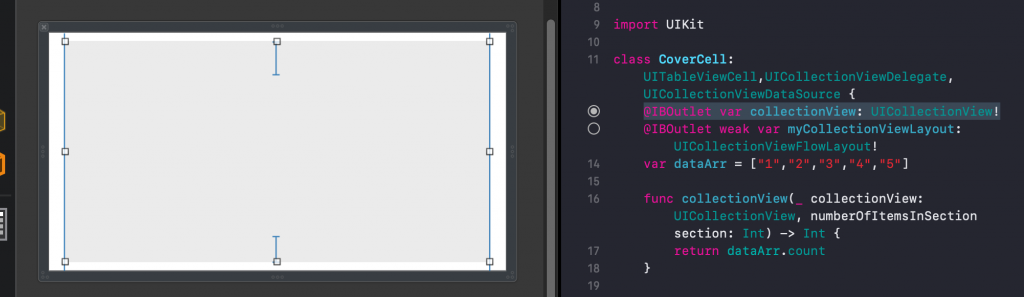
也可以使用手打的都可以
順便宣告等等collectionView會用到的dataArr
@IBOutlet var collectionView: UICollectionView!
var dataArr = ["1","2","3","4","5"]

func collectionView(_ collectionView: UICollectionView, numberOfItemsInSection section: Int) -> Int {
    return dataArr.count
}

func collectionView(_ collectionView: UICollectionView, cellForItemAt indexPath: IndexPath) -> UICollectionViewCell {
    let collectionViewCell = collectionView.dequeueReusableCell(withReuseIdentifier: "myCell", for: indexPath) as! HomeCell
    return collectionViewCell
}
至於cell初始化部分
請把collectionView 基本設定完畢
並且註冊collectionView 客製化 cell
以及上方delegate
還不會的同學可以參考我之前的文章
[Day 6] Swift 新增 collectionview + 客製化 cell
override func awakeFromNib() {
    super.awakeFromNib()

    let layout = UICollectionViewFlowLayout()
    layout.sectionInset = UIEdgeInsets(top: 10, left: 0, bottom: 10, right: 0)
    layout.minimumLineSpacing = 5
    layout.scrollDirection = .horizontal
    layout.itemSize.height = self.frame.height - 20
    layout.itemSize.width = UIScreen.main.bounds.width - 80

    collectionView.collectionViewLayout = layout
    collectionView.backgroundColor = UIColor.white
    collectionView.register(UINib(nibName:"HomeCell", bundle:nil),
                            forCellWithReuseIdentifier:"myCell")
    collectionView.delegate = self
    collectionView.dataSource = self
}
class CoverCell: UITableViewCell,UICollectionViewDelegate, UICollectionViewDataSource
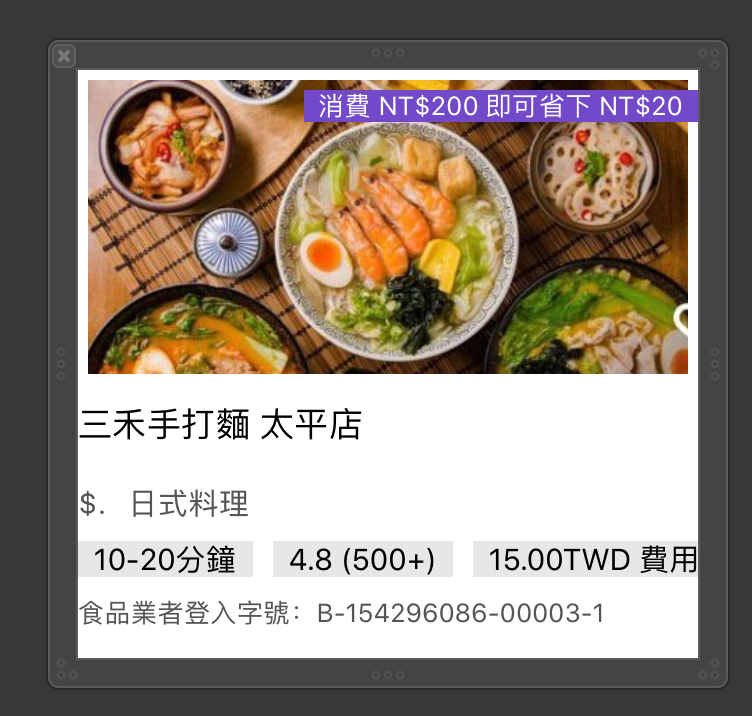
這邊設置你想要最終的UI
想要得圖片文字都是在這邊設定Swift檔案沒動 只設定Xib
我這裡是仿造Uber eat
效果如下
全部設定好以後就可以執行看看
Demo

這部分檔案都丟到Github
方便大家試用
Github:
https://github.com/Bgihe/TableView-CollectionViewTest
相關資料:
雖然我不會Swift,抱著學習的精神來看大大的文章!(大誤XD那個XDDDDDDDDOC寫的實作效果動圖真棒
我做的APP尺度有點大
我怕大家會受不了 哈哈哈哈
不不~ 其實是Uber eat感謝季對吧(被打XDD
直接開放本公司黃金永久VIP一名抽獎
影片看到飽 (/ω\)
但只有男性取向的東西比較可惜了

(等等....你們公司在做什麼的...)XD
販賣健康取向的影片
部分交友運動也可以 (/ω\) (/ω\) (/ω\)
(/ω\) (/ω\) (/ω\)
太酷了~ 夢幻公司耶XDDDDD

