有了方塊的新功能後,我們需要改變它酷炫的外觀。
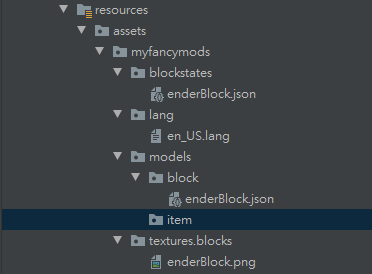
在建立圖片之前,我們需要在resources/assets/myfancymods目錄下,建立下面的目錄結構:
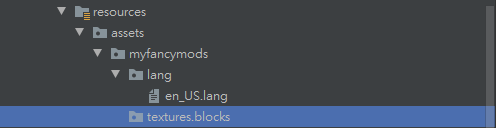
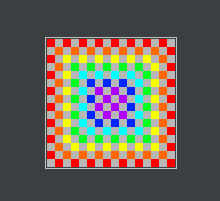
接著需要建立我們自己的方塊圖片 (必須是16x16像素比、附檔名為.png的檔案):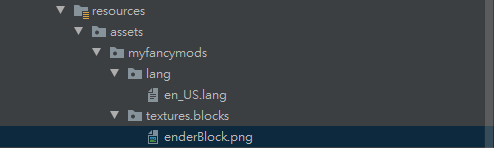
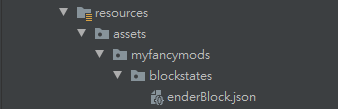
接著,我們需要定義Forge要如何使用我們的圖片。建立以下的目錄結構:
blockstates是用來告訴Forge在不同的方塊狀態下要使用哪個方塊模型。我們先在blockstates內加上一個檔案名為enderBlock.json,並且內容是:
{
  "variants": {
    "normal": {
      "model": "myfancymods:enderBlock"
    }
  }
}
這邊的意思是:當Forge看到enderBlock這個名稱的方塊註冊後,會找blockstates目錄下的enderBlock.json檔案;這個檔案內容定義要依據方塊方向(variants)來決定使用哪種方塊模型(model),而這裡我們定義任何方向(normal)都使用在模組ID為myfancymods目錄下的方塊模型目錄models/block下找到名為enderBlock.json的模型檔。
這裡的敘述請盡可能看懂,因為這個涉及在Minecraft內定義的物件能不能被正常的識別與呈現出來...我們繼續下一步
我們來到模型檔models的部分。在models/block目錄下,建立新的enderBlock.json模型檔:
{
  "parent": "block/cube_all",
  "textures": {
    "all": "myfancymods:blocks/enderBlock"
  }
}
這裡是敘述我們方塊的六個面各自要使用什麼圖片。有一些細節需要注意:
"parent"代表的是它要繼承自哪個模型。這個基礎模型你可以到forgeSrc-1.8-11.14.4.1563.jar這個檔案內,找尋assets/minecraft/models/block/下的cube_all.json模型檔:
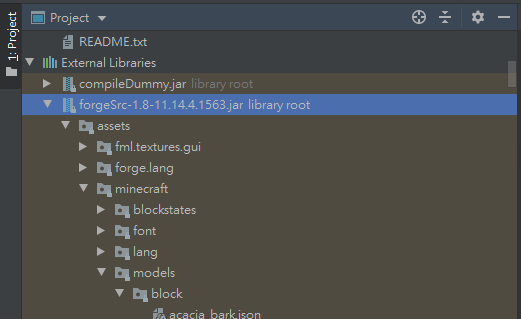
檔案內容描述方塊六個面都長一樣,並且圖片都指定為#all,就是我們用的變數名稱。
{
  "parent": "block/cube",
  "textures": {
    "particle": "#all",
    "down": "#all",
    "up": "#all",
    "north": "#all",
    "east": "#all",
    "south": "#all",
    "west": "#all"
  }
}
"textures"說明這個模型的紋理貼圖要去myfancymods/textures/blocks目錄下找enderBlock.png圖片,並指定到all這個變數內。
到這裡我們完成一半的工作了,關於方塊我們還需要一個json檔案:就是方塊在手上時的模型需要定義,而定義的檔案需要放在models/item目錄下。為什麼呢?
我們可以這樣想:不管現在拿在手上的是什麼東西,只要在手上就通通都稱之為物品(Item),所以接下來我們要寫的"方塊在手上的模型檔案"要放在item目錄下。
請在models目錄下建立新的item目錄:
在前一步驟的目錄下新增一個enderBlock.json檔案 (注意:這裡的檔案與models/block下的檔案不同):
{
  "parent": "myfancymods:block/enderBlock",
  "display": {
    "thirdperson": {
      "rotation": [ 10, -45, 170 ],
      "translation": [ 0, 1.5, -2.75 ],
      "scale": [ 0.375, 0.375, 0.375 ]
    }
  }
}
這裡的"parent"的概念與前面類似,但這邊是直接去繼承我們在models/block內定義的模型檔 (因為方塊拿在手上,實際上與方塊置放在地上的模型是一樣的)。
"thirdperson"表示這個物品是用第三人稱的方式去呈現 (丟到地上是第三人稱的物品),定義旋轉角度、翻轉方向、尺寸大小。
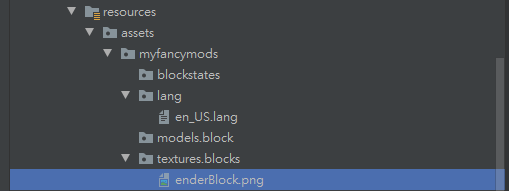
你的resource目錄到這邊應該會與我的類似: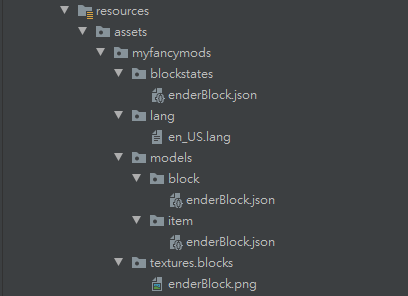
最後的最後,我們需要做一件很容易忘記的事情。剛剛前面有說到:方塊在手上時的模型需要定義,因此,我們也需要在程式碼內告訴Forge關於這個新方塊的"手上模型(物品)"需要註冊!
回到主程式,在FMLInitializationEvent加上以下幾行:
// 告訴Forge這個是FML(Forge Mod Loader)事件處理的方法
// FMLInitializationEvent : 這裡我們處理的是模組的初始化的事件
@EventHandler
public void init(FMLInitializationEvent event) {
    // 從方塊轉換成物品的方法
    Item item = Item.getItemFromBlock(enderBlock);
    // 定義方塊資源目錄
    // 第一個參數是"{模組ID}:方塊註冊名稱"
    // 第二個參數請使用"inventory",表示從資源庫內尋找
    ModelResourceLocation location = new ModelResourceLocation(
            "myfancymods:enderBlock",
            "inventory"
    );
    // 註冊這個方塊物品到Forge內
    Minecraft.getMinecraft().getRenderItem().getItemModelMesher()
            .register(item, 0, location);
}
你的主程式最後應該會長這樣(我把之前其他系列的程式碼移除以求簡潔):
// 透過註釋@Mod告訴Forge這個是模組的主要檔案
@Mod(modid = Main.MODID, version = Main.VERSION)
public class Main {

    // 作為辨識模組的唯一識別碼 (此值不可與其他模組名稱相同)
    public static final String MODID = "myFancyMods";
    // 模組版本號,後續可以更新
    public static final String VERSION = "1.0";
    // 自定義的方塊
    public static Block enderBlock;

    @EventHandler
    public void preInit(FMLPreInitializationEvent event) {
        enderBlock = new EnderBlock();
        GameRegistry.registerBlock(enderBlock, "enderBlock");
    }

    @EventHandler
    public void init(FMLInitializationEvent event) {
        // 從方塊轉換成物品的方法
        Item item = Item.getItemFromBlock(enderBlock);
        // 定義方塊資源目錄
        // 第一個參數是"{模組ID}:方塊註冊名稱"
        // 第二個參數請使用"inventory",表示從資源庫內尋找
        ModelResourceLocation location = new ModelResourceLocation(
                "myfancymods:enderBlock",
                "inventory"
        );
        // 註冊這個方塊物品到Forge內
        Minecraft.getMinecraft().getRenderItem().getItemModelMesher()
                .register(item, 0, location);
    }
}
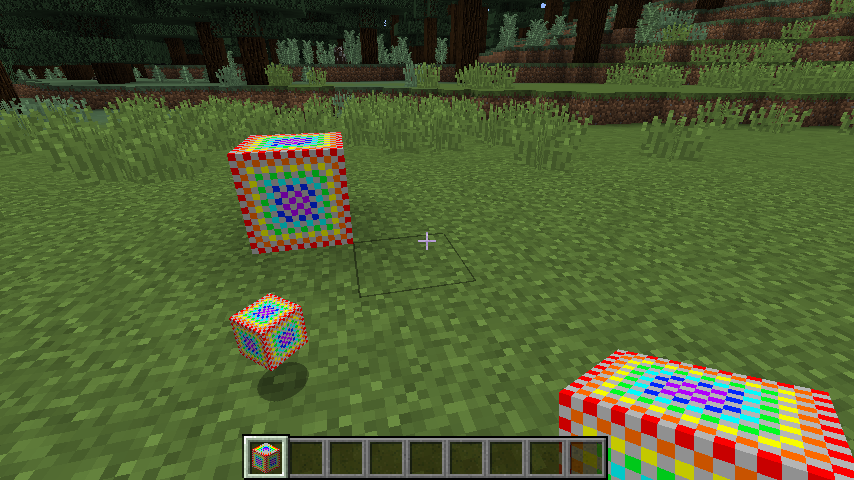
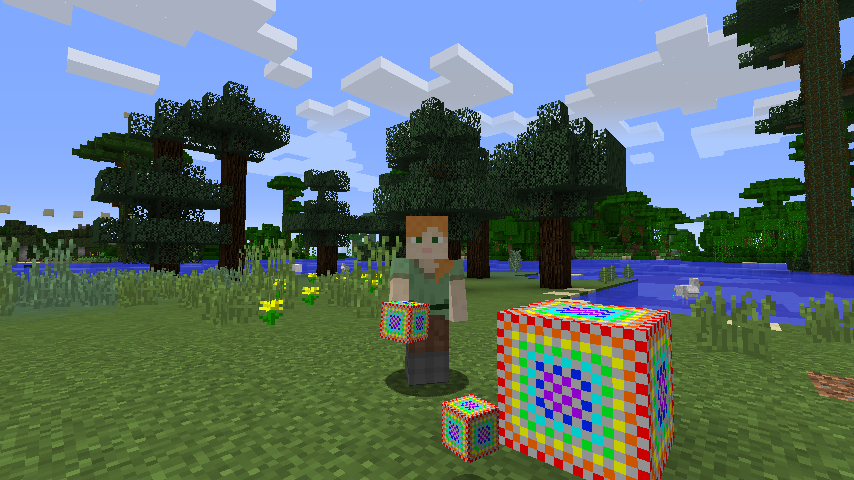
好了,恭喜你正式完成自定義方塊的工作了!現在存檔後進入遊戲,你可以看到方塊應該會被成功上圖片(在物品欄、地上、拿在手上以及丟棄在地上):