由於 Keras 的引進,使得 Tensorflow 架構變得有點疊床架屋,到底要遵從哪一路徑學習,常令初學者感到困擾,因此,對 Tensorflow 其他模組作個簡單介紹,並說明它們與Keras的關係,包括 Estimator、Tensorflow Hub、Tensorflow Serving。
根據【What's the difference between a Tensorflow Keras Model and Estimator?】說明,Tensorflow v1.1 以前的架構如下: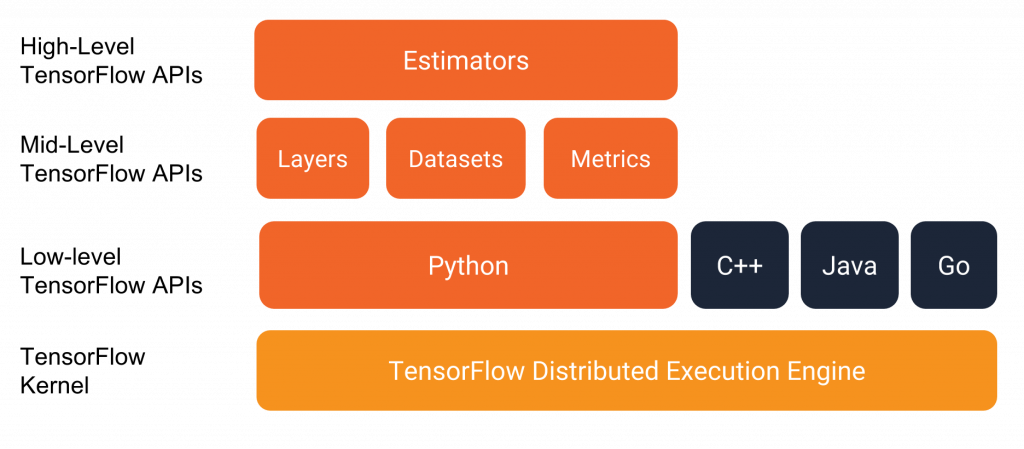
圖一. Tensorflow v1.1 以前的架構
Tensorflow v1.4 引進 Keras 後,新架構如下: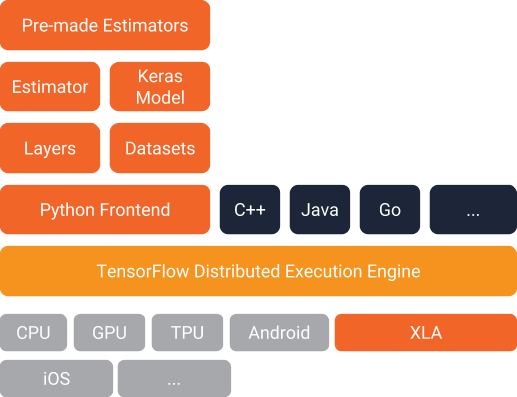
圖二. Tensorflow 最新架構
不管哪一版本都可以看到 Estimator,它是甚麼東東呢? 我們先來探討一下。
根據官網說明,Tensorflow Estimator 是一個高階的API,它支援以下階段的執行:
【官網 Premade Estimators】還有最重要的一段話:
Note that in TensorFlow 2.0, the Keras API can accomplish many of these same tasks, and is believed to be an easier API to learn. If you are starting fresh, we would recommend you start with Keras.
也就是說 Keras 與 Estimator 高度重疊,建議初學者從 Keras 學起。
Estimator 比 Keras 還是有一些優勢如下:
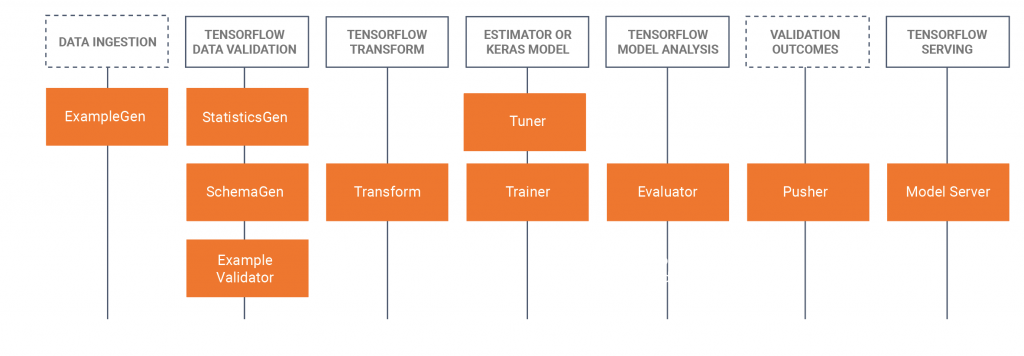
圖一. TensorFlow Extended (TFX) 架構,串連整個生產流程。
我們就來測試一些簡單的範例。
先使用現成的模型(pre-made Estimators) 作【鳶尾花】(Iris)品種識別。
import tensorflow as tf
import pandas as pd
from sklearn.datasets import load_iris
ds = load_iris()

df = pd.DataFrame(ds.data, columns=ds.feature_names)
X = ds.data
y = ds.target
from sklearn.model_selection import train_test_split
X_train, X_test, y_train, y_test = train_test_split(df, y, test_size=0.2)
# 建立 Estimator input function
def input_fn(features, labels, training=True, batch_size=256):
    """An input function for training or evaluating"""
    # 將 NumPy Array 轉成 Dataset.
    dataset = tf.data.Dataset.from_tensor_slices((dict(features), labels))

    # 隨機抽樣
    # Shuffle and repeat if you are in training mode.
    if training:
        dataset = dataset.shuffle(1000).repeat()

    return dataset.batch(batch_size)

# 建立 Feature columns 提供給 Estimator 使用
my_feature_columns = []
for key in X_train.keys():
    my_feature_columns.append(tf.feature_column.numeric_column(key=key))
my_feature_columns
# 建立兩層的深度神經網路(DNN with 2 hidden layers with 30 and 10 hidden nodes each)
classifier = tf.estimator.DNNClassifier(
    feature_columns=my_feature_columns,
    # Two hidden layers of 30 and 10 nodes respectively.
    hidden_units=[30, 10],
    # The model must choose between 3 classes.
    n_classes=3)
classifier.train(
    input_fn=lambda: input_fn(X_train, y_train, training=True),
    steps=5000)
eval_result = classifier.evaluate(
    input_fn=lambda: input_fn(X_test, y_test, training=False))

print('\n準確度: {accuracy:0.3f}\n'.format(**eval_result))
執行結果:準確度為 0.933,並沒有比一般的機器學習好,不過,這不重要,我們只是要了解 Estimator 如何運作。
# 預測資料
expected = ['Setosa', 'Versicolor', 'Virginica']
predict_x = {
    'SepalLength': [5.1, 5.9, 6.9],
    'SepalWidth': [3.3, 3.0, 3.1],
    'PetalLength': [1.7, 4.2, 5.4],
    'PetalWidth': [0.5, 1.5, 2.1],
}

# 預測使用的 Input function
def input_fn_pred(features, batch_size=256):
    """An input function for prediction."""
    # Convert the inputs to a Dataset without labels.
    return tf.data.Dataset.from_tensor_slices(dict(features)).batch(batch_size)

# 預測
predictions = classifier.predict(
    input_fn=lambda: input_fn_pred(predict_x))

# 顯示預測結果
for pred_dict, expec in zip(predictions, expected):
    class_id = pred_dict['class_ids'][0]
    probability = pred_dict['probabilities'][class_id]

    print('Prediction is "{}" ({:.1f}%), expected "{}"'.format(
        SPECIES[class_id], 100 * probability, expec))
如果要利用 Estimator 作分散式訓練或佈署,可以將 Keras 模型轉換為 Estimator,程式片段如下:
# 建立 Keras 模型
model = tf.keras.models.Sequential([
    tf.keras.layers.Dense(16, activation='relu', input_shape=(4,)),
    tf.keras.layers.Dropout(0.2),
    tf.keras.layers.Dense(3)
])

model.compile(loss=tf.keras.losses.SparseCategoricalCrossentropy(from_logits=True),
              optimizer='adam')

# 轉換為 Estimator
import tempfile
model_dir = tempfile.mkdtemp()
keras_estimator = tf.keras.estimator.model_to_estimator(
    keras_model=model, model_dir=model_dir)
TensorFlow Serving 可以提供一個網站,讓Client端程式以 Rest API 方式呼叫模型,進行預測,安裝指令如下:
pip install tensorflow-serving-api
官網只介紹如何使用 Docker/k8s 虛擬機架網站,詳情可參考【這裡】。
# Download the TensorFlow Serving Docker image and repo
docker pull tensorflow/serving

git clone https://github.com/tensorflow/serving
docker run -p 8500:8500 \
--mount type=bind,source=/tmp/mnist,target=/models/mnist \
-e MODEL_NAME=mnist -t tensorflow/serving &
tools/run_in_docker.sh python tensorflow_serving/example/mnist_client.py \
  --num_tests=1000 --server=127.0.0.1:8500
另外常看到一些進階的應用範例使用 Tensorflow Hub,它又是甚麼功能呢? 可以參考【Tensorflow Hub 官網】,根據官網解釋,它希望提供一些以訓練好的模型,並可以客製化(fine tuning),這好像又與 Keras Applications 功能重疊,因為它需要另外安裝,我懷疑它類似Contribution,是一些Tensorflow 尚在開發中的模型,不敢確定。
自官網修改一支程式 23_02_Text_Classification.ipynb,請可自【這裡】下載,囿於篇幅,就不詳細介紹了。
Tensorflow Team 的企圖心很大,他們不只要提供開發環境,也希望支援從開發到上線服務的完整流程模組,同時針對大型專案也能使用分散式處理,節省訓練所需時間,只能說佩服、佩服。
本篇範例包括 23_01_Premade_Estimator.ipynb、23_02_Text_Classification.ipynb,可自【這裡】下載。
Estimator 的模型跟 Keras 使用 save 方式的模型,兩者是不一樣的嗎 ? 還是說其實都可以布署?
Estimator 是希望透過 TensorFlow Serving 佈署,比較有彈性,例如 Docker/K8S,可以大量佈署,如果只是單點的佈署,Keras Model 存檔,搭配 DJango/Flask 也就可以了。
了解謝謝!!