機器學習永遠不會跟你講錯,不管你丟甚麼東西進入訓練流程或預測,它都會給你一個答案,正是所謂的 Garbage In Garbage Out,因此,產生了兩個問題:
通常有兩個現象,我們會認為有錯:
因此,進行專案時,千萬不要一下子就將資料丟進模型訓練,建議還是要照著下圖10個步驟依序進行,前3個步驟才是成功的關鍵,找到影響目標(Y)的關鍵因子(X)遠勝過模型的選擇,除非你是在參加 Kaggle 競賽。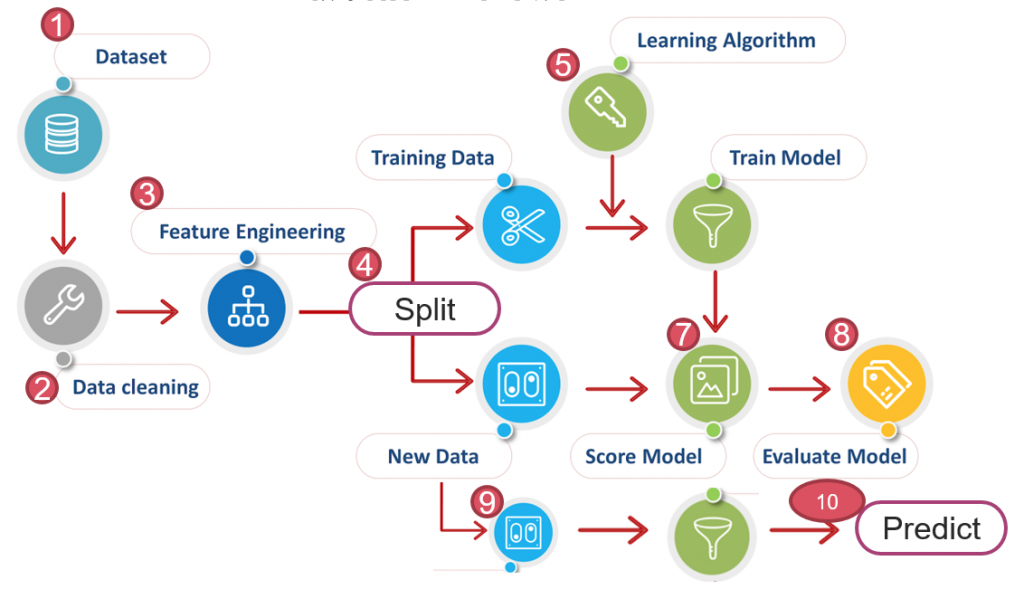
圖一. 機器學習流程,修改自 Free Machine learning diagram
Keras 除錯並不容易,通常 model.compile() 只會做基本的檢查,神經網路層層連接,只有等到執行結束,才能開始找錯誤,所以,個人建議依以下步驟進行:
import tensorflow as tf
from tensorflow.keras import layers

# 輸入的維度
input_shape = (28, 28, 1)

# 建立模型
model = tf.keras.Sequential(
    [
        tf.keras.Input(shape=input_shape),
        layers.Conv2D(32, kernel_size=(3, 3), activation="relu"),
        layers.MaxPooling2D(pool_size=(2, 2)),
        layers.Conv2D(64, kernel_size=(3, 3), activation="relu"),
        layers.MaxPooling2D(pool_size=(2, 2)),
        layers.Flatten(),
        layers.Dropout(0.5),
        layers.Dense(10, activation="softmax"),
    ]
)

# 顯示 Model output
model.summary()
最後一行顯示如下圖二,可以看出每一層的output維度,如果是較複雜的神經網路如下圖三,有神經層合併時,特別要注意是否正確,紅框為合併層,最後一欄【Connected to】為合併的來源層。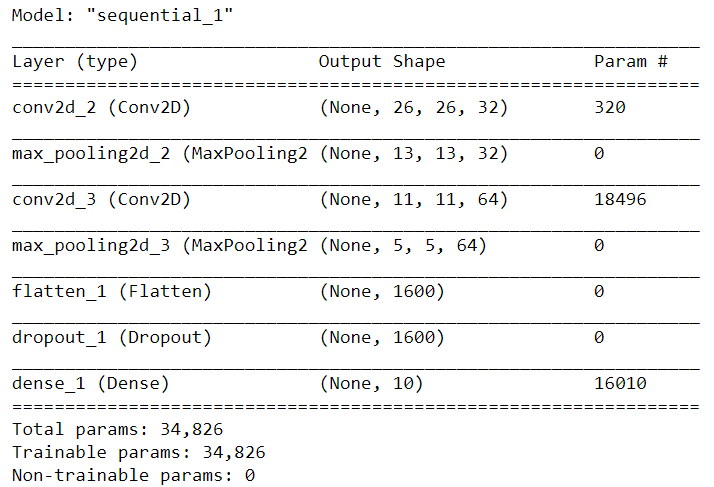
圖二. 模型彙總,model.summary() 的執行結果
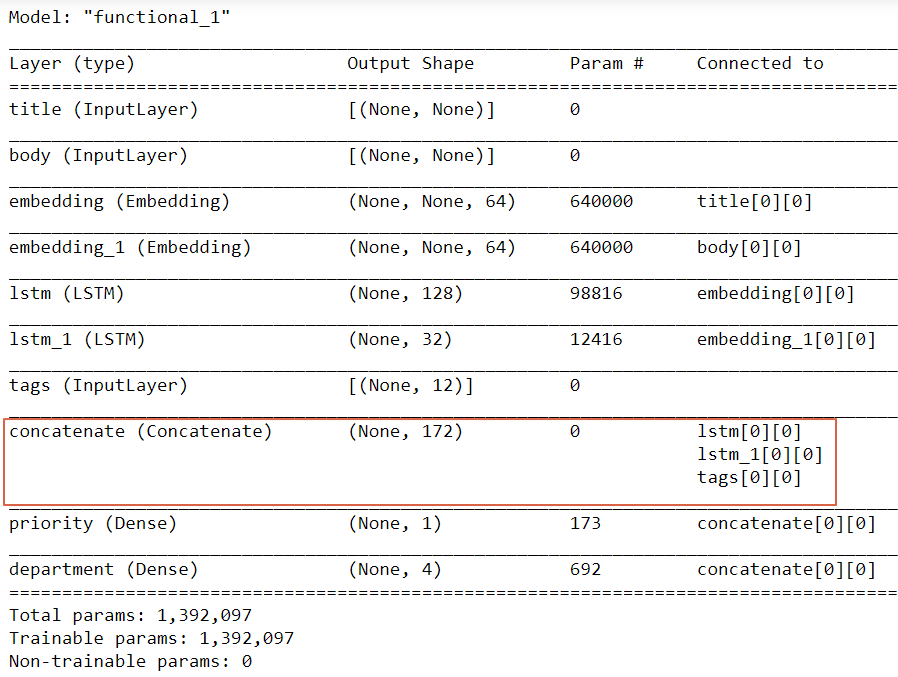
圖三. 較複雜的神經網路模型彙總
keras.utils.plot_model(model, show_shapes=True, to_file='debug_model.png')
print(model_cnn.layers[-1].weights)
from tensorflow import keras
from tensorflow.keras import layers

# 輸入的維度
input_shape = (28, 28, 1)

# 建立模型
model = tf.keras.Sequential([
    tf.keras.Input(shape=input_shape),
    layers.Conv2D(32, 3, activation='relu'),
    layers.Conv2D(32, 3, activation='relu'),
    layers.MaxPooling2D(2),
    layers.Conv2D(32, 3, activation='relu'),
    layers.Conv2D(32, 3, activation='relu'),
    layers.GlobalMaxPooling2D(),
    layers.Dense(10),
])
extractor = keras.Model(inputs=model.inputs,
                        outputs=[layer.output for layer in model.layers])
features = extractor(x_test[0:1])
features
intermediate_layer_model = keras.Model(inputs=model.input,
                                       outputs=model.layers[-2].output)
features = intermediate_layer_model(x_test[0:1])
features
若自訂神經層,再與其他層結合之前,可以先作單層測試,例如:
import tensorflow as tf
from tensorflow.keras import layers

# 自訂層(Custom Layer)
class MyAntirectifier(layers.Layer):
    def build(self, input_shape):
        output_dim = input_shape[-1]
        self.kernel = self.add_weight(
            shape=(output_dim * 2, output_dim),
            initializer="he_normal",
            name="kernel",
            trainable=True,
        )

    def call(self, inputs):
        # Take the positive part of the input
        pos = tf.nn.relu(inputs)
        # Take the negative part of the input
        neg = tf.nn.relu(-inputs)

        # Concatenate the positive and negative parts
        # ****** bug, axis應該為1 ******* #
        concatenated = tf.concat([pos, neg], axis=0)

        # Project the concatenation down to the same dimensionality as the input
        return tf.matmul(concatenated, self.kernel)
x = tf.random.normal(shape=(2, 5))
y = MyAntirectifier()(x)
InvalidArgumentError: Matrix size-incompatible: In[0]: [4,5], In[1]: [10,5] [Op:MatMul]
class MyAntirectifier(layers.Layer):
    def build(self, input_shape):
        output_dim = input_shape[-1]
        self.kernel = self.add_weight(
            shape=(output_dim * 2, output_dim),
            initializer="he_normal",
            name="kernel",
            trainable=True,
        )

    def call(self, inputs):
        pos = tf.nn.relu(inputs)
        neg = tf.nn.relu(-inputs)
        print("pos.shape:", pos.shape)
        print("neg.shape:", neg.shape)
        concatenated = tf.concat([pos, neg], axis=1)
        print("concatenated.shape:", concatenated.shape)
        print("kernel.shape:", self.kernel.shape)
        return tf.matmul(concatenated, self.kernel)
x = tf.random.normal(shape=(2, 5))
y = MyAntirectifier()(x)
pos.shape: (2, 5)
neg.shape: (2, 5)
concatenated.shape: (2, 10)
kernel.shape: (10, 5)
筆者突發奇想,也許我們可以作一個自訂層(Custom Layer)不加任何處理,單純print,作除錯用,也許是一個不錯的主意。
Tensorflow Keras 訓練時是使用完全優化的運算圖(fully-compiled computation graph)計算,並不是一般的Python 程式碼,所以很難在程式中間除錯,這時,我們可以在 compile() 內加參數 run_eagerly=True,那麼訓練就會被轉換成除錯模式(debug mode),可以在程式中間印出張量(Tensor)值,相對應會有一個缺點,訓練將變得非常慢,詳細的介紹可參考【Keras 官網】 Tip 3 段落,例如訓練一值無法收斂,每一批或步驟的梯度忽正忽負,那可能就是原因,也許應該先做個標準化處理。
以上是撰寫Keras兩年來的經驗,希望對初學者有一些幫助。
本篇範例包括 24_01_debug.ipynb,可自【這裡】下載。
作者我想問一件我還在解決的事,我繼承 keras.Model 方式自定義神經網路,但發現 summary() 這功能無法使用。雖然作者這邊沒提到 keras.Model。
確實抓不到,可能要 debug 原始程式碼keras/utils/layer_utils.py
https://github.com/keras-team/keras/commit/e0697c3768a53c7b6744e2eab253667d7a42e040


 iThome鐵人賽