有了前兩天的人臉關鍵點偵測後,我們今天終於要談到人臉對齊 (Facial Alignment)這個工作了!
在前面系列或多或少都有提到人臉對齊是很重要的,因為
人臉對齊的精神很簡單:
透過縮放、移動、旋轉等操作,讓不同人臉的相對位置盡可能相同
作法大概可以分為兩種
我們今天要使用的做法就是第二種。
facial_landmark
dlib_with_imutils.py檔案import ntpath
import sys
# resolve module import error in PyCharm
sys.path.append(ntpath.dirname(ntpath.dirname(ntpath.abspath(__file__))))
import argparse
import os
from bz2 import decompress
from urllib.request import urlretrieve
import cv2
import dlib
import numpy as np
from imutils.face_utils import rect_to_bb
from imutils.face_utils.facealigner import FaceAligner
from face_detection.dlib_mmod import detect
def main():
# 初始化arguments
ap = argparse.ArgumentParser()
ap.add_argument("-i", "--image", required=True, help="path to input image")
args = vars(ap.parse_args())
# 初始化68-points facial landmark模型
model_url = f"https://github.com/davisking/dlib-models/raw/master/shape_predictor_68_face_landmarks_GTX.dat.bz2"
model_name = "shape_predictor_68_face_landmarks_GTX.dat"
if not os.path.exists(model_name):
urlretrieve(model_url, model_name + ".bz2")
with open(model_name, "wb") as new_file, open(model_name + ".bz2", "rb") as file:
data = decompress(file.read())
new_file.write(data)
os.remove(model_name + ".bz2")
predictor = dlib.shape_predictor(model_name)
# 初始化Face Aligner
aligner = FaceAligner(predictor, desiredFaceWidth=256)
# 載入圖片並偵測人臉
image = cv2.imread(args["image"])
gray = cv2.cvtColor(image, cv2.COLOR_BGR2GRAY)
rects = detect(image, return_ori_result=True)
for rect in rects:
(x, y, w, h) = rect_to_bb(rect)
orign_face = cv2.resize(image[y:y + h, x:x + w], (256, 256))
# 注意:如果此方法丟出getRotationMatrix2D()的型別錯誤,請將opencv-contrib-python的版本降版到4.1
align_face = aligner.align(image, gray, rect)
# 顯示結果
result = np.hstack([orign_face, align_face])
cv2.imshow("Result", result)
cv2.waitKey(0)
if __name__ == '__main__':
main()
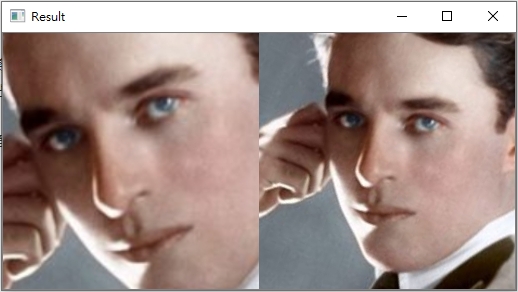
python facial_alignment/dlib_with_imutils.py -i {你要辨識的照片.jpg},範例輸出為 (左側為原始圖片中的人臉ROI,右側為對齊後的人臉):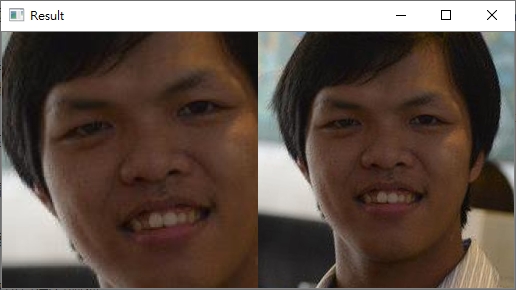
imutils套件裡的FaceAligner.align()方法
Let's All, 今日程式碼參考在這
回報執行狀況喔。我使用Python 3.10.5 + imutils 0.5.4,在使用 FaceAligner.align()時會報錯:
File "\imutils\face_utils\facealigner.py", line 68, in align
M = cv2.getRotationMatrix2D(eyesCenter, angle, scale)
TypeError: Can't parse 'center'. Sequence item with index 0 has a wrong type
直接進到facealigner.py,修改64行,把eyesCenter都補上int,就可以正常執行了。竟然是函式庫的型態出錯。
感謝回報~
通常我不太建議去修改package的原始程式碼...這個問題在imutils的github有相關issue (還未resolved),可能要等他們修正,或是參考我在程式碼註解的解法:
# 注意:如果此方法丟出getRotationMatrix2D()的型別錯誤,請將opencv-contrib-python的版本降版到4.1
align_face = aligner.align(image, gray, rect)