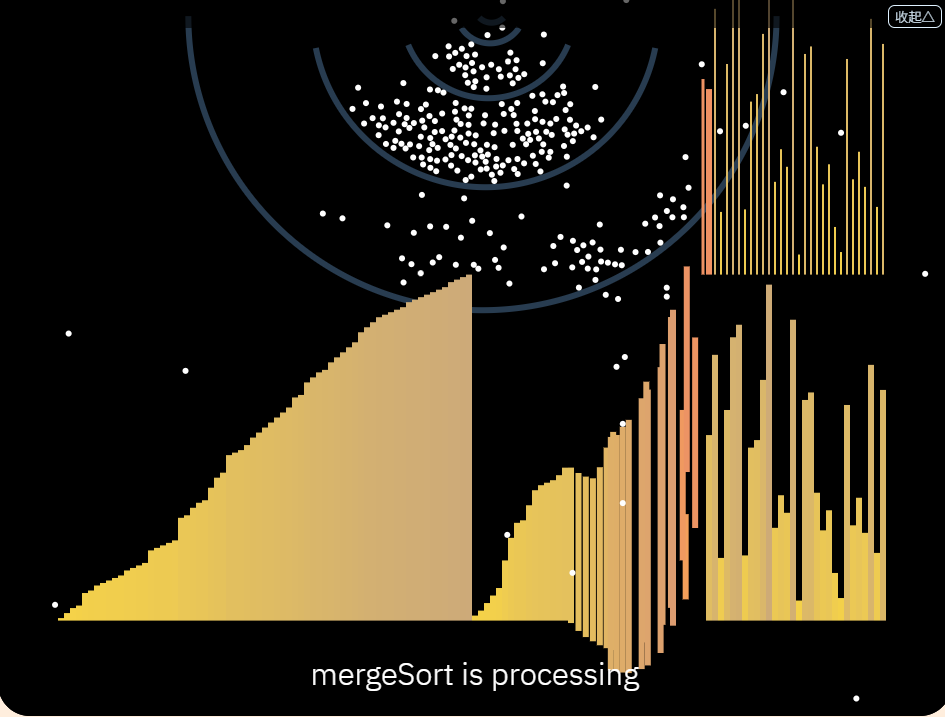
在昨天的文章中,我們介紹了 快速排序(Quick Sort) 演算法,它也是一種基於 分治法 的排序方法。快速排序透過選取一個樞軸(pivot),將數列分割成兩部分,並遞迴地對每個部分進行排序。另一方面,今天我們要介紹的另一種分治法排序演算法—— 合併排序(Merge Sort),則採用了不同的策略,透過先分割再合併來達成排序目的。

我們通過不斷分割陣列,直到不能分割為止,再進行合併。合併的時候會從兩個陣列的開頭取出最小值,重複此步驟直到其中一個陣列被完全取出,最後將剩下的數值添加到結尾。
function mergeSort(arr) {
    if (arr.length <= 1) return arr;
    const mid = Math.floor(arr.length / 2);
    const left = mergeSort(arr.slice(0, mid));
    const right = mergeSort(arr.slice(mid));
    return merge(left, right);
}

function merge(left, right) {
    let result = [];
    while (left.length && right.length) {
        if (left[0] < right[0]) result.push(left.shift());
        else result.push(right.shift());
    }
    return [...result, ...left, ...right];
}
這個範例通過遞迴地將數列分成兩半進行排序,最後再將已排序的部分合併成一個整體。這種方法的時間複雜度為 𝑂(𝑛 log 𝑛),在許多情況下,合併排序的性能非常穩定。然而,我們遇到和快速排序相同的問題,這個架構較難植入視覺化的程式碼。
這一版本使用模擬遞迴的方式,透過 stack 保存要處理的子陣列範圍,避免了遞迴調用,對記憶體友善。與遞迴版本不同,我們將手動管理每個階段的合併步驟,這使得過程更加具體且可控制。
以下是基於迭代的程式結構,分為多個階段進行合併排序,每次執行位於 stack 陣列最上層的任務,並決定何時 pop 或 push 以管理合併步驟:
class SortAlgorithm{
    constructor(){
        this.secondColumns = [];
    }
    mergeSortSetting(columns){
        const heights = columns.map((column)=>{return column.height});
        this.height = Math.max(...heights);
        this.stack = [[], []];
        this.stack[0][0] = {'left': 0, 'right': columns.length - 1};
        this.mergePhase = "0.Split";
        this.i = 0;
        this.j = 0;
    }
    mergeSort(columns) {
        const len0 = this.stack[0].length;
        const len1 = this.stack[1].length;
        const {min, mid, max} = this.stack[1][len1 - 1] ? this.stack[1][len1 - 1] : {};
        const i = this.i;
        const j = mid - min + this.j;
        const col = this.secondColumns.slice(min, max + 1);
        const frame = 60;
        // const frame = Math.floor((max - j + mid - i)/(len/256));
        switch(this.mergePhase){
            case "0.Split":
            case "1.Copy":
            case "2.Merge":
            case "3.MergeLeft":
            case "4.MergeRight":
            default :
        }
    }
}
這個階段會重複進行,標記並推送所有分割的索引值到 stack[1],直到不能再分割為止。為求視覺衝擊,此時我們複製一整份的長條圖,透過動畫路徑的設定,將其移動到原圖形的正上方。
case "0.Split":
if(len0 == 0){
    this.mergePhase = "1.Copy";
    this.timesEveryFrame = 1;
    this.secondColumns = JSON.parse(JSON.stringify(columns.slice(0, columns.length + 1)));
    this.secondColumns.forEach((column) => {
        column.path = new Path(column.x, column.y);
        column.path.NewTarget(column.x, column.y - this.height, 20);
        column.width/=3;
    })
    return;
}
const { left, right } = this.stack[0][len0 - 1];
const middle = Math.ceil((left + right) / 2);
this.stack[0].pop();
if(left != right){
    this.stack[0].push({'left': left, 'right': middle - 1});
    this.stack[0].push({'left': middle, 'right': right});
    this.stack[1].push({'min': left, 'mid': middle, 'max': right});
}
break;
class ParticleSystem{
    createColumn(x, y, width, height){
        const path = new Path(x, y);
        const column = {x, y, width, height, path};
        return column;
    }
}
針對要合併的片段,拷貝長條圖的高度(數值),並設置些微不同的寬度,以示區別。這個步驟才是真正的拷貝,但是容易發生拷貝動畫還沒完成,就已經合併完成。雖然不影響動畫流暢性,但視覺化過程不夠清晰。因此才會在上個階段進行統一的前置處理,主要是視覺化的考量。
case "1.Copy":
if(len1 == 0){
    return true;
}
col.forEach((column, index) => {
    column.height = columns[min + index].height;
    column.width = columns[min + index].width/2;
    column.path.NewTarget(column.x, column.y - this.height, 20);
})
this.mergePhase = "2.Merge";
break;
這部分才開始實際的合併過程。每次比較 left 和 right 的元素,將較小的數值放到合併陣列中。這個過程會持續到一個子陣列被完全取出。
case "2.Merge":
if(col[i].height > col[j].height){
    const a = col[j];
    const b = columns[min + this.i + this.j];
    SortAlgorithm.swapColumn(a, b, frame);
    a.height = 0;
    this.j++;
    if(this.j > max - mid){
        this.mergePhase = "3.MergeLeft";
    }
}
else{
    const a = col[i];
    const b = columns[min + this.i + this.j];
    SortAlgorithm.swapColumn(a, b, frame);
    a.height = 0;
    this.i++;
    if(this.i > mid - 1 - min){
        this.mergePhase = "4.MergeRight";
    }
}
break;
當右半部分已經合併完畢,處理左半部分的剩餘元素,重複取代原始陣列,直到結束,將堆疊釋放,並回到拷貝階段。
case "3.MergeLeft":
if(i > mid - 1 - min){
    this.i = 0;
    this.j = 0;
    this.stack[1].pop();
    this.mergePhase = "1.Copy";
}
else{
    const a = col[i];
    const b = columns[min + this.i + this.j];
    SortAlgorithm.swapColumn(a, b, frame);
    a.height = 0;
    this.i++;
}
break;
和階段3相似,唯一不同的是,分割左右側的索引值分別是 mid - 1 和 mid,因此兩者比較的索引值大小有所區別。
case "4.MergeRight":
if(j > max - min){
    this.i = 0;
    this.j = 0;
    this.stack[1].pop();
    this.mergePhase = "1.Copy";
}
else{
    const a = col[j];
    const b = columns[min + this.i + this.j];
    SortAlgorithm.swapColumn(a, b, frame);
    a.height = 0;
    this.j++;
}
break;
現在,讓我們利用 迭代生成器 (Generator Function) 來實現遞迴,結構上和昨天的快速排序相似。在這裡我們會先將數據進行分割,最後才合併,這樣不但能保持程式結構簡潔,同時也便於動畫展示和異步操作。
class SortAlgorithmIterable{
    * mergeSortMaker(columns, left = 0, right = columns.length - 1) {
        if (left >= right) return;
        const mid = Math.ceil((left + right) / 2);
        yield* this.mergeSortMaker(columns, left, mid - 1);
        yield* this.mergeSortMaker(columns, mid, right);
        yield* this.mergeMaker(columns, left, mid, right);
        if(left == 0 && right == columns.length - 1) yield true;
    }
}
合併的部分我們採用相同的方法,此時我們可以放入完整的演算法而不需要狀態管理,透過 yield 就能控制每個步驟的執行:
class SortAlgorithmIterable{
    * mergeMaker(columns, left, mid, right) {
        // 階段1:拷貝陣列
        this.secondColumns = JSON.parse(JSON.stringify(columns.slice(left, right + 1)));
        const heights = this.secondColumns.map((column)=>{return column.height});
        const max = Math.max(...heights);
        // 為每個 column 添加 path
        this.secondColumns.forEach((column) => {
            column.path = new Path(column.x, column.y);
            column.path.NewTarget(column.x, column.y - max, 20);
            column.width /= 2;
        });

        let i = 0;
        let j = mid - left + 1;
        let k = left;

        // 階段2:合併
        while (i <= mid - 1 - left && j <= right - left) {
            yield false;
            if (this.secondColumns[i].height <= this.secondColumns[j].height) {
                var b = this.secondColumns[i];
                i++;
            } else {
                var b = this.secondColumns[j];
                j++;
            }
            const a = columns[k];
            SortAlgorithm.swapColumn(a, b, 30);
            b.height = 0;
            k++;
        }

        // 階段3:合併左側
        while (i <= mid - 1 - left) {
            yield false;
            const a = columns[k];
            const b = this.secondColumns[i];
            SortAlgorithm.swapColumn(a, b, 30);
            b.height = 0;
            i++;
            k++;
        }

        // 階段4:合併右側
        while (j <= right - left) {
            yield false;
            const a = columns[k];
            const b = this.secondColumns[j];
            SortAlgorithm.swapColumn(a, b, 30);
            b.height = 0;
            j++;
            k++;
        }
    }
}
結合以上例子,我們可以看到為了實現視覺化和逐格動畫,合併排序的生成器版本並沒辦法向前幾種排序一樣簡潔。然而,仍比手動管理堆疊更具有可讀性。這有很大一部分原因是分治法本身不需要複雜的狀態管理,它利用遞迴和線性操作來完成,因此非常適合用生成器製作逐格動畫。
在實作中,生成器透過 yield 來控制每個步驟的執行,使得動畫效果的展示更加流暢。這樣的結構不僅保持了程式碼的整潔性,還增強了程式的可理解性,讓我們能夠更專注於演算法的邏輯而非狀態管理的細節。
在思考遞迴的核心概念時,我們也需要考慮是否真的有必要手動管理堆疊。在許多情況下,利用生成器來簡化流程,能有效降低複雜度,並使程式碼的維護和擴展變得更加容易。
