
主張:多 agent 系統不是把一堆 agent 丟在一起就叫協作,七個模式各自對應不同的通訊機制與控制流,選錯模式,系統會比單一 agent 更難維護。
讀完能做到:從七個官方模式裡,依任務的核心動作對應到正確的模式,並知道模式之間可以疊加組合,而不是七選一硬套而已。
Day 13 到 16 一路學下來,你已經摸過 graph、dynamic workflow、還有三個模板積木。官方文件 用一張更高的視角,把所有多步驟、多 agent 的建構方式歸納成四類:
BaseAgent,提供固定的順序、迴圈、平行執行結構——昨天講完的三個老前輩。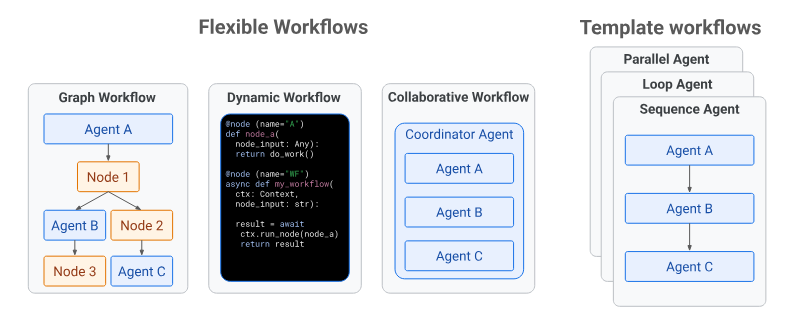
而今天要講的七個多 agent 模式,不是第五種選擇,而是跨越以上這些機制的設計思維——同一個模式,你可以用 SequentialAgent 落地,也可以用 graph 落地,重點是先想清楚「這個任務的結構長什麼樣子」。
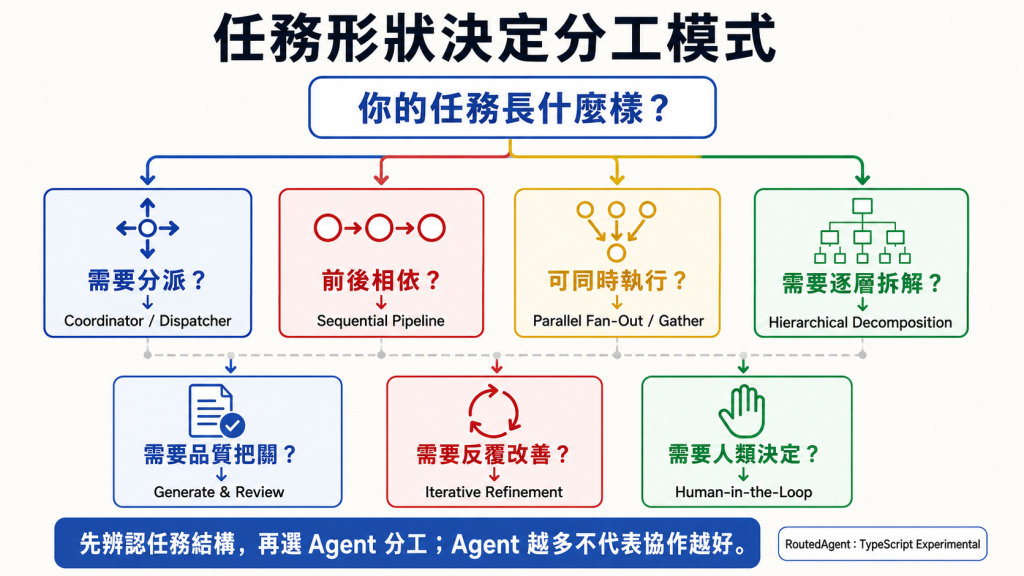
ADK 文件的 Multi-agent workflow patterns 頁列出這七個模式,每個都附上概念性程式碼。有意思的是,同一份七個模式的清單也出現在 Google Cloud 的《The New Agentic Landscape》企業轉型框架文件裡——兩份出處不同、受眾不同的文件講的是同一套分類。
官方文件開宗明義提醒:這些模式適用於廣泛的應用場景,動手前要依自己的專案需求評估與測試,不是每個模式都直接照搬就好。
LlmAgent(Coordinator)管理數個專職的 sub_agents。sub_agents 裡。description、Coordinator 有適當的 instruction)或 Explicit Invocation(把專家包成 AgentTool 放進 tools)。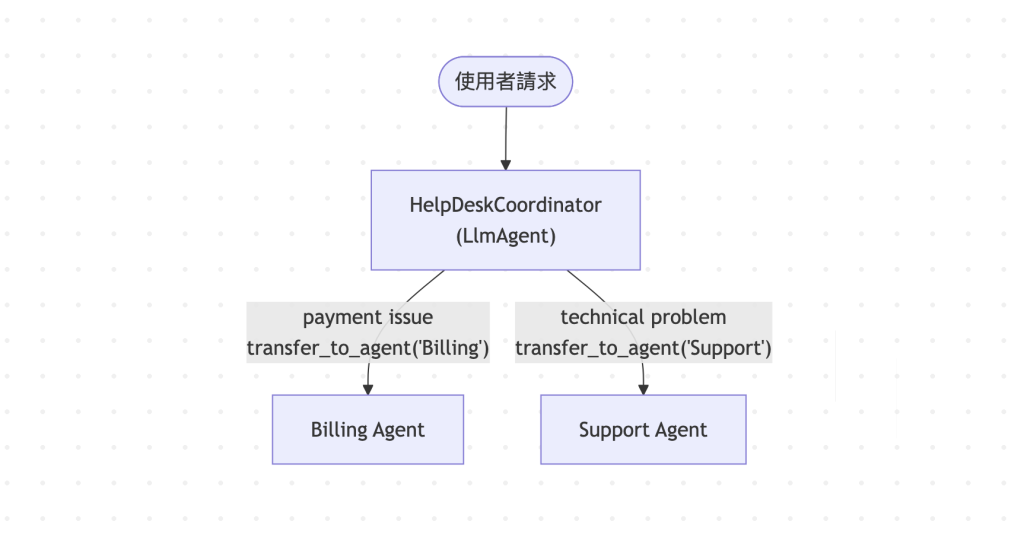
# Conceptual Code: Coordinator using LLM Transfer
from google.adk.agents import LlmAgent

billing_agent = LlmAgent(name="Billing", description="Handles billing inquiries.")
support_agent = LlmAgent(name="Support", description="Handles technical support requests.")

coordinator = LlmAgent(
    name="HelpDeskCoordinator",
    model="gemini-flash-latest",
    instruction="Route user requests: Use Billing agent for payment issues, Support agent for technical problems.",
    description="Main help desk router.",
    # allow_transfer=True is often implicit with sub_agents in AutoFlow
    sub_agents=[billing_agent, support_agent]
)
# User asks "My payment failed" -> Coordinator's LLM should call transfer_to_agent(agent_name='Billing')
# User asks "I can't log in" -> Coordinator's LLM should call transfer_to_agent(agent_name='Support')
這個範例呼應 Day 3 提過的重點:description 不是裝飾——billing_agent 與 support_agent 的 description 寫得越精準,Coordinator 的 LLM 判斷委派對象時就越準,這是 LLM-Driven Delegation 能不能用得起來的關鍵。反過來說,如果你不放心把「該轉給誰」這個判斷交給 LLM,官方文件 也點出了另一條路——把專家包成 AgentTool 塞進 Coordinator 的 tools,變成 Explicit Invocation,由 Coordinator 的 instruction 明確指示什麼情況呼叫哪個工具,而不是靠 LLM 自己揣摩 description。
SequentialAgent 包住依固定順序執行的 sub_agents,這是 Day 16 已經完整講過的模板積木。SequentialAgent 決定執行順序。output_key 寫入結果,後面的 agent 用 {key} 佔位符從 context.state 讀出來。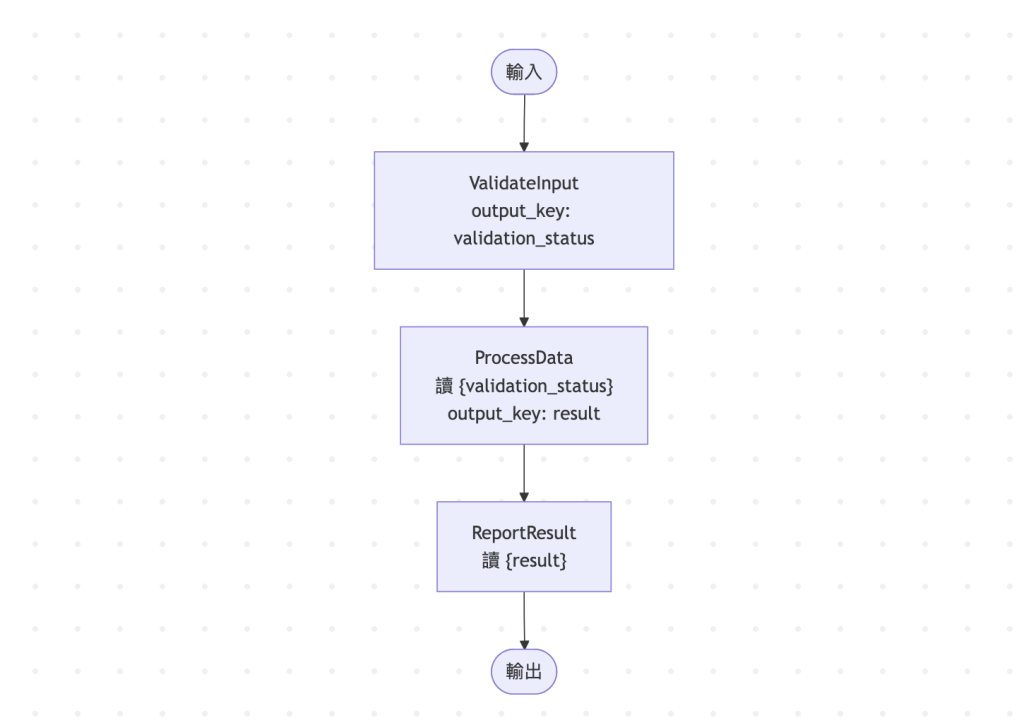
# Conceptual Code: Sequential Data Pipeline
from google.adk.agents import SequentialAgent, LlmAgent

validator = LlmAgent(name="ValidateInput", instruction="Validate the input.", output_key="validation_status")
processor = LlmAgent(name="ProcessData", instruction="Process data if {validation_status} is 'valid'.", output_key="result")
reporter = LlmAgent(name="ReportResult", instruction="Report the result from {result}.")

data_pipeline = SequentialAgent(
    name="DataPipeline",
    sub_agents=[validator, processor, reporter]
)
# validator runs -> saves to state['validation_status']
# processor runs -> reads state['validation_status'], saves to state['result']
# reporter runs -> reads state['result']
這個模式的重點不在 SequentialAgent 本身(Day 16 已經拆過),而在通訊機制永遠是 Shared Session State,不是函式回傳值——processor 的 instruction 裡直接寫 {validation_status},ADK 在執行前會把這個佔位符替換成 context.state["validation_status"] 的實際內容,三個 agent 完全靠這條 state 管線串起來,彼此不需要知道對方的存在。
ParallelAgent 平行跑多個 sub_agents,後面常接一個放在 SequentialAgent 裡的彙整 agent。ParallelAgent 負責 Fan-Out(平行執行);常巢狀在 SequentialAgent 裡處理後續的 Gather(彙整)步驟。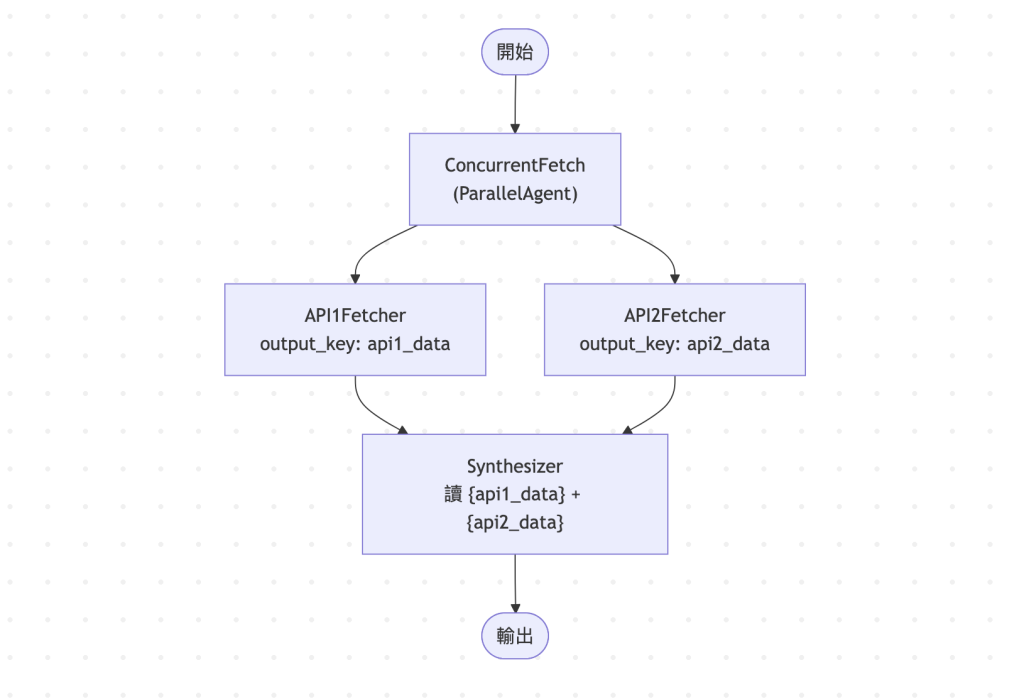
# Conceptual Code: Parallel Information Gathering
from google.adk.agents import SequentialAgent, ParallelAgent, LlmAgent

fetch_api1 = LlmAgent(name="API1Fetcher", instruction="Fetch data from API 1.", output_key="api1_data")
fetch_api2 = LlmAgent(name="API2Fetcher", instruction="Fetch data from API 2.", output_key="api2_data")

gather_concurrently = ParallelAgent(
    name="ConcurrentFetch",
    sub_agents=[fetch_api1, fetch_api2]
)

synthesizer = LlmAgent(
    name="Synthesizer",
    instruction="Combine results from {api1_data} and {api2_data}."
)

overall_workflow = SequentialAgent(
    name="FetchAndSynthesize",
    sub_agents=[gather_concurrently, synthesizer] # Run parallel fetch, then synthesize
)
# fetch_api1 and fetch_api2 run concurrently, saving to state.
# synthesizer runs afterwards, reading state['api1_data'] and state['api2_data'].
注意這裡的巢狀關係:gather_concurrently(ParallelAgent)與 synthesizer 一起被包進外層的 overall_workflow(SequentialAgent)——Fan-Out 階段要「平行」,Gather 階段要「等平行的都跑完才開始」,單靠 ParallelAgent 或單靠 SequentialAgent 都做不到,兩者疊在一起才是這個模式的完整型態。這也呼應開頭「四種蓋 workflow 的方式」裡提到的:七個模式是跨越 template/graph/dynamic 的設計思維,不是單一元件。
parent_agent / sub_agents 結構。AgentTool) 讓上層指派任務給下層,結果透過 tool response 或 state 沿階層往上回傳。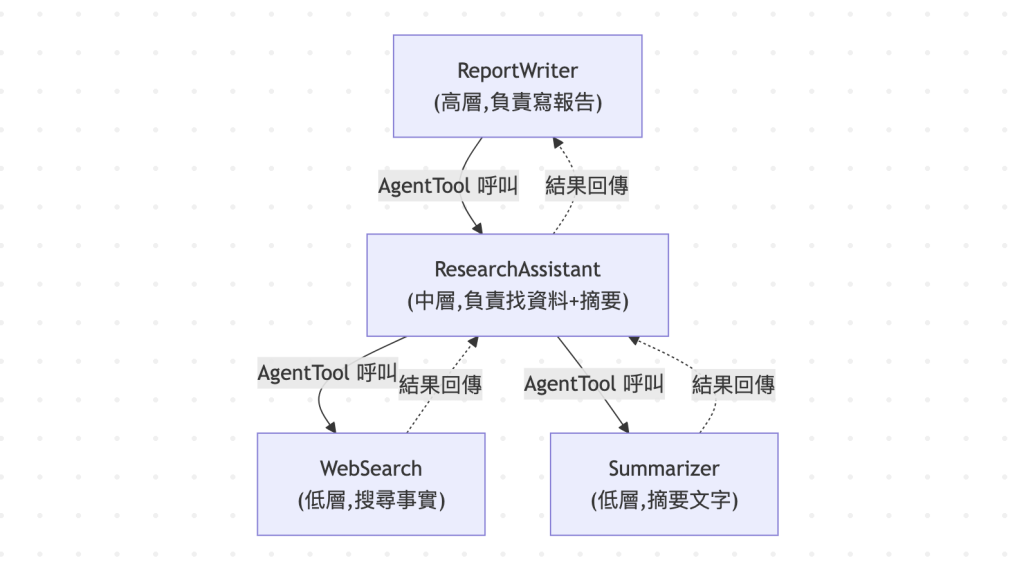
# Conceptual Code: Hierarchical Research Task
from google.adk.agents import LlmAgent
from google.adk.tools import agent_tool

# Low-level tool-like agents
web_searcher = LlmAgent(name="WebSearch", description="Performs web searches for facts.")
summarizer = LlmAgent(name="Summarizer", description="Summarizes text.")

# Mid-level agent combining tools
research_assistant = LlmAgent(
    name="ResearchAssistant",
    model="gemini-flash-latest",
    description="Finds and summarizes information on a topic.",
    tools=[agent_tool.AgentTool(agent=web_searcher), agent_tool.AgentTool(agent=summarizer)]
)

# High-level agent delegating research
report_writer = LlmAgent(
    name="ReportWriter",
    model="gemini-flash-latest",
    instruction="Write a report on topic X. Use the ResearchAssistant to gather information.",
    tools=[agent_tool.AgentTool(agent=research_assistant)]
    # Alternatively, could use LLM Transfer if research_assistant is a sub_agent
)
# User interacts with ReportWriter.
# ReportWriter calls ResearchAssistant tool.
# ResearchAssistant calls WebSearch and Summarizer tools.
# Results flow back up.
這是一個三層的樹狀結構:report_writer → research_assistant → web_searcher/summarizer,每一層都用 AgentTool 把下一層包成工具。這正是 Day 6 提過「AgentTool 呼叫完會回到原 agent」這個特性最能發揮的場景——每一層完成任務後,控制權都乾淨地回到呼叫者手上,不像 sub-agent 的 transfer 需要額外的交接邏輯。官方文件的註解裡也提到一個替代做法:如果把 research_assistant 設成 report_writer 的 sub_agent 而非 AgentTool,就能改用 LLM Transfer 委派——差別在於 transfer 會把控制權真的交出去,而 AgentTool 呼叫完會自動交回來,該選哪個要看你希望上層 agent 是否需要繼續介入下層的執行過程。
SequentialAgent 裡放兩個 agent——一個生成、一個評審。SequentialAgent 確保「先生成、後評審」的順序。output_key 存輸出,Reviewer 讀那個 state key;Reviewer 也可以把評語存進另一個 state key,供後續步驟使用)。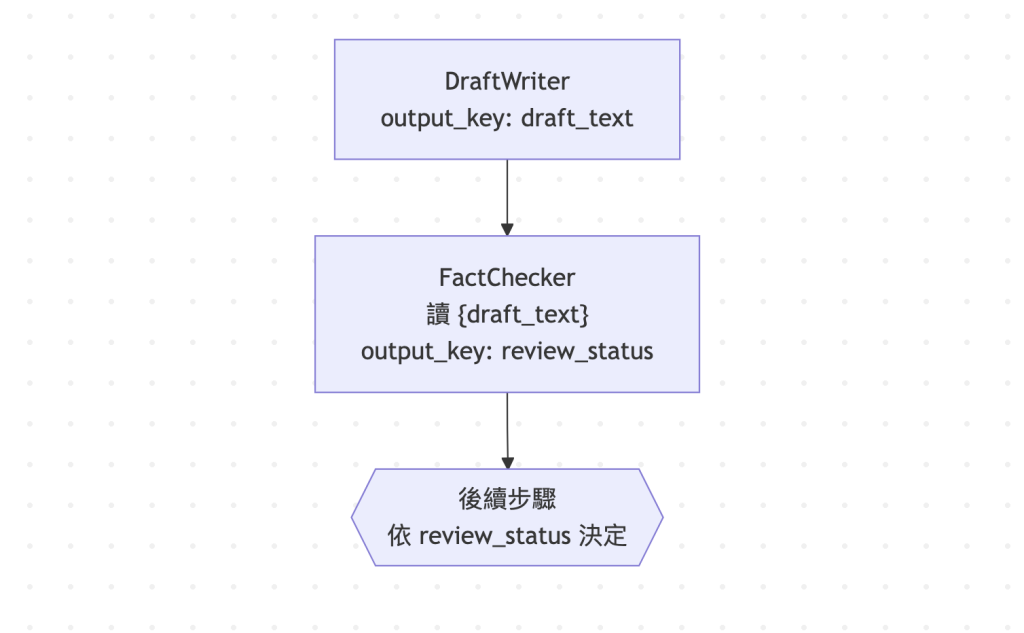
# Conceptual Code: Generator-Critic
from google.adk.agents import SequentialAgent, LlmAgent

generator = LlmAgent(
    name="DraftWriter",
    instruction="Write a short paragraph about subject X.",
    output_key="draft_text"
)

reviewer = LlmAgent(
    name="FactChecker",
    instruction="Review the text in {draft_text} for factual accuracy. Output 'valid' or 'invalid' with reasons.",
    output_key="review_status"
)

# Optional: Further steps based on review_status

review_pipeline = SequentialAgent(
    name="WriteAndReview",
    sub_agents=[generator, reviewer]
)
# generator runs -> saves draft to state['draft_text']
# reviewer runs -> reads state['draft_text'], saves status to state['review_status']
跟 Sequential Pipeline(模式 2)長得很像,差別在意圖:Sequential Pipeline 的每一步是流程上不同的處理階段,Generator-Critic 的兩步是同一份內容的「生產」與「把關」。官方範例特地留了一句 # Optional: Further steps based on review_status——這暗示這個模式常常不會就此打住,而是接到模式 6(Iterative Refinement)繼續迭代,直到 review_status 通過為止。
LoopAgent 包住一個或多個 agent,讓它們在多輪迭代中持續改善一項任務。LoopAgent 管理重複執行。max_iterations 結束,或由一個專職的檢查 agent 在結果令人滿意時,於 Event Actions(掛在每個 Event 物件上、控制流程是否繼續的旗標集合)裡設定 escalate=True——這正是 Day 16 提過的終止機制在這個模式裡的具體用法。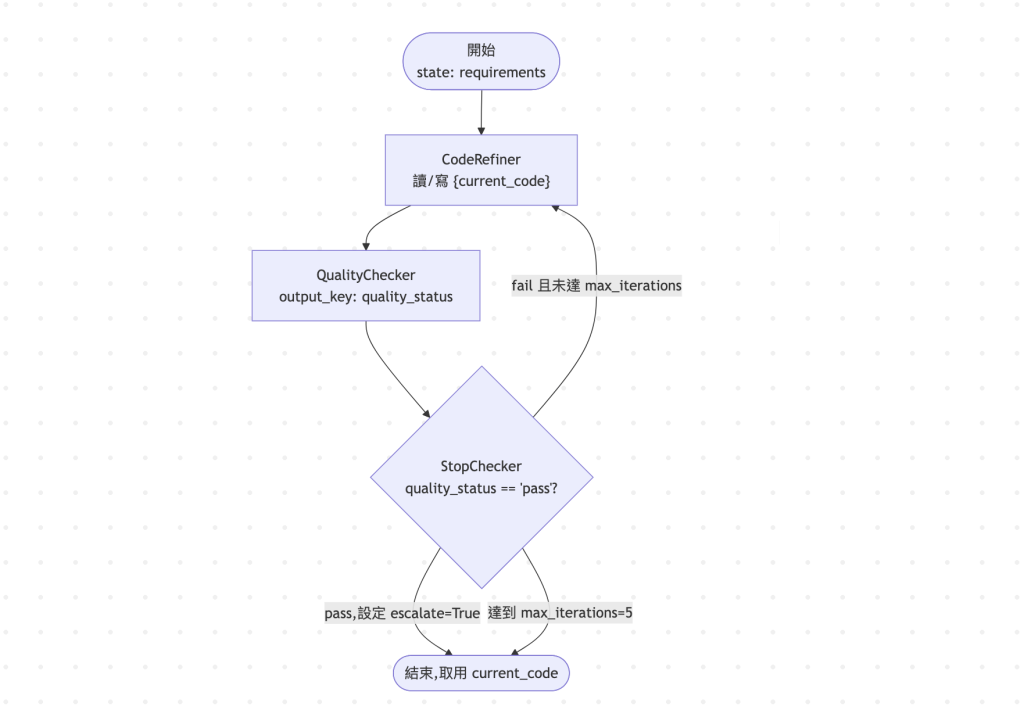
# Conceptual Code: Iterative Code Refinement
from google.adk.agents import LoopAgent, LlmAgent, BaseAgent
from google.adk.events import Event, EventActions
from google.adk.agents.invocation_context import InvocationContext
from typing import AsyncGenerator

# Agent to generate/refine code based on state['current_code'] and state['requirements']
code_refiner = LlmAgent(
    name="CodeRefiner",
    instruction="Read state['current_code'] (if exists) and state['requirements']. Generate/refine Python code to meet requirements. Save to state['current_code'].",
    output_key="current_code" # Overwrites previous code in state
)

# Agent to check if the code meets quality standards
quality_checker = LlmAgent(
    name="QualityChecker",
    instruction="Evaluate the code in state['current_code'] against state['requirements']. Output 'pass' or 'fail'.",
    output_key="quality_status"
)

# Custom agent to check the status and escalate if 'pass'
class CheckStatusAndEscalate(BaseAgent):
    async def _run_async_impl(self, ctx: InvocationContext) -> AsyncGenerator[Event, None]:
        status = ctx.session.state.get("quality_status", "fail")
        should_stop = (status == "pass")
        yield Event(author=self.name, actions=EventActions(escalate=should_stop))

refinement_loop = LoopAgent(
    name="CodeRefinementLoop",
    max_iterations=5,
    sub_agents=[code_refiner, quality_checker, CheckStatusAndEscalate(name="StopChecker")]
)
# Loop runs: Refiner -> Checker -> StopChecker
# State['current_code'] is updated each iteration.
# Loop stops if QualityChecker outputs 'pass' (leading to StopChecker escalating) or after 5 iterations.
三個角色分工要看清楚:code_refiner 只管「產生更好的版本」,quality_checker 只管「打分數」,真正決定迴圈要不要停的是第三個自訂的 CheckStatusAndEscalate——它繼承 BaseAgent,自己覆寫 _run_async_impl,讀 quality_status 之後 yield 一個帶 EventActions(escalate=True) 的 Event。這是本篇七個模式裡唯一一個必須自己寫 BaseAgent 子類才能完成的模式,因為「檢查條件並決定是否跳出迴圈」不是任何內建 agent 類別的職責。
transfer_to_agent)指向一個概念上的「Human Agent」觸發外部流程,或直接在 LlmAgent 裡用自訂工具。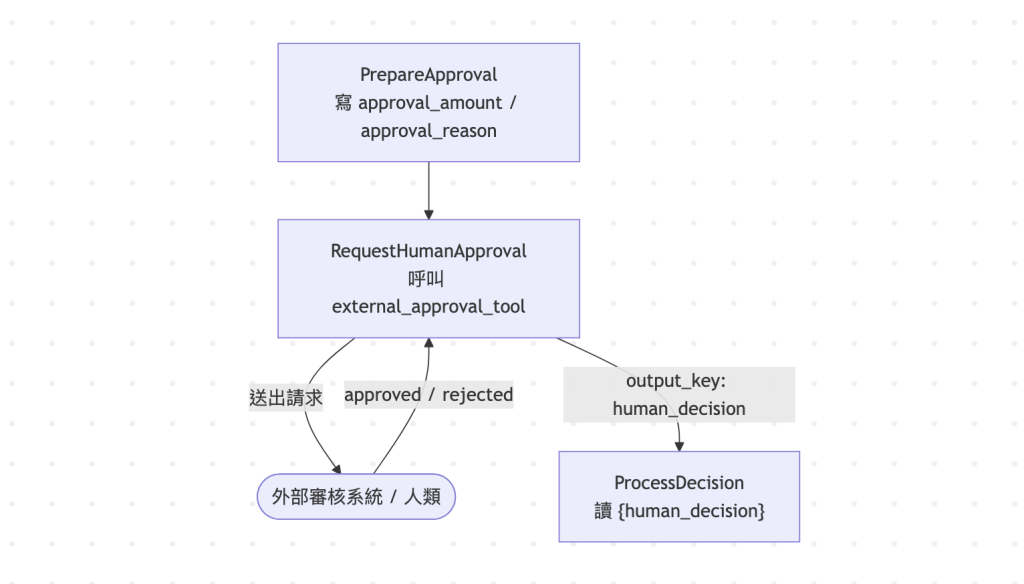
# Conceptual Code: Using a Tool for Human Approval
from google.adk.agents import LlmAgent, SequentialAgent
from google.adk.tools import FunctionTool

# --- Assume external_approval_tool exists ---
# This tool would:
# 1. Take details (e.g., request_id, amount, reason).
# 2. Send these details to a human review system (e.g., via API).
# 3. Poll or wait for the human response (approved/rejected).
# 4. Return the human's decision.
# async def external_approval_tool(amount: float, reason: str) -> str: ...
approval_tool = FunctionTool(func=external_approval_tool)

# Agent that prepares the request
prepare_request = LlmAgent(
    name="PrepareApproval",
    instruction="Prepare the approval request details based on user input. Store amount and reason in state.",
    # ... likely sets state['approval_amount'] and state['approval_reason'] ...
)

# Agent that calls the human approval tool
request_approval = LlmAgent(
    name="RequestHumanApproval",
    instruction="Use the external_approval_tool with amount from state['approval_amount'] and reason from state['approval_reason'].",
    tools=[approval_tool],
    output_key="human_decision"
)

# Agent that proceeds based on human decision
process_decision = LlmAgent(
    name="ProcessDecision",
    instruction="Check {human_decision}. If 'approved', proceed. If 'rejected', inform user."
)

approval_workflow = SequentialAgent(
    name="HumanApprovalWorkflow",
    sub_agents=[prepare_request, request_approval, process_decision]
)
這個模式的完整落地細節,就是 Day 15 講過的 RequestInput 節點與 tool confirmation 兩套機制——上面這段概念性程式碼裡的 external_approval_tool 換成同步等待就是 tool confirmation,換成讓使用者能繼續互動的非同步請求就是 RequestInput。
值得一提的是,TypeScript 另外有一條官方推薦的路,不是自己寫工具,而是用 PolicyEngine + SecurityPlugin 這套更結構化的機制:你自訂一個實作 BasePolicyEngine 的 class,它的 evaluate() 方法決定某次 tool call 要不要暫停等人類確認;一旦回傳 PolicyOutcome.CONFIRM,SecurityPlugin(加到 Runner 的 plugins 裡)就會攔截該次工具呼叫,自動產生一個特殊的 FunctionCall 交給應用程式呈現確認畫面,使用者確認後應用程式回傳 FunctionResponse,工具才真的執行。官方文件明講:這套 Policy-based 模式是 TypeScript 目前推薦的做法,其他語言的支援還在規劃中——如果你的專案是 Python,現階段仍然只能用上面 FunctionTool 那套手動整合。
| 模式 | 對應元件 |
|---|---|
| Coordinator/Dispatcher | LLM-driven transfer 或 AgentTool,見 Day 18 |
| Sequential Pipeline | SequentialAgent |
| Parallel Fan-Out/Gather | ParallelAgent(常巢狀在 SequentialAgent 內) |
| Hierarchical Task Decomposition | 多層 AgentTool 包裝 |
| Generate and Review | SequentialAgent(generator + critic) |
| Iterative Refinement | LoopAgent + escalate=True |
| Human-in-the-Loop | Day 15 的 RequestInput 或 tool confirmation |
需要條件分支、fan-out/join、巢狀流程等更精細控制時,這些模式也都能改用 Graph Workflows 或 Dynamic Workflows 實作——模板與 graph 不是互斥的兩條路,是同一組架構思維在不同抽象層級的落地。
七個模式會重疊,挑的時候回到每個模式定義裡的那句 Goal 就好:任務的核心動作是「路由」就選 Coordinator/Dispatcher,是「固定順序處理」就選 Sequential Pipeline,是「同時做互不相依的事再合併」就選 Parallel Fan-Out,是「拆解成子任務逐層委派」就選 Hierarchical Task Decomposition,是「先產生再把關」就選 Generate and Review,是「反覆修到及格」就選 Iterative Refinement,是「需要人簽核」就選 Human-in-the-Loop。一個任務常常同時吃到兩個 Goal(例如「先產生、審核,審核沒過就重試」),這時候不必二選一——Generate and Review 負責產生與把關那一步,外面再包一層 Iterative Refinement 的 LoopAgent 管重試次數,兩個模式疊著用。
七個模式都是「怎麼組合多個 agent」的思維工具,但還沒回答一個更具體的問題:當一個 agent 團隊裡的每個成員該有多少自主權——能不能自己跟使用者對話、任務做完該不該自動把控制權交回去?Day 18 會用官方那個漸進式的 Weather Bot 教學,把 Collaborative Workflows 的三種 mode 講清楚。
Google ADK 官方網站
GitHub - Agent Development Kit (ADK) 2.0
GitHub 開源實作:https://github.com/SeanLinH/adk_tutor



 iThome鐵人賽
 看影片追技術