前一篇利用CNN辨識手寫阿拉伯數字,其實有幾個缺點:
以下就前兩點實作,辨識貓或狗,看看效果如何。
如果要在本機執行,須進行以下前置作業:
如果要在 Colab 執行,就直接在 Notebook 內完成以上兩件事:
# 下載資料集
!curl -O https://download.microsoft.com/download/3/E/1/3E1C3F21-ECDB-4869-8368-6DEBA77B919F/kagglecatsanddogs_3367a.zip

# 解壓縮
!unzip -q kagglecatsanddogs_3367a.zip
原版程式請自【Image classification from scratch】下載,經測試在 Colab 環境下載資料集及解壓縮,比 Windows 環境快上許多,建議直接在Colab環境上測試。在Windows環境上執行,可解壓縮部份檔案即可,只是準確度會降低。
這次的範例檔為12_01_CatAndDog.ipynb,程式有點長,又有一些新指令,我們就一段段詳加說明:
import os

num_skipped = 0
for folder_name in ("Cat", "Dog"):
    folder_path = os.path.join("PetImages", folder_name)
    for fname in os.listdir(folder_path):
        fpath = os.path.join(folder_path, fname)
        try:
            fobj = open(fpath, "rb")
            is_jfif = tf.compat.as_bytes("JFIF") in fobj.peek(10)
        finally:
            fobj.close()

        if not is_jfif:
            num_skipped += 1
            # Delete corrupted image
            os.remove(fpath)

print("Deleted %d images" % num_skipped)
image_size = (180, 180)
batch_size = 32

train_ds = tf.keras.preprocessing.image_dataset_from_directory(
    "PetImages",
    validation_split=0.2,
    subset="training",
    seed=1337,
    image_size=image_size,
    batch_size=batch_size,
)
val_ds = tf.keras.preprocessing.image_dataset_from_directory(
    "PetImages",
    validation_split=0.2,
    subset="validation",
    seed=1337,
    image_size=image_size,
    batch_size=batch_size,
)
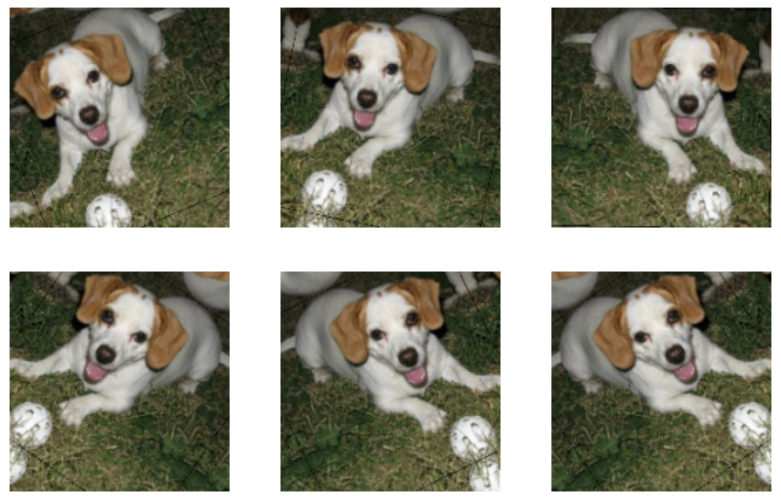
# RandomFlip("horizontal"):水平翻轉、
# RandomRotation(0.1):旋轉 0.1 比例
data_augmentation = keras.Sequential(
    [
        layers.experimental.preprocessing.RandomFlip("horizontal"),
        layers.experimental.preprocessing.RandomRotation(0.1),
    ]
)
轉換後的樣本如下圖:
train_ds = train_ds.prefetch(buffer_size=32)
val_ds = val_ds.prefetch(buffer_size=32)
def make_model(input_shape, num_classes):
    inputs = keras.Input(shape=input_shape)
    # Image augmentation block
    x = data_augmentation(inputs)

    # Entry block
    x = layers.experimental.preprocessing.Rescaling(1.0 / 255)(x)
    x = layers.Conv2D(32, 3, strides=2, padding="same")(x)
    x = layers.BatchNormalization()(x)
    x = layers.Activation("relu")(x)

    x = layers.Conv2D(64, 3, padding="same")(x)
    x = layers.BatchNormalization()(x)
    x = layers.Activation("relu")(x)

    previous_block_activation = x  # Set aside residual

    for size in [128, 256, 512, 728]:
        x = layers.Activation("relu")(x)
        x = layers.SeparableConv2D(size, 3, padding="same")(x)
        x = layers.BatchNormalization()(x)

        x = layers.Activation("relu")(x)
        x = layers.SeparableConv2D(size, 3, padding="same")(x)
        x = layers.BatchNormalization()(x)

        x = layers.MaxPooling2D(3, strides=2, padding="same")(x)

        # Project residual
        residual = layers.Conv2D(size, 1, strides=2, padding="same")(
            previous_block_activation
        )
        x = layers.add([x, residual])  # Add back residual
        previous_block_activation = x  # Set aside next residual

    x = layers.SeparableConv2D(1024, 3, padding="same")(x)
    x = layers.BatchNormalization()(x)
    x = layers.Activation("relu")(x)

    x = layers.GlobalAveragePooling2D()(x)
    if num_classes == 2:
        activation = "sigmoid"
        units = 1
    else:
        activation = "softmax"
        units = num_classes

    x = layers.Dropout(0.5)(x)
    outputs = layers.Dense(units, activation=activation)(x)
    return keras.Model(inputs, outputs)
BatchNormalization layer 是將輸出標準化,通常可增加準確度。
epochs = 5
model.compile(
    optimizer=keras.optimizers.Adam(1e-3),
    loss="binary_crossentropy",
    metrics=["accuracy"],
)
model.fit(
    train_ds, epochs=epochs, validation_data=val_ds,
)
訓練50 epochs,驗證準確率約 96%。
img = keras.preprocessing.image.load_img(
    "./PetImages/Cat/18.jpg", target_size=image_size
)
img_array = keras.preprocessing.image.img_to_array(img)
img_array = tf.expand_dims(img_array, 0)  # Create batch axis

predictions = model.predict(img_array)
score = predictions[0]
print(
    "This image is %.2f percent cat and %.2f percent dog."
    % (100 * (1 - score), 100 * score)
)
Keras 獨立套件之前的寫法如下,使用 ImageDataGenerator來產生增補資料,model.fit_generator 取代 model.fit,在Tensorflow 依然可以使用 ImageDataGenerator來產生增補資料,用法稍有差異,可以參考下一篇:
datagen = ImageDataGenerator(
        rotation_range=10,
        zoom_range=0.1,
        width_shift_range=0.1,
        height_shift_range=0.1)

model.compile(loss='categorical_crossentropy', optimizer=optimizer, metrics=['accuracy'])

history = model.fit(datagen.flow(X_train, y_train, batch_size=batch_size), epochs=epochs,
                              validation_data=(X_test, y_test), verbose=2,
                              steps_per_epoch=X_train.shape[0]//batch_size,
                              callbacks=[learning_rate_reduction])
這一次我們自行準備訓練資料,並透過【資料增補】(Data Augmentation)方式自動產生更多資料。之後我們將套用預訓模型(Pre-trained Models),利用已訓練好的模型,使辨識更精準。
本篇範例檔為 12_01_CatAndDog.ipynb,,可自【這裡】下載。

老師您好,想請問老師在"建立訓練(Training)及驗證(Validation)資料集"的時候是怎麼給予label的
以子目錄名稱為label,cat及dog,其下放圖檔即可。
了解謝謝老師
想問一下 如果圖片資料不平衡了話 應該怎麼做
有兩個方式:
喔喔原來 感謝!!
另外 想問一下
如果同時有照片又有數值 怎麼一起訓練模型?
因為照片轉成RPG矩陣後會變成很大的矩陣 不知道該怎麼加入列
如
csv檔裡面含有照片路徑、性別、年齡等數值
照片切割成50x50,照片總共有100張
那進去訓練的資料大小就會是(100,50,50,3)
要怎麼再加入excel上的數值資料(像是年紀啊、性別啊)一起訓練啊
非常好的問題,可以使用 functional API 建立模型,兩種input,一個是影像,一個是照片屬性,之後再concat即可。參閱:
https://www.pyimagesearch.com/2019/02/04/keras-multiple-inputs-and-mixed-data/
不好意思 我剛才用您的方法測試 沒有辦法如期合併欸@@
((6392, 50, 50, 3), (6392, 3))
會出現像是這樣的錯誤
all the input arrays must have same number of dimensions, but the array at index 0 has 4 dimension(s) and the array at index 1 has 2 dimension(s)
是以 Keras functional API 合併,而非資料合併,因CNN已轉成特徵向量,無法合併,故使用 functional API。
https://keras.io/guides/functional_api/
老師我在使用
train_ds = train_ds.prefetch(buffer_size=32)
val_ds = val_ds.prefetch(buffer_size=32)
在做訓練的時候都一直出現這個錯誤訊息,
the kernel appears to have died. it will restart automatically.
如果不使用這種取資料方式做訓練就正常,請問該怎麼解決?
使用下列指令試試看:
dataset = dataset.prefetch(tf.data.AUTOTUNE)
好的我試試看
老師我想請問我用相同的方法只是在不同的環境,一個是用1660S GPU 一個是用3060 GPU,我用3060跑的時候就會出現 kernel dead的情況,但1660S卻沒有,1660S的效能應該比3060差才對怎麼會1660S能跑3060不能跑,老師有遇過這種情況嗎?
沒有喔,通常是記憶體爆掉,檢查一下GPU toolkit是否安裝成功,並且看看 cmd 是否有錯誤訊息。
CUDA 是有安裝成功的,cmd是win10的還是jupyter的,我是用jupyter跑的,但jupyter倒是有出現這個錯誤訊息。
Allocation of 8433180672 exceeds 10% of free system memory.
Allocation of 8433180672 exceeds 10% of free system memory.
這就是ram爆了