前一篇介紹如何安裝 TensorFlow 2 Object Detection API,今天我們就來實作一個簡單的物件偵測(Object Detection)。
【TensorFlow Object Detection API 教學網站】 裡面的範例寫得有點複雜,我把一些函數拿掉,盡量縮短程式,整理為 17_01_Tensorflow_Object_Detection_API_Test.ipynb,我們分段說明:
gpus = tf.config.experimental.list_physical_devices('GPU')
for gpu in gpus:
    tf.config.experimental.set_memory_growth(gpu, True)
gpus = tf.config.experimental.list_physical_devices('GPU')
if gpus:
    tf.config.experimental.set_virtual_device_configuration(gpus[0], [tf.config.experimental.VirtualDeviceConfiguration(memory_limit=1024*2)])
# 下載模型,並解壓縮
def download_model(model_name, model_date):
    base_url = 'http://download.tensorflow.org/models/object_detection/tf2/'
    model_file = model_name + '.tar.gz'
    # 解壓縮
    model_dir = tf.keras.utils.get_file(fname=model_name,
                                        origin=base_url + model_date + '/' + model_file,
                                        untar=True)
    return str(model_dir)

MODEL_DATE = '20200711'
MODEL_NAME = 'centernet_hg104_1024x1024_coco17_tpu-32'
PATH_TO_MODEL_DIR = download_model(MODEL_NAME, MODEL_DATE)
PATH_TO_MODEL_DIR
def download_labels(filename):
    base_url = 'https://raw.githubusercontent.com/tensorflow/models/master/research/object_detection/data/'
    label_dir = tf.keras.utils.get_file(fname=filename,
                                        origin=base_url + filename,
                                        untar=False)
    label_dir = pathlib.Path(label_dir)
    return str(label_dir)

LABEL_FILENAME = 'mscoco_label_map.pbtxt'
PATH_TO_LABELS = download_labels(LABEL_FILENAME)
PATH_TO_LABELS
import time
from object_detection.utils import label_map_util
from object_detection.utils import visualization_utils as viz_utils

PATH_TO_SAVED_MODEL = PATH_TO_MODEL_DIR + "/saved_model"

print('載入模型...', end='')
start_time = time.time()

# 載入模型。
detect_fn = tf.saved_model.load(PATH_TO_SAVED_MODEL)

end_time = time.time()
elapsed_time = end_time - start_time
print(f'共花費 {elapsed_time} 秒.')
category_index = label_map_util.create_category_index_from_labelmap(PATH_TO_LABELS, use_display_name=True)
# 選一張圖片(./images_2/image2.jpg)物件偵測
import numpy as np
from PIL import Image
import matplotlib.pyplot as plt

# 不顯示警告訊息
import warnings
warnings.filterwarnings('ignore')   # Suppress Matplotlib warnings

# 開啟一張圖片
image_np = np.array(Image.open('./images_2/image1.jpg'))

# 轉為 TensorFlow tensor 資料型態
input_tensor = tf.convert_to_tensor(image_np)
# 加一維,變為 (筆數, 寬, 高, 顏色)
input_tensor = input_tensor[tf.newaxis, ...]
# 這方法也可以
# input_tensor = np.expand_dims(image_np, 0)

detections = detect_fn(input_tensor)

# All outputs are batches tensors.
# Convert to numpy arrays, and take index [0] to remove the batch dimension.
# We're only interested in the first num_detections.
num_detections = int(detections.pop('num_detections'))

# detections:物件資訊 內含 (候選框, 類別, 機率)
print(f'物件個數:{num_detections}')
detections = {key: value[0, :num_detections].numpy()
               for key, value in detections.items()}

detections['num_detections'] = num_detections
# 轉為整數
detections['detection_classes'] = detections['detection_classes'].astype(np.int64)

print(f'物件資訊 (候選框, 類別, 機率):')
for detection_boxes, detection_classes, detection_scores in \
    zip(detections['detection_boxes'], detections['detection_classes'], detections['detection_scores']):
    print(np.around(detection_boxes,4), detection_classes, round(detection_scores*100, 2))
顯示物件偵測的資訊 內含候選框、類別、機率,部份結果如下: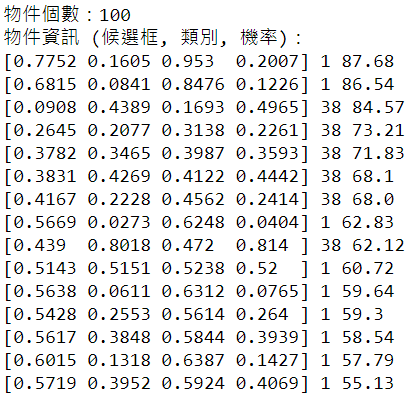
# min_score_thresh=.30 表機率(Confidence)至少要大於 30%
image_np_with_detections = image_np.copy()

viz_utils.visualize_boxes_and_labels_on_image_array(
      image_np_with_detections,
      detections['detection_boxes'],
      detections['detection_classes']+1,
      detections['detection_scores'],
      category_index,
      use_normalized_coordinates=True,
      max_boxes_to_draw=200,
      min_score_thresh=.30,
      agnostic_mode=False)

plt.figure(figsize=(12,8))
plt.imshow(image_np_with_detections, cmap='viridis')
plt.show()
框起來的影像顯示不出來,我使用 OpenCV 也無法顯示,只好先存檔,再顯示。
plt.savefig('./images_2/detection2.png')
# plt.show()
from IPython.display import Image
Image('./images_2/detection2.png')
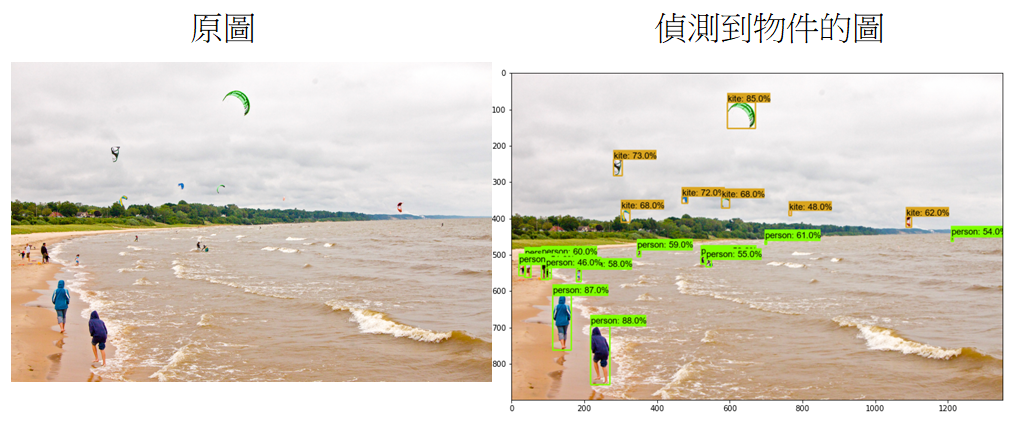
結果如下: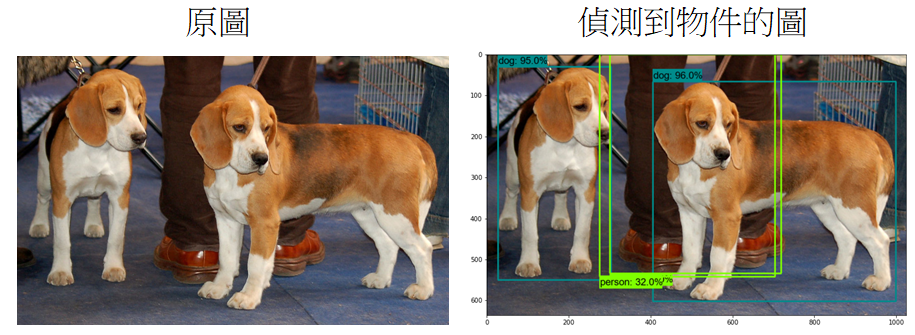
從下載的目錄載入模型,實在等太久了,我在一篇文章找到另一種載入的方式,只需要 0.6 秒,但是,detection_classes 索引值差1,相關程式碼要調整一下,請參見完整程式檔。
本篇範例包括 17_01_Tensorflow_Object_Detection_API_Test.ipynb,可自【這裡】下載。