前一篇實作一個簡單的物件偵測(Object Detection),接下來我們來模擬自駕車(Self Driving)如何辨識前方的障礙物,一樣使用TensorFlow Object Detection API。
自駕車(Self Driving)辨識前方道路需求,至少要含以下項目:
辨識速度要快:假設汽車行駛道路平均時速60KM,亦即秒速為 60,000 / 3,600 = 16.7 公尺,如果,一個車身是 2.4 公尺,那麼,每秒辨識一張圖片,不考慮汽車動作時間,車子必須與前方障礙物保持 6.5 個車身的距離。
參見下圖,YOLO之父Joseph Redmon 在 2016 CVPR 研討會說明以當時 YOLO 速度大約 2 英尺就可辨識一張圖片,即 1/4 車身的距離。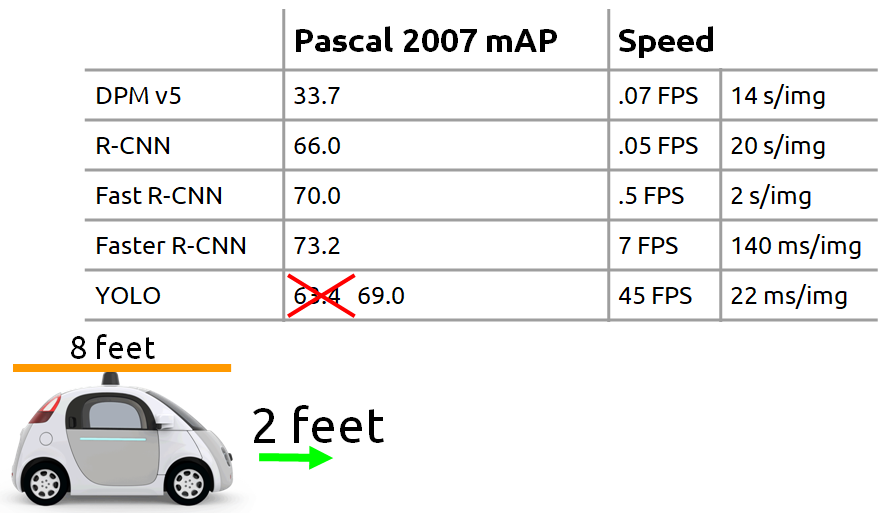
圖一. 各演算法辨識速度與車身距離關係,圖片來源:Joseph Redmon 2016 CVPR 研討會 PPT
辨識正確率要高:辨識錯誤就悲劇了,前陣子就有一個活生生的例子,Tesla 啟動自動駕駛功能,結果撞穿貨車貨櫃,可能原因是貨櫃是白色,被誤認是空白,就完全沒減速,直接撞穿貨櫃,幸好駕駛沒大礙。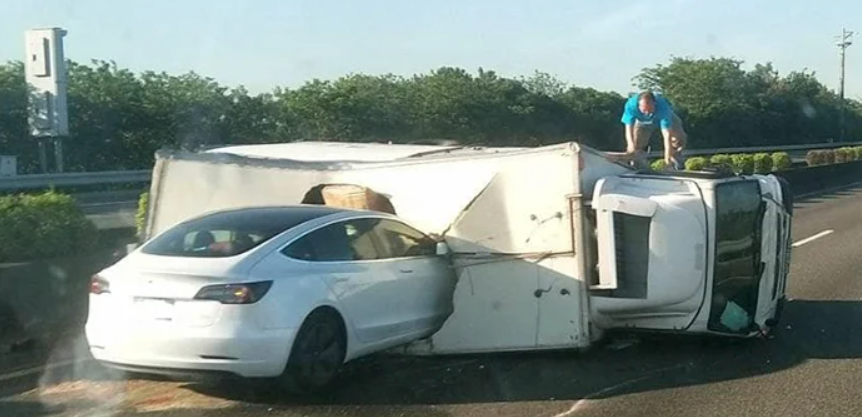
圖二. Tesla 撞貨車,圖片來源:Tesla Taiwan 特斯拉台灣 Facebook 社團
程式碼整理為 18_01_Tensorflow_Object_Detection_API_Video.ipynb,以下分段說明:
cap = cv2.VideoCapture('./0_video/pedestrians.mp4')
使用 webcam:
cap = cv2.VideoCapture(0)
i=0
while True:
    # 讀取一幀(frame) from camera or mp4
    ret, image_np = cap.read()

    # 加一維,變為 (筆數, 寬, 高, 顏色)
    # Expand dimensions since the model expects images to have shape: [1, None, None, 3]
    image_np_expanded = np.expand_dims(image_np, axis=0)

    # Things to try:
    # Flip horizontally
    # image_np = np.fliplr(image_np).copy()

    # Convert image to grayscale
    # image_np = np.tile(
    #     np.mean(image_np, 2, keepdims=True), (1, 1, 3)).astype(np.uint8)

    # 轉為 TensorFlow tensor 資料型態
    input_tensor = tf.convert_to_tensor(np.expand_dims(image_np, 0), dtype=tf.float32)

    # detections:物件資訊 內含 (候選框, 類別, 機率)
    detections = detect_fn(input_tensor)

    num_detections = int(detections.pop('num_detections'))

    if i==0:
        print(f'物件個數:{num_detections}')
    detections = {key: value[0, :num_detections].numpy()
                   for key, value in detections.items()}
    # detection_classes should be ints.
    detections['detection_classes'] = detections['detection_classes'].astype(int)

    # 第一個 label 編號
    label_id_offset = 1

    image_np_with_detections = image_np.copy()

    viz_utils.visualize_boxes_and_labels_on_image_array(
          image_np_with_detections,
          detections['detection_boxes'],
          detections['detection_classes'] + label_id_offset,
          detections['detection_scores'],
          category_index,
          use_normalized_coordinates=True,
          max_boxes_to_draw=200,
          min_score_thresh=.30,
          agnostic_mode=False)

    # 顯示偵測結果
    img = cv2.resize(image_np_with_detections, (800, 600))
    cv2.imshow('object detection', img)

    # 存檔
    i+=1
    if i==30:
        cv2.imwrite('./images_2/pedestrians.png', img)

    # 按 q 可以結束
    if cv2.waitKey(25) & 0xFF == ord('q'):
        break

cap.release()
cv2.destroyAllWindows()
第30幀(frame)圖片辨識如下圖,可分出 Car/Bus/Truck。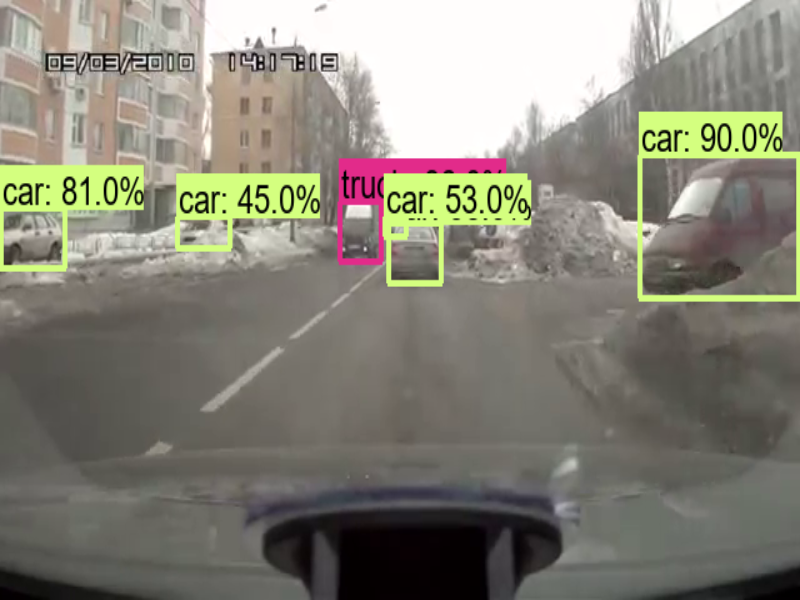
圖三. 車輛辨識
改為辨識夜景(night.mp4),結果也還不錯如下圖。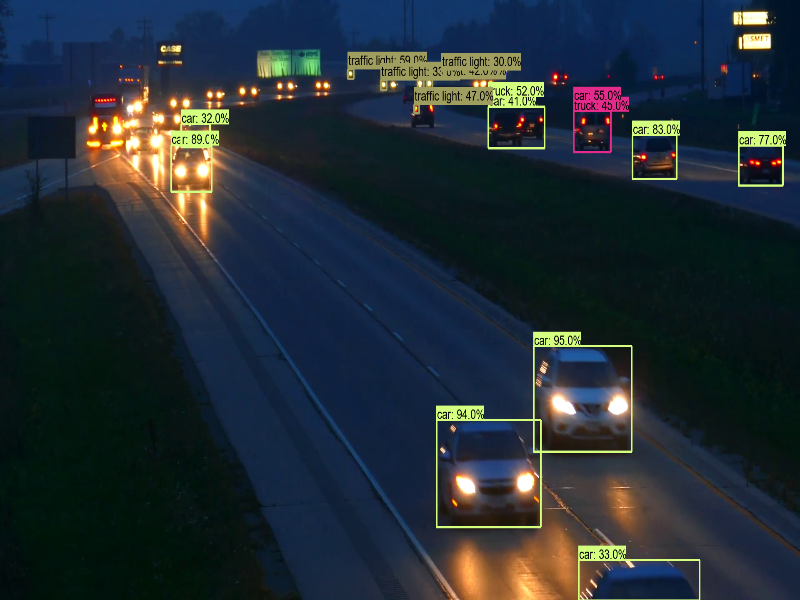
圖四. 夜景辨識
以上使用 【CenterNet HourGlass104 1024x1024】模型,速度是 197 毫秒(ms),辨識夜景(night.mp4)有點卡卡的,再找一個比較快的模型,例如 【CenterNet Resnet50 V1 FPN 512x512】,速度是 27 毫秒(ms),快上6倍,果然順多了,程式檔案為 18_02_Tensorflow_Object_Detection_API_Video_SSD.ipynb。
讀者也許會問『如何辨識道路呢?』,這可以使用 Mask R-CNN 來偵測,它可以把物件分成不同顏色的區塊,如下圖。這部分 TensorFlow Object Detection API 也有提供此類模型。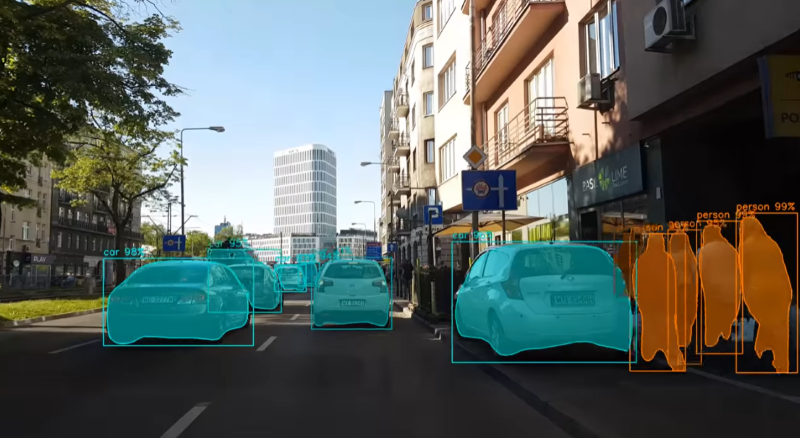
圖五. Mask R-CNN,圖片來源:Mask RCNN - COCO - instance segmentation
以上只是概念的介紹,離具體實現還差的遠了,有興趣的讀者可再深入研究,筆者能力有限,只能淺嚐即止,畢竟還要研讀其他的應用。
本篇範例包括 18_01_Tensorflow_Object_Detection_API_Video.ipynb、18_02_Tensorflow_Object_Detection_API_Video_SSD.ipynb,可自【這裡】下載。
