iT邦幫忙

第 12 屆 iThome 鐵人賽

DAY 16
0
AI & Data

輕鬆掌握 Keras 及相關應用系列 第 16

Day 16:TensorFlow 2 Object Detection API 安裝

前言

筆者曾介紹過物件偵測(Object Detection),請參閱【這裡】,三年來,整個技術的演進又提升了不少,尤其是YOLO演算法已經進化到第5版了,而且還是不同的開發者。Tensorflow 也推出TensorFlow 2 物件偵測(Object Detection) API,包括Tensorflow 1.x 及Tensorflow 2.x的版本,後者的安裝簡化許多,本文就以Tensorflow 2.x版本為主。

物件偵測

物件偵測(Object Detection) 不只要辨識物件的類別,還包括以下要求:

  1. 指出物件所在位置。
  2. 一幀圖片可以同時辨識多個物件。

https://ithelp.ithome.com.tw/upload/images/20200916/20001976AzfHTL2kwJ.png
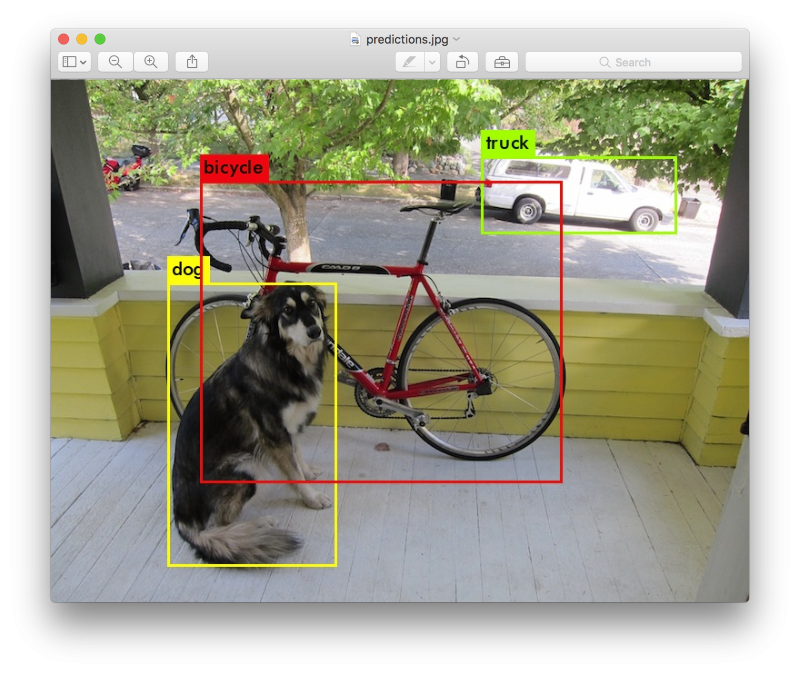
圖一. 物件偵測範例,圖片來源:YOLO: Real-Time Object Detection

https://ithelp.ithome.com.tw/upload/images/20171221/20001976UbwpLiOdbj.png
圖二. ImageNet ILSVRC 挑戰賽項目

有了物件偵測功能,無人車、機器人、AGV就可以辨識前方的道路或障礙物,達到自動行進/停止/轉彎的特異功能。除了精準辨識外,還要辨識速度快,系統才能即時作出反應。

物件偵測演算法依處理方式概分為兩類:

  1. 兩階段(Two Steps)演算法:含RCNN、Fast RCNN、Faster RCNN ...等,參見圖三,從演算法名稱就知道,要不斷改良,快還要更快。演算法分兩階段,第一步先用 Region Proposal Network(RPN),找出2000個可能含有目標影像的框(Region),第二步將 2000個框分別進行辨識,找出物件。

https://ithelp.ithome.com.tw/upload/images/20200916/200019767YTfZZA28C.png
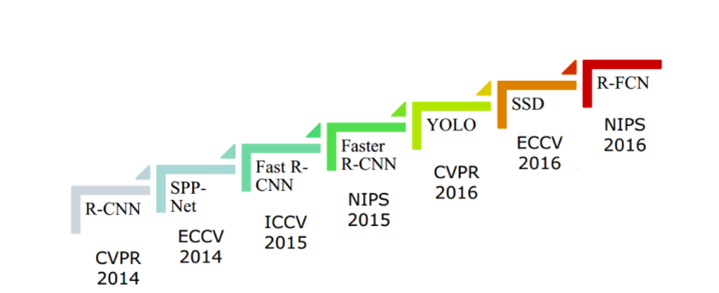
圖三. Object Detection RCNN 演進

  1. 一階段(One Step)演算法:直接將圖片切成多個格子(Grid),每個格子使用多個 Anchor Box,偵測是否含物件,一氣呵成,演算法包括SSD、YOLO等,其中 YOLO 不到一年就換新一個版本,腳步都跟不上了。
    https://ithelp.ithome.com.tw/upload/images/20200916/20001976KvoYdtOoRs.png
    圖四. YOLO 辨識示意圖

https://ithelp.ithome.com.tw/upload/images/20200916/20001976uM7gkRD5CZ.png
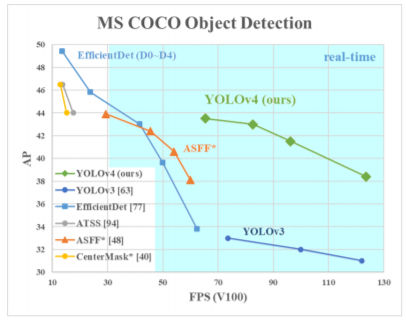
圖五. YOLO 與其他版本、其他演算法比較,縱軸為準確度,橫軸為速度(FPS),圖片來源:YOLOv4: Optimal Speed and Accuracy of Object Detection

要研究這麼多演算法真的很累,幸好 Tensorflow 推出 API,它幾乎全包了。
https://ithelp.ithome.com.tw/upload/images/20200916/20001976aOzc7lr8Jk.png
圖六. TensorFlow 2 Object Detection API 支援的演算法

安裝 TensorFlow 2 Object Detection API

安裝環境需求請參考 【TensorFlow Object Detection API 教學官網】,目前如下表:
https://ithelp.ithome.com.tw/upload/images/20200916/20001976sfj4RapBvw.png
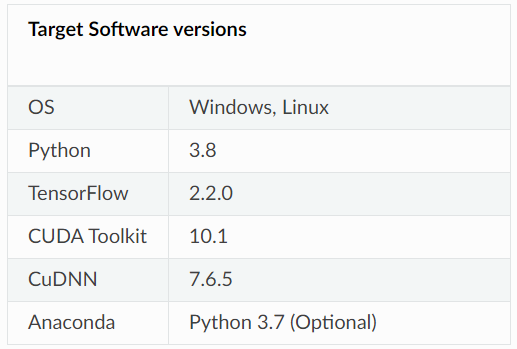
圖七. TensorFlow 2 Object Detection API 安裝環境需求

以下介紹 Windows 作業環境下的安裝:

  1. 建議安裝 Anaconda 最新版。
  2. 安裝 TensorFlow v2.2 以上。
  3. GPU 不一定需要,如果要使用GPU,需安裝 CUDA 10.1/cuDNN v7.6.5,詳細說明請參考【TensorFlow Object Detection API 教學網站】
  4. 在任意目錄下建立 TensorFlow 次目錄。
  5. 【GitHub】下載整個專案(repository) 。並解壓縮至 TensorFlow 次目錄下,並將models-master目錄改為名 models。
  6. 【這裡】下載 protoc-3.13.0-win64.zip,解壓縮至特定目錄,例如 "C:\Program Files\Google Protobuf",將"C:\Program Files\Google Protobuf\bin"加到環境變數Path中。
  7. 安裝Protobuf,在第4步驟的 TensorFlow\models\research 目錄開啟 cmd,執行:
protoc object_detection/protos/*.proto --python_out=.
  1. 安裝 COCO API,執行:
pip install cython
pip install git+https://github.com/philferriere/cocoapi.git#subdirectory=PythonAPI
  1. 安裝 Object Detection API,更改目前目錄至Tensorflow\models\research,再複製 object_detection/packages/tf2/setup.py,執行:
python -m pip install .
  1. 安裝至此大功告成,執行測試:
python object_detection/builders/model_builder_tf2_test.py

出現以下畫面,就搞定了。
https://ithelp.ithome.com.tw/upload/images/20200916/20001976WmE7cDggtd.png
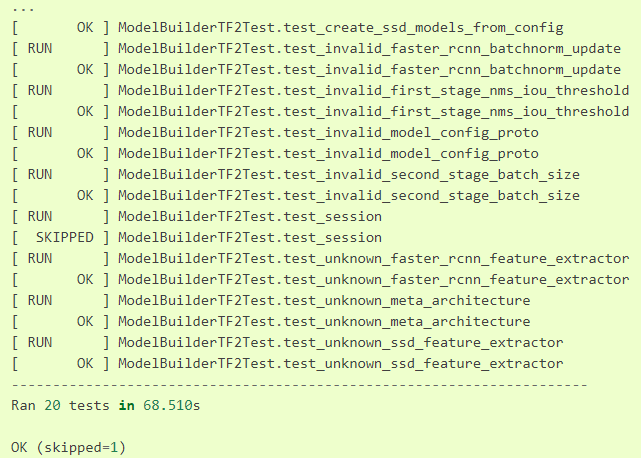
圖八. TensorFlow 2 Object Detection API 測試結果

結論

夜深了,明天再戰。


上一篇
Day 15:戴口罩偵測實作
下一篇
Day 17:TensorFlow 2 Object Detection API 實作
系列文
輕鬆掌握 Keras 及相關應用30
圖片
  直播研討會
圖片
{{ item.channelVendor }} {{ item.webinarstarted }} |
{{ formatDate(item.duration) }}
直播中

1 則留言

0
rtfgvb74125
iT邦新手 4 級 ‧ 2021-02-23 16:46:16

老師我在執行

pip install cython
pip install git+https://github.com/philferriere/cocoapi.git#subdirectory=PythonAPI

的時候一直顯示git失敗,一開始以為是網址失效,但用google搜尋可以找到該github,請問老師還有哪些原因可能造成錯誤嗎?

看更多先前的回應...收起先前的回應...

我在本機測試OK喔。新版好像有改變,可參考下列說明:
https://github.com/philferriere/cocoapi

https://ithelp.ithome.com.tw/upload/images/20210223/20001976SDCHkrmsVT.png

謝謝老師,我再試試看!
另外請教老師關於步驟7~10分別是在哪個終端機執行,因為我一直搞混不知道該在win10的cmd還是anaconda的prompt。

win10的cmd。

謝謝老師!最後請教老師在研究tensorflow object detection api的時候有哪些參考資料可以分享的嗎?

老師第九個步驟的複製,是放到哪一個資料夾當中

內文第9步驟更新,請參閱。
原文安裝步驟:
https://tensorflow-object-detection-api-tutorial.readthedocs.io/en/latest/install.html

範例:
https://tensorflow-object-detection-api-tutorial.readthedocs.io/en/latest/auto_examples/index.html

也可以google一下,網路有許多文章可參考。

好的非常感謝老師

我要留言

立即登入留言