本系列文已出版成書「NestJS 基礎必學實務指南:使用強大且易擴展的 Node.js 框架打造網頁應用程式」,感謝 iT 邦幫忙與博碩文化的協助。如果對 NestJS 有興趣、覺得這個系列文對你有幫助的話,歡迎前往購書,你的支持是我最大的寫作動力!
在傳輸資料時經常會使用到主體資料,比如說:POST、PUT、PATCH等操作,Nest 有提供 @Body 裝飾器來取得主體資料。範例程式碼如下:
import { Body, Controller, Post } from '@nestjs/common';

@Controller('todos')
export class TodoController {
  @Post()
  create(@Body() data: { title: string, description?: string }) {
    const id = 1;
    return { id, ...data };
  }
}
也可以透過指定參數名稱來取得特定參數:
import { Body, Controller, Post } from '@nestjs/common';

@Controller('todos')
export class TodoController {
  @Post()
  create(
    @Body('title') title: string,
    @Body('description') description?: string
  ) {
    const id = 1;
    return { id, title, description };
  }
}
透過 Postman 查看結果: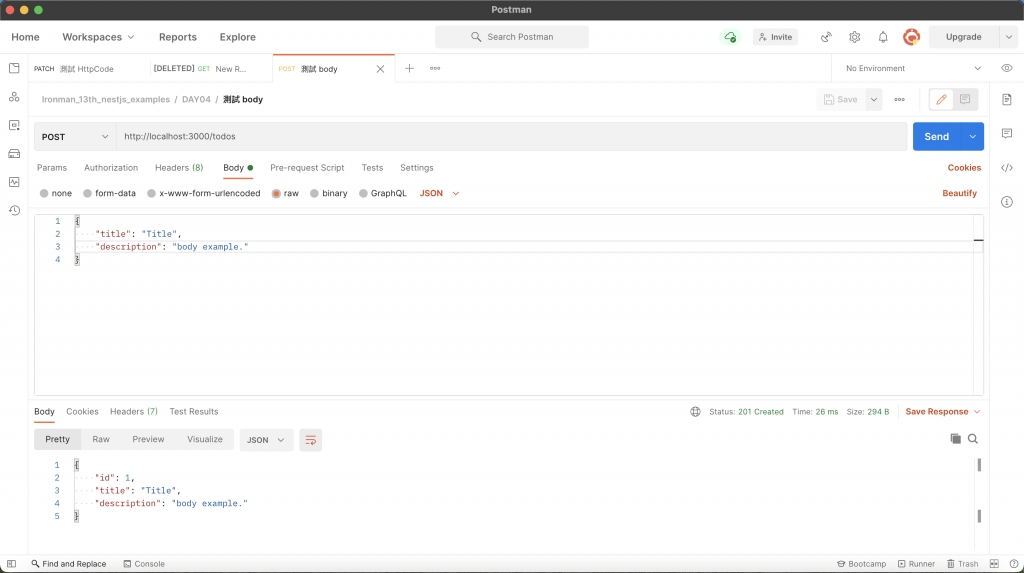
什麼是 DTO?它的全名是 資料傳輸物件 (Data Transfer Object),其用途廣泛,通常用於過濾、格式化資料,它只負責存放要傳遞的資訊,故 只有唯讀屬性,沒有任何方法。定義 DTO 之後,就不必一直翻文件查到底參數格式為何,可以很清楚了解傳入 / 傳出的參數內容,在 Nest 的世界裡,甚至可以基於 DTO 的格式來設置驗證器,進而大幅降低維護成本。
既然是定義格式,那麼就有兩種選擇:
interface
class
基本上會建議大家採用 class 的形式來建立 DTO,原因是 interface 在編譯成 JavaScript 就會被刪除,而 class 會保留,這對部分功能是有影響的,所以 官方也推薦大家採用 class。
那麼就來建立一個範例的 DTO 吧,在要調整的 Controller 目錄下,新增一個名為 dto 的資料夾,並建立 create-<CONTROLLER_NAME>.dto.ts,我這邊的檔案名稱為 create-todo.dto.ts:
export class CreateTodoDto {
  public readonly title: string;
  public readonly description?: string;
}
建立完畢後,在 Controller 中使用,將帶有 @Body 裝飾器之參數的型別指定為該 DTO:
import { Body, Controller, Post } from '@nestjs/common';
import { CreateTodoDto } from './dto/create-todo.dto';

@Controller('todos')
export class TodoController {
  @Post()
  create(@Body() dto: CreateTodoDto) {
    const id = 1;
    return { id, ...dto };
  }
}
有時候可能需要設置標頭來回傳給用戶端,這時候就可以用 @Header 裝飾器來配置:
import { Controller, Get, Header } from '@nestjs/common';

@Controller('todos')
export class TodoController {
  @Get()
  @Header('X-Hao-headers', '1')
  getAll() {
    return {
      id: 1,
      title: 'Title 1',
      description: ''
    };
  }
}
透過 Postman 查看結果: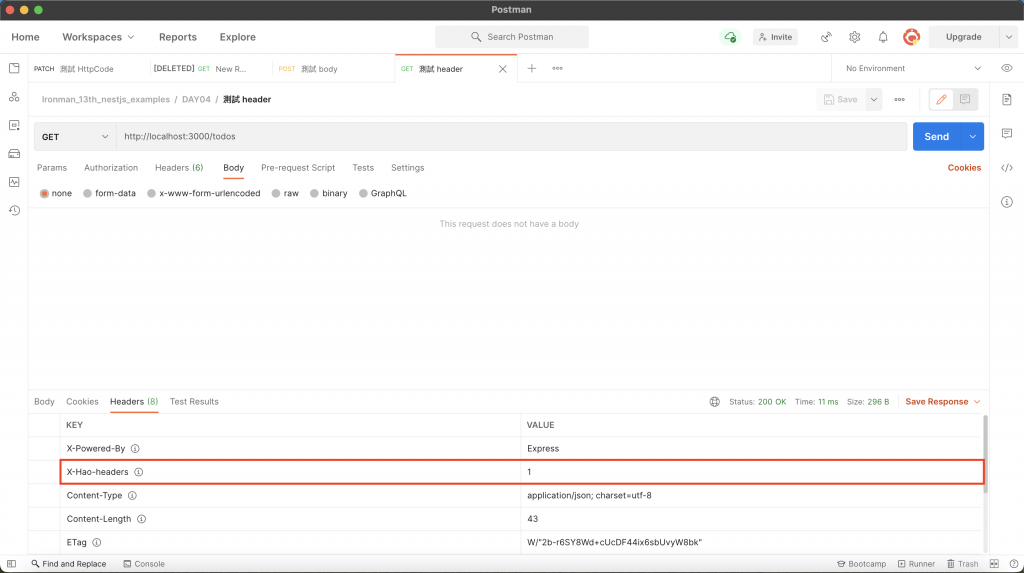
前面有提過 Nest 是以 Express 或 Fastify 作為底層基礎進行整合的框架,在很多地方都是對底層平台進行包裝的,其中的參數正是包裝出來的,透過特定的參數裝飾器來取得不同的資訊,除了前面提及的幾項以外,還有提供許多參數裝飾器來提供開發人員取得更多資訊:
@Request():請求的裝飾器,帶有此裝飾器的參數會賦予底層框架的 請求物件 (Request Object),該裝飾器有別稱 @Req(),通常將參數名稱取為 req。@Response():回應的裝飾器,帶有此裝飾器的參數會賦予底層框架的 回應物件 (Response Object),該裝飾器有別稱 @Res(),通常將參數名稱取為 res。@Next():Next 函式的裝飾器,帶有此裝飾器的參數會賦予底層框架的 Next 函式,用途為呼叫下一個 中介軟體 (Middleware),詳細說明可以參考我先前寫的 Express 基本結構與路由。@Param(key?: string):路由參數的裝飾器,相當於 req.params 或 req.params[key]。@Query(key?: string):查詢參數的裝飾器,相當於 req.query 或 req.query[key]。@Body(key?: string):主體資料的裝飾器,相當於 req.body 或 req.body[key]。@Headers(name?: string):請求標頭的裝飾器,相當於 req.headers 或 req.headers[name]。@Session():session 的裝飾器,相當於 req.session。@Ip():IP 的裝飾器,相當於 req.ip。@HostParam():host 的裝飾器,相當於 req.hosts。前面我們使用的範例都是透過 return 的方式來處理回應資料的,事實上 Nest 提供了兩種方式來處理回應:
透過 return 資料的方式讓 Nest 來處理回應的動作,也是 官方最推薦 的方式。範例程式碼如下:
import { Controller, Get } from '@nestjs/common';

@Controller('todos')
export class TodoController {
  @Get()
  getAll() {
    return [];
  }
}
在後端領域中,幾乎都會使用到非同步操作,這時候用 ES7 的 async/await 再好不過,而標準模式也支援此方式:
import { Controller, Get } from '@nestjs/common';

@Controller('todos')
export class TodoController {
  @Get()
  async getAll() {
    return new Promise((resolve, reject) => setTimeout(() => resolve([]), 1000));
  }
}
RxJS 也是近年來十分熱門的函式庫,在 Angular 中可以經常看到它的身影,而受到 Angular 啟發的 Nest 也跟進使用了 RxJS。Nest 會自動訂閱 / 取消訂閱對象,無須手動取消訂閱,下方為範例程式碼:
import { Controller, Get } from '@nestjs/common';
import { of } from 'rxjs';

@Controller('todos')
export class TodoController {
  @Get()
  getAll() {
    return of([]);
  }
}
這個模式是使用底層框架的回應物件來處理回應,不透過 return 的方式讓 Nest 處理,相當於每個方法都是 void。下方為範例程式碼:
import { Controller, Get, Res } from '@nestjs/common';
import { Response } from 'express';

@Controller('todos')
export class TodoController {
  @Get()
  getAll(@Res() res: Response) {
    res.send([]);
  }
}
注意:須依照使用的底層框架來決定
res的型別,範例中使用 Express 作為底層,故用其Response型別。
Nest 會去偵測是否有帶 @Res、@Response、@Next 裝飾器的參數,如果有的話,該資源就會啟用函式庫模式,而標準模式會被關閉,這是什麼意思呢?簡單來說 return 值的方式會失去作用。下方為範例程式碼:
import { Controller, Get, Res } from '@nestjs/common';
import { Response } from 'express';

@Controller('todos')
export class TodoController {
  @Get()
  getAll(@Res() res: Response) {
    return [];
  }
}
可以發現按照此段程式碼建構的資源無法被存取:
那如果真的要從回應物件中取得資訊,但又想採用標準模式的話,有什麼方法可以突破此限制嗎?答案是有的,只需要在裝飾器中添加 passthrough: true 即可:
import { Controller, Get, Res } from '@nestjs/common';
import { Response } from 'express';

@Controller('todos')
export class TodoController {
  @Get()
  getAll(@Res({ passthrough: true }) res: Response) {
    return [];
  }
}
透過 Postman 查看結果: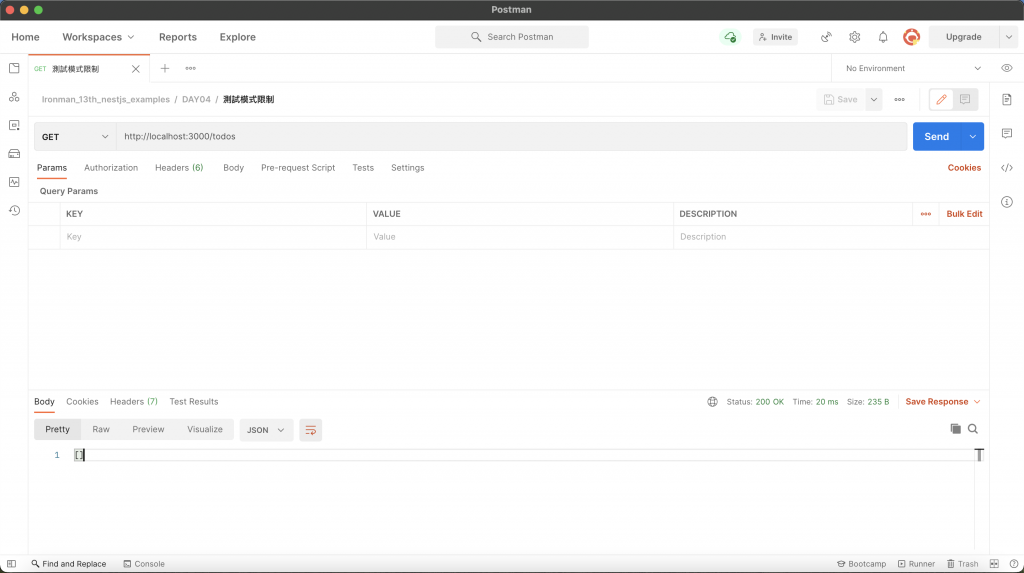
先來懶人包一下今天的內容:
@Body 取得主體資料。@Header 配置回應的標頭。return 的方式回傳資訊,並支援 async/await、RxJS。@Response、@Res 或 @Next 會關閉標準模式,若要在標準模式下使用的話需要添加 passthrough: true 在裝飾器中。Controller 負責處理客戶端的請求,可以把它視為 API 的門面,既然是門面,那麼在面對各式各樣的請求都要有相對應的應對方式,所以 Controller 的功能這麼多合情合理!
還記得前面說過的 Controller 是某個區塊的外場服務生嗎?目前的範例是將 Controller 直接掛在根模組下,如果所有的 Controller 都掛在根模組的話,會變成所有的外場服務生都屬於同一區,並沒有做到良好的動線規劃,所以應該要將 Controller 放入對應的 Module。下一篇將會介紹 Nest 中的 Module,那就明天見囉!


 iThome鐵人賽