前面實作了 AI 影像分類效果雖然不錯,但是在真實環境中使用仍然有些落差,因為大部分我們擷取到的影像資料,通常都會涵蓋多種類型的物件在其中,若只能將一張照片分類為一個類別,也會讓 AI 判讀也些失真。而 Object Detection 物件偵測的出現能夠在單一影像中偵測到多個類別,並框選出對應的位置。
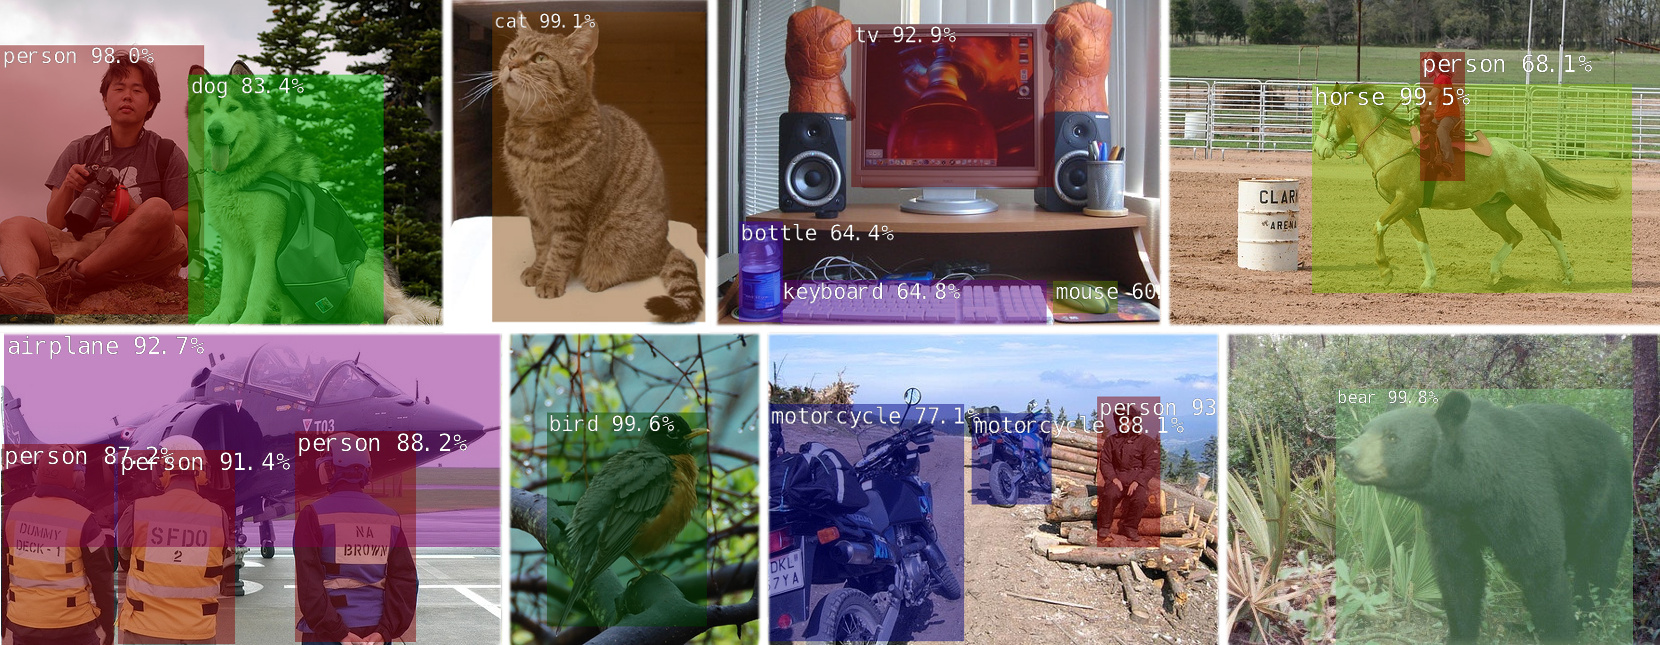
Object Detection 物件偵測 (source: NVIDIA)
首先一樣先進到 docker 容器中的推論環境
cd jetson-inference/
docker/run.sh
執行以下指令將 peds_0.jpg 進行推論,結果另存為 output.jpg:
detectnet.py data/images/peds_3.jpg data/images/test/output_3.jpg
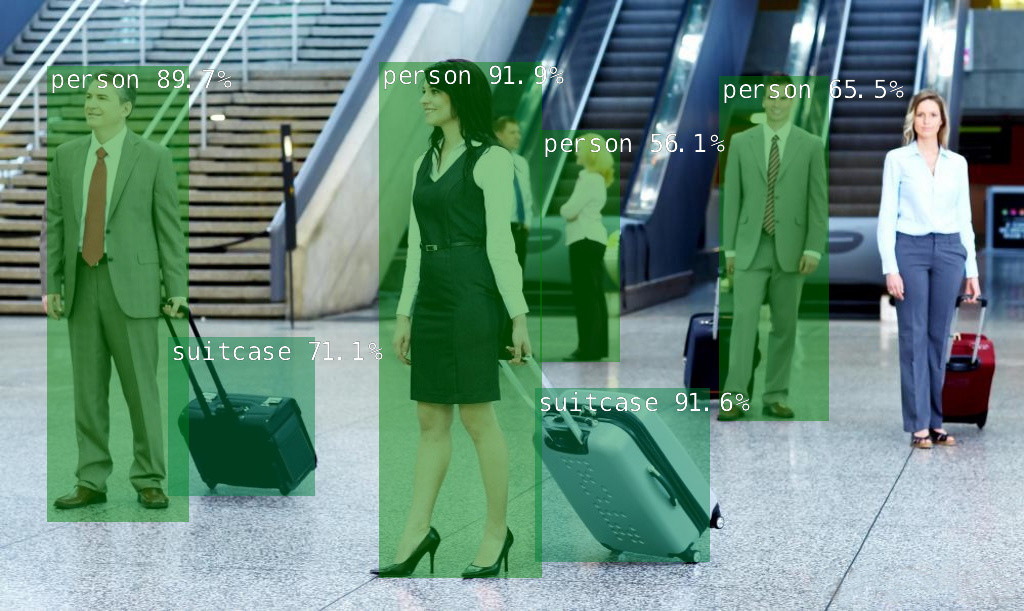
首次執行的模型依然會做 TensorRT 的最佳化再進行推論,得到的輸出結果 output_3.jpg 如下圖所示。在每個偵測到的物件會套上一個色塊方框,並顯示其類別以及信心度。但在比較小的物件仍有位辨識出來的情況。
detectnet.py 可以帶入幾種不同的參數,其說明如下:
| 模型名稱 | 帶入參數名稱 | 物件類別 Object classes |
|---|---|---|
| SSD-Mobilenet-v1 | ssd-mobilenet-v1 | 91 (COCO classes) |
| SSD-Mobilenet-v2 | ssd-mobilenet-v2 | 91 (COCO classes) |
| SSD-Inception-v2 | ssd-inception-v2 | 91 (COCO classes) |
| DetectNet-COCO-Dog | coco-dog | dogs |
| DetectNet-COCO-Bottle | coco-bottle | bottles |
| DetectNet-COCO-Chair | coco-chair | chairs |
| DetectNet-COCO-Airplane | coco-airplane | airplanes |
| ped-100 | pednet | pedestrians |
| multiped-500 | multiped | pedestrians, luggage |
| facenet-120 | facenet | faces |
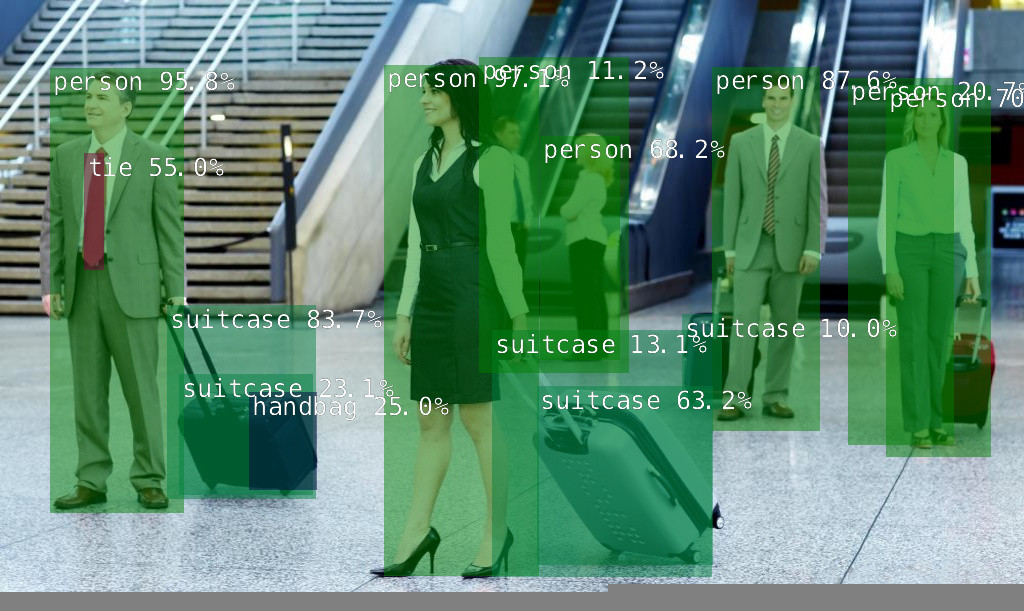
稍微調整一下參數,使用 ssd-inception-v2 並將門檻值降低到 0.1 做比對測試:
detectnet.py --network=ssd-inception-v2 --threshold=0.1 data/images/peds_3.jpg data/images/test/output_3.jpg
可看到如下圖的結果,一樣的照片但是被偵測出的物件變多了,一些比較小的物件如領帶或是遠景的行李箱與人都有被辨識出來。但也卻額外多了一些不存在或是被重複辨識的物件,如手提包與重複的人等,因次設定物件偵測的模型與門檻值也是要有一些技巧的,才能讓判讀的資訊更加完整而精確!
除了照片之外,當然也可以從影像串流進行物件偵測的推論。下載範例影像並且使用 ssd-inception-v2 進行推論。得到結果如下方顯示,仍然會有一些小物件是無法有效被偵測到的。
wget https://nvidia.box.com/shared/static/veuuimq6pwvd62p9fresqhrrmfqz0e2f.mp4 -O pedestrians.mp4
detectnet.py --network=ssd-inception-v2 --threshold=0.3 pedestrians.mp4 data/images/test/pedestrians_ssd.mp4
此外若想要從 webcam 即時推論可以執行以下指令,結果如何就留給各位去嘗試了!
detectnet.py --network=ssd-inception-v2 /dev/video0 images/test/output.mp4
稍微看一下推論程式 detectnet.py就如同前面 imagenet.py,大部分的呼叫都被包在 jetson_inference 與 jetson_utils 中,因此程式看起來相當精簡。主程式只要負責處理推論完的結果,看是要儲存到哪或是如何顯示資料等,也等同於說日後當我們模型準備好,套入此範例就能完成推論,開發者只要著重於如何處置推論完的結果或是做什麼樣的連動控制而已!
#!/usr/bin/env python3
#
# Copyright (c) 2020, NVIDIA CORPORATION. All rights reserved.
#

import sys
import argparse

from jetson_inference import detectNet
from jetson_utils import videoSource, videoOutput, logUsage

# parse the command line
parser = argparse.ArgumentParser(description="Locate objects in a live camera stream using an object detection DNN.",
                                 formatter_class=argparse.RawTextHelpFormatter,
                                 epilog=detectNet.Usage() + videoSource.Usage() + videoOutput.Usage() + logUsage())

parser.add_argument("input_URI", type=str, default="", nargs='?', help="URI of the input stream")
parser.add_argument("output_URI", type=str, default="", nargs='?', help="URI of the output stream")
parser.add_argument("--network", type=str, default="ssd-mobilenet-v2", help="pre-trained model to load (see below for options)")
parser.add_argument("--overlay", type=str, default="box,labels,conf", help="detection overlay flags (e.g. --overlay=box,labels,conf)\nvalid combinations are:  'box', 'labels', 'conf', 'none'")
parser.add_argument("--threshold", type=float, default=0.5, help="minimum detection threshold to use")

is_headless = ["--headless"] if sys.argv[0].find('console.py') != -1 else [""]

try:
	args = parser.parse_known_args()[0]
except:
	print("")
	parser.print_help()
	sys.exit(0)

# create video sources and outputs
input = videoSource(args.input_URI, argv=sys.argv)
output = videoOutput(args.output_URI, argv=sys.argv+is_headless)

# load the object detection network
net = detectNet(args.network, sys.argv, args.threshold)

# note: to hard-code the paths to load a model, the following API can be used:
#
# net = detectNet(model="model/ssd-mobilenet.onnx", labels="model/labels.txt",
#                 input_blob="input_0", output_cvg="scores", output_bbox="boxes",
#                 threshold=args.threshold)

# process frames until the user exits
while True:
	# capture the next image
	img = input.Capture()

	# detect objects in the image (with overlay)
	detections = net.Detect(img, overlay=args.overlay)

	# print the detections
	print("detected {:d} objects in image".format(len(detections)))

	for detection in detections:
		print(detection)

	# render the image
	output.Render(img)

	# update the title bar
	output.SetStatus("{:s} | Network {:.0f} FPS".format(args.network, net.GetNetworkFPS()))

	# print out performance info
	net.PrintProfilerTimes()

	# exit on input/output EOS
	if not input.IsStreaming() or not output.IsStreaming():
		break
從 Camera 抓取影像做即時的物件偵測,其結果非常有吸睛奪目的效果,即便能辨識的物件不及影像分類上千種類別這麼多,但也足夠在一般日常中實現應用。但若是想要辨識的物件並沒有在預設的 COCO dataset 中,就需要自行訓練物件偵測模型了!下一篇將會和各位一起實作物件偵測的模型訓練, don’t miss out!