vLLM是一個速度快、靈活又簡單好用的推理加速框架,主打使用PagedAttention管理kv cache,Model Parallelization的兩種方法 - tensor parallelism和pipeline parallelism都可以使用,除了可以與OpenAI API相容的API server架設方式,多種廠牌的GPUs都可以使用,還針對了CUDA kernels去做FlashAttention優化。 🔧💨
- ⚖️ 支援分散式推理 (distributed inference)
- 🗂️ 對 request 做 continuous batching
- 提供更大的吞吐量 > Day12
- 🧠 主打使用 PagedAttention 管理 kv cache
- 減少記憶體的浪費、提高處理效率 > Day13
- 🧩 多種 decoding algorithms 可以選擇
- 包含 parallel sampling, beam search 等等 > Day13
- 🔢 支援量化模型
- GPTQ, AWQ, INT4, INT8, and FP8 > Day16
- ⚡ Speculative decoding
- 預測推理,讓推理速度更加速 > Day18
- 🌐 OpenAI-Compatible Server
- 呼叫方法與 OpenAI 相同,可以簡單的部屬在現有應用框架上
- 可以支援部屬 HuggingFace 上的 local 模型
- 可以做 Streaming outputs
這串充滿專有名詞的介紹,剛開始看不知道有多神奇,但是在經過 Day10-Day19 的技術篇章一個一個介紹後,有沒有更懂這些名詞了呢XD

(圖源: 自製)
那就開始實作部分啦!!(o゜▽゜)⊃━☆゚.*・。
從官方文件可以看到它需要的Requirements:
OS: Linux
Python: 3.8 – 3.12
GPU: compute capability 7.0 or higher (請看 Day5 的整理,基本上不會低於7 XD)
由此可知,vLLM顯然是一個linux服務,那如果只有windows怎麼辦!?
答案是可以從Docker Desktop去安裝,還是可以用的!之後也會介紹它( •̀ ω •́ )✧
首先針對cuda 12.1以上,創一個conda環境pip install。
# (Recommended) Create a new conda environment.
conda create -n vllm_env python=3.10 -y
conda activate vllm_env

# Install vLLM with CUDA 12.1.
pip install vllm
vLLM提供兩種使用方式,而直接離線推理是最快的使用方式,因為比起架設API,少了呼叫API的網路傳輸時間。這邊是官方的範例,不過因為我們是使用meta-llama/Meta-Llama-3-8B-Instruct,所以要先做HF的登入。
from huggingface_hub import login
login(token='')
接下來即可開始在電腦中推理。
參數的部分sampling和inference各自還有很多可以使用,筆者將連結附在程式內。
from vllm import LLM, SamplingParams

prompts = [
    "Hello, my name is",
    "The president of the United States is",
    "The capital of France is",
    "The future of AI is",
]
# 可加上其他參數調整 https://docs.vllm.ai/en/latest/dev/sampling_params.html
sampling_params = SamplingParams(temperature=0.8, top_p=0.95)

#可加上其他參數調整 https://docs.vllm.ai/en/latest/dev/offline_inference/llm.html
llm = LLM(model="meta-llama/Meta-Llama-3-8B-Instruct")

outputs = llm.generate(prompts, sampling_params)

# Print the outputs.
for output in outputs:
    prompt = output.prompt
    generated_text = output.outputs[0].text
    print(f"Prompt: {prompt!r}, Generated text: {generated_text!r}")
結果如下:
上面也會寫出速度,input: 25.94 tokens/sec, output: 63.85 tokens/sec
可以明顯看出vLLM針對推理部分做了很多優化,不過也跟自身設備的算力有關。
最簡單好懂的方法就是架設一個API讓大家可以呼叫他,使用的是大家熟悉的OpenAI的API格式。預設情況下是在http://localhost:8000/,可以用--host和--port去做調整,--model也可以改成自己的路徑。
python -m vllm.entrypoints.openai.api_server \
    --model meta-llama/Meta-Llama-3-8B-Instruct \
    --port 8503 \
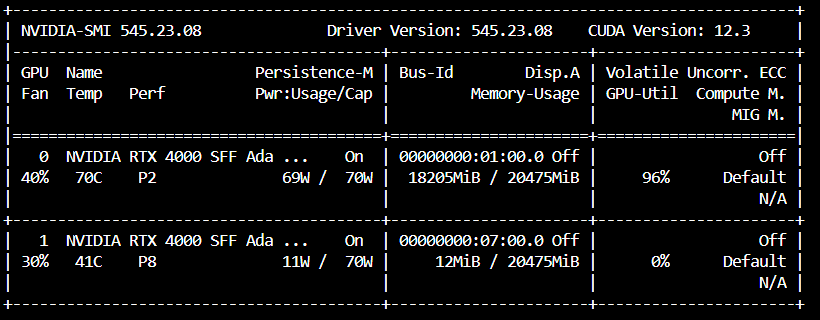
可以看到vLLM API如果沒有設定,一次只會跑在一個GPU上。

這時可能會想說,為什麼他會用到18GB的空間!?
不是說8B的模型用BF16載入大概只有16GB嗎? 🤔那是因為 --gpu-memory-utilization 預設是 0.9。
因為 20 * 0.9 = 18,也就是它預留了18GB記憶體給vllm使用,這個數字也能自行調整。
來源:官方文件 舊截圖 (請自行Ctrl+F 搜尋--gpu-memory-utilization)
2024/12補充:可惡vllm更新偷改掉網址了,介紹也變多了,今天發現就跟著改一下T_T
新版本的介紹多了這段:如果您有兩個vllm開在同一個GPU上,可以將每個vllm的GPU memory utilization設為0.5。
既然前面API server開好了,那就可以來call API玩囉!!相信有call過OpenAI API的讀者應該十分熟悉了。
stream=True和False各自有不同的方法:
import json
import requests
from openai import OpenAI


# Set OpenAI's API key and API base to use vLLM's API server.
openai_api_key = "EMPTY"
openai_api_base = "http://localhost:8503/v1"

client = OpenAI(
    api_key=openai_api_key,
    base_url=openai_api_base,
)

chat_response = client.chat.completions.create(
    model="meta-llama/Meta-Llama-3-8B-Instruct",
    messages=[
        {"role": "system", "content": "zh-tw. You are a helpful assistant."},
        {"role": "user", "content": "我好想吃蘋果派,哪裡有賣?"},
    ],
    top_p=0.9,
    temperature=0.1,
    stream=True #Stream
)

#Stream=True
for chunk in chat_response:
    if chunk.choices[0].delta.content:  # 確保content不是None
        print(chunk.choices[0].delta.content, end='', flush=True)

#Stream=False
#print(chat_response.choices[0].message.content)
快速生成結果,llama-3中英夾雜的回答非常有趣XD
如果想要體驗對話的感覺,可以用這段:
import json
import requests
from openai import OpenAI

# Set OpenAI's API key and API base to use vLLM's API server.
openai_api_key = "EMPTY"
openai_api_base = "http://localhost:8503/v1"

client = OpenAI(
    api_key=openai_api_key,
    base_url=openai_api_base,
)

# Initialize conversation
messages = [
    {"role": "system", "content": "zh-tw. You are a helpful assistant."}
]

while True:
    query = input("Please enter your question: ")

    if query == "q":
        break

    # Add user's message to conversation history
    messages.append({"role": "user", "content": query})

    # Send stream request
    chat_response = client.chat.completions.create(
        model="meta-llama/Meta-Llama-3-8B-Instruct",
        messages=messages,
        top_p=0.9,
        temperature=0.1,
        stream=True
    )

    # Initialize the content of Assistant response
    assistant_response = ""

    # Handle streaming responses
    print("Assistant: ", end='', flush=True)
    for chunk in chat_response:
        if chunk.choices[0].delta.content:  # Make sure content is not None
            print(chunk.choices[0].delta.content, end='', flush=True)
            assistant_response += chunk.choices[0].delta.content
    print()

    # Add Assistant's response to conversation history
    messages.append({"role": "assistant", "content": assistant_response})
效果:
雖然筆者喜歡生成表情符號,但一般對話的速度體感超快也是非常舒服。
這章簡單的介紹了vLLM這個推理加速框架,涵蓋了從安裝 🛠️、離線推理 🧪、架設與OpenAI相容的API 🌐,到呼叫API的方法 📡。透過這些步驟,已經可以掌握如何將vLLM應用到不同的場景,並且了解它如何與現有的應用框架無縫整合,提高推理的速度與效率 🚀。
原本想全部塞一天,但程式碼和圖片放太多看起來非常冗長 📜,因此明天來講Model Parallelization與Speculative decoding的設定方式,以及其他參數的進階用法,讓你的系統更上一層樓! 📈🔥!
