在昨天的文章中,我們完成了一個繪圖工具 painter,已經完成渲染的步驟,今天,我們將把演算法的細節補足:
export default function createAlgorithm(){
    //......
	const painter = new createPainter();
    this.transitionRadian = 0;
    this.trasitionOmega = Math.PI / 10000;
	this.update = (ctx, width, height) => {
		this.transitionRadian += this.trasitionOmega * this.speed;
		this.motion(width, height);
		this.addTexture(width, height, ctx);
	}
    this.render = () => {
		clear(ctx);
		ctx.save();
		ctx.translate(ctx.canvas.width * offset, 0);
		painter.render();
		ctx.restore();
    }
    return this;
}
藉由 addTask 繪圖管理方法,我們就可以輕鬆完成紋理的演算法,完整程式碼如下:
this.addTexture = (width, height, ctx) => {
    this.data.forEach((point) => {
        const x = point.x;
        const y = point.y;
        const ex = x / width;
        const ey = y / height;
        const dx = this.equation1(ex, ey) * width;
        const dy = this.equation2(ex, ey) * height;

        const x2 = x + this.dlength * dx;
        const y2 = y + this.dlength * dy;

        const blue = Math.abs( y / width * 255 );
        const green = Math.abs( x / width * 255 );
        const red = Math.abs( Math.sin(this.transitionRadian) * 255 );
        const color = `rgb(${red}, ${green}, ${blue})`;

        const mypoint = { name: "point", size: 2, ctx, x, y, color };
        const myline = { name: "line", size: 2, ctx, x, y, color, x2, y2 };
        painter.addTask(0, myline, mypoint);
    });
}
還記得前天介紹這個方程式的時候,我們計算出了 dx 和 dy,此時將其等比例放大,可以方便我們看清楚這條切線::
const x2 = x + this.dlength * dx;
const y2 = y + this.dlength * dy;
顏色方面,讓藍綠色通道隨座標變化產生漸層效果,而紅色通道隨週期變化,營造出動態視覺:
const blue = Math.abs( y / width * 255 );
const green = Math.abs( x / width * 255 );
const red = Math.abs( Math.sin(this.transitionRadian) * 255 );
最後,我們填充資料格式,提供畫筆繪圖的依據:
const mypoint = { name: "point", size: 2, ctx, x, y, color };
const myline = { name: "line", size: 2, ctx, x, y, color, x2, y2 };
painter.addTask(0, myline, mypoint);
這個選題是我非常喜歡的一個,前天我們操作動畫的時候,是直接設定週期、並讓圖形旋轉變換,現在還要加入引力效果,不會互相衝突嗎?這問題非常有趣,我們不仿換個角度想:圖形變換和旋轉的依據是什麼?
this.motion = (width, height) => {
    this.data.forEach((point) => {
        const rad = this.transitionRadian;
        const period1 = Math.cos(rad);
        const period2 = Math.sin(rad);

        const angular1 = point.d * period1 * 0.1;
        const angular2 = point.d * period2 * 0.1;

        point.r+= Math.PI / 1000;

        point.x = width / 2 + point.d * Math.cos(point.r + angular1);
        point.y = height / 2 + point.d * Math.sin(point.r + angular2);
    })
}
答案是極座標系的角度和距離
這段程式碼通過極座標來計算粒子的位置,我們可以設法將引力效果與旋轉變換區別開來,避免互相衝突。
現在,想像這些粒子像電子一樣,在虛擬磁場中運動。這個影響是由初始值 r 和 d 決定的,不會輕易改變。
const point = {
    "d": Math.sqrt(Math.random()) * width / 2, // distance
    "r": Math.random() * 2 * Math.PI, // radian
};
因此我們會得到一個跟磁場有關的虛擬座標:
point.fakeX = width / 2 + point.d * Math.cos(point.r);
point.fakeY = height / 2 + point.d * Math.sin(point.r);
當磁場發生改變時,我們需要對粒子座標進行修正,而非直接更新:
this.motion = (width, height) => {
    // 1.旋轉
    this.data.forEach((point) => {
        //......
        const newX = width / 2 + point.d * Math.cos(point.r + angular1);
        const newY = height / 2 + point.d * Math.sin(point.r + angular2);

        point.x += newX - point.fakeX;
        point.y += newY - point.fakeY;

        point.fakeX = newX;
        point.fakeY = newY;
    });
    // 2.引力
}
這樣我們就得到一個疊加的座標系,正常運行下,就和原本的動畫相同。但我們可以嘗試把起始座標統一設置為中心點,這會有很魔幻的效果,像波一樣。
point.fakeX = width / 2;
point.fakeY = height / 2;
因為太魔幻了,我不知道如何形容,所以,看影片吧!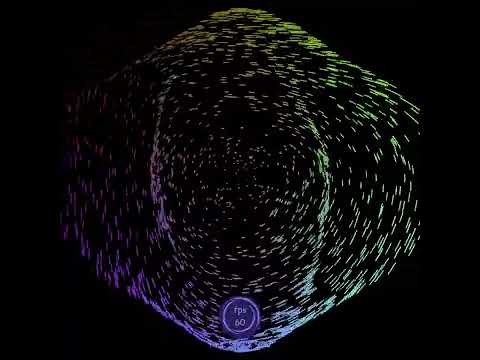
我們現在可以回過頭來設計引力效果了,引力大小和粒子在空間中的相對位置、距離有關,我有準備一個基本的模型,但直接實現有一定的挑戰。
範本程式碼展示了完整的引力計算,但它的時間複雜度是 O(n²),這意味著對於 2000 個粒子而言,我們需要計算 2000² / 2 次,這對於動畫來說會對效能造成很大的負擔,不適合我們做動畫。
範本程式碼如下:
for (let i = 0; i < this.data.length; i++) {
    const p1 = this.data[i];
    let vx = 0, vy = 0;
    for (let j = i + 1; j < this.data.length; j++) {
        const p2 = this.data[j];
        const d = getDistance(p1.x, p1.y, p2.x, p2.y);
        const MAXD = 10;
        if(d < MAXD){
            let force;
            if((d) < MAXD * 0.1) force = -1;
            if((d) < MAXD * 0.55) force = 1 * ((d)- MAXD * 0.1) / (MAXD * 0.45);
            if((d) < MAXD) force = 1 * (MAXD - (d)) / (MAXD * 0.45);
            const directionX = (p2.x > p1.x) ? 1 : -1;
            const directionY = (p2.y > p1.y) ? 1 : -1;
            vx+= directionX * force;
            p2.vx[0]-= directionX * force;
            vy+= directionY * force;
            p2.vy[0]-= directionY * force;
        }
    }
    p1.x+= caluVelocity(p1.vx);
    p1.y+= caluVelocity(p1.vy);

    const GRAVITY = 10;

    vx+= (width*0.5 + 50 > p1.x) ? 1 : -1 * GRAVITY;
    vx-= (width*0.5 - 50 < p1.x) ? 1 : -1 * GRAVITY;
    vy+= (height/2 + 50 > p1.y) ? 1 : -1 * GRAVITY;
    vy-= (height/2 - 50 < p1.y) ? 1 : -1 * GRAVITY;

    addVelocity(p1.vx, vx);
    addVelocity(p1.vy, vy);
}
接下來,我們將實作一個只包含重力的基礎版本。首先,在初始化時,我們將所有粒子的速度設為 0,並通過緩衝陣列來控制速度變化的平滑性。
const point = {
    "vx": new Array(60).fill(0),
    "vy": new Array(60).fill(0),
    //......
};
這裡,我們使用一個長度為 60 的陣列來保存每個粒子的速度數據,這樣可以避免速度變化過於劇烈,並保持動畫的連貫性。
每當速度變化時,我們將新速度插入陣列的開頭,並移除尾端的舊數據,以此保持速度緩慢改變。計算速度時,我們會取這些速度值的平均數:
function addVelocity(arr, v){
    arr.unshift(v); // 在開頭插入 v
    arr.pop(); // 刪除尾端元素
}
function caluVelocity(arr){
	const avg = arr.reduce((sum, value) => sum + value, 0) / arr.length;
	return avg;
}
這樣的方式讓速度變化平滑且自然,使粒子的運動更加流暢。想像它是一顆行星,我們還設計了一個反直覺的重力模型:離中心越遠的粒子,受到的吸引力越強。而在中心區域則設置一個閥值,在範圍內不受引力影響。
this.motion = (width, height) => {
    // 1.旋轉
    this.data.forEach((point) => {
        //......
    });
    // 2.引力
    this.data.forEach((point) => {
		point.x+= caluVelocity(point.vx);
		point.y+= caluVelocity(point.vy);
		let vx = 0, vy = 0;
		const GRAVITY = 10;
		const GAP = 50;
		vx+= (width * 0.5 + GAP > point.x) ? 1 : -1 * GRAVITY;
		vx-= (width * 0.5 - GAP < point.x) ? 1 : -1 * GRAVITY;
		vy+= (height * 0.5 + GAP > point.y) ? 1 : -1 * GRAVITY;
		vy-= (height * 0.5 - GAP < point.y) ? 1 : -1 * GRAVITY;
		addVelocity(point.vx, vx);
		addVelocity(point.vy, vy);
    });
}
這樣一來,整個引力效果就能夠自然地與粒子運動結合,並且對效能十分友好。此版本不僅運行流暢,也能表現出複雜的引力互動效果。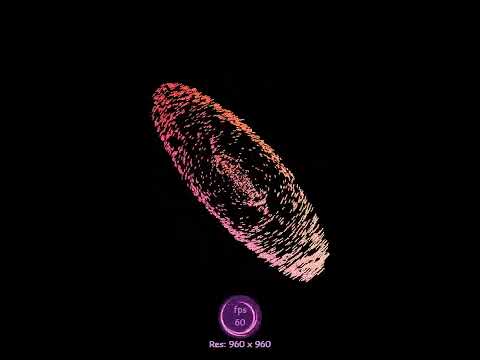
透過這篇文章,我們展示了掠食者獵物方程作為基底紋理的潛力,並嘗試在單純的動畫中,添加粒子系統和引力計算。當中,我們實作全套的引力模型,嘗試在計算效能與物理真實性之間取得平衡。最終,我們選擇了一種基於緩衝的重力實作方法,確保動畫的流暢運行,同時保留了引力效果的核心概念。