在先前關於 Google Agent 白皮書的探討中,我們觸及了一個核心觀點:一個大型語言模型(LLM)之所以能被稱為「Agent」(代理人),其關鍵區別在於它是否具備 調用「工具」(Tool)的能力。
一個純粹的 LLM,無論多麼強大,它的知識都被凍結在訓練數據的截止日期。它像一個博學的歷史學家,能告訴你過去的一切,卻無法告訴你「今天」的天氣。而 Agent 則不同,它能透過使用工具,主動與外部世界互動、獲取即時資訊、執行特定任務,從而打破數據的牢籠,真正地介入並影響真實世界。
這篇文章將帶你踏上一段從微觀到宏觀的旅程。我們將從一個最簡單的程式碼範例出發,讓你徹底理解「工具」的本質,並最終你會發現,無論是 OpenAI 的 Function Calling,還是複雜的 MCP(Model Context Protocol)、A2A(Agent-to-Agent)協議,其背後的思想都是驚人地統一。
讓我們忘掉所有複雜的術語,回到最根本的問題:如何讓 LLM 使用我們提供的能力?答案就是描述。
所謂的「工具」,在本質上就是一個我們希望 LLM 在需要時能夠「請求調用」的函式(Function)。為了讓 LLM 理解這個工具,我們需要用它能懂的語言(通常是 JSON 格式)來描述它。
const tools = [
  {
    type: "function",
    name: "get_weather",
    description: "Get the current weather for a city.",
    parameters: {
      type: "object",
      properties: {
        city: { type: "string", description: "City name, e.g., Taipei" },
        unit: { type: "string", enum: ["c", "f"], default: "c" }
      },
      required: ["city"],
      additionalProperties: false
    }
  }
];
這份描述包含兩個核心部分:
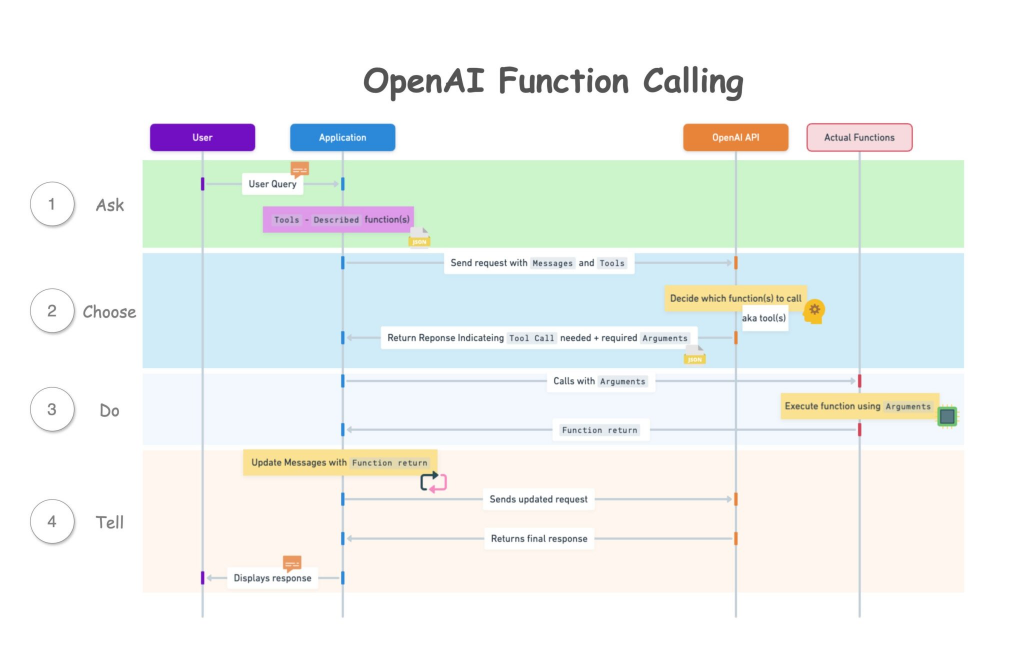
想像一下,當用戶問「東京今天天氣如何?」,整個流程如下圖所示:
get_current_weather 工具描述,一起發送給 OpenAI API。get_current_weather 這個工具非常適合回答這個問題,並且從問題中提取出必要的參數 location 是「東京」。get_current_weather(location='Tokyo') 這個函式。這個函式可能會去呼叫一個真實的氣象 API,並得到結果,例如 {"temperature": "15", "condition": "晴天"}。看到這裡,你應該明白了,「工具」一點也不神秘。它就是一個「LLM 負責決策,客戶端負責執行」的協作模式。我們為 LLM 提供了能力的「說明書」,它在需要時告訴我們該用哪個能力以及如何用,我們執行後再把結果回饋給它。這是所有後續玩法(ReAct、MCP、A2A)的共同骨架。
現在,我們把難度稍微提高一點。如果用戶的問題更複雜,需要多個步驟才能解決呢?例如:「東京今天天氣如何?我應該怎麼穿搭?」
這就需要一個最基礎的 ReAct (Reason + Act) 流程。LLM 會像人一樣思考,一步步地分解問題,並重複調用工具來搜集資訊,直到它認為資訊足夠為止。
整個流程會是這樣:
get_current_weather 工具。// 步驟 1: 定義我們擁有的所有工具函式
async function get_weather({ city, unit = "c" }) {
console.log(`[Tool Executed]: get_weather(city: "${city}")`);
return JSON.stringify({ city, unit, temp: 15, condition: "sunny" }); // 模擬東京的天氣
}
// 新增的工具:根據溫度提供穿搭建議
async function get_fashion_advice({ temp }) {
console.log(`[Tool Executed]: get_fashion_advice(temp: ${temp})`);
if (temp > 25) {
return JSON.stringify({ advice: "天氣很熱,建議穿 T-shirt 和短褲。" });
} else if (temp > 15) {
return JSON.stringify({ advice: "天氣有點涼,建議穿長袖上衣和一件薄外套。" });
} else {
return JSON.stringify({ advice: "天氣冷,建議穿毛衣和保暖外套。" });
}
}
// 步驟 2: 讓 LLM "看得懂" 我們的工具說明書
const tools = [
{
type: "function",
function: {
name: "get_weather",
description: "取得指定城市的即時天氣",
parameters: {
type: "object",
properties: {
city: {
type: "string",
description: "城市名稱,例如:台北",
},
},
required: ["city"],
},
},
},
{
type: "function",
function: {
name: "get_fashion_advice",
description: "根據溫度提供穿搭建議",
parameters: {
type: "object",
properties: {
temp: {
type: "number",
description: "溫度數值",
},
},
required: ["temp"],
},
},
},
];
// 步驟 3: 建立一個工具名稱到函式的映射,方便後續呼叫
const toolMap = {
get_weather,
get_fashion_advice, // 將新工具加入 map
};
// 核心 ReAct 循環
async function ask(question) {
console.log(`User: ${question}\n`);
// 第一次請求,送出問題和工具列表
let res = await client.chat.completions.create({
model: "gpt-4o-mini",
messages: [{ role: "user", content: question }],
tools: tools,
tool_choice: "auto",
});
let message = res.choices[0].message;
const messages = [{ role: "user", content: question }, message];
// 只要 LLM 回應的是工具調用,就繼續循環
while (message.tool_calls) {
console.log("LLM wants to call tools:", message.tool_calls.map(c => `${c.function.name}(${c.function.arguments})`).join(", "));
const toolOutputs = [];
for (const toolCall of message.tool_calls) {
const fn = toolMap[toolCall.function.name];
const args = JSON.parse(toolCall.function.arguments);
const result = await fn(args);
console.log(`[Tool Output for ${toolCall.function.name}]: ${result}`);
toolOutputs.push({
tool_call_id: toolCall.id,
role: "tool",
name: toolCall.function.name,
content: result,
});
}
// 將工具的執行結果加到對話歷史中
messages.push(...toolOutputs);
// 帶著新的資訊 (工具產出) 再次請求 LLM
res = await client.chat.completions.create({
model: "gpt-4o-mini",
messages: messages,
tools: tools,
tool_choice: "auto",
});
message = res.choices[0].message;
messages.push(message);
}
// 當 LLM 不再回傳工具調用時,代表它已準備好最終答案
console.log(`\nLLM (Final Answer): ${message.content}`);
}
// 執行
ask("東京今天天氣如何?我應該怎麼穿搭?");
這個重複「思考 -> 調用工具 -> 觀察結果」的循環,就是 ReAct 模式的核心。
LLM 透過一次或多次的工具調用,不斷地豐富自己的上下文,最終在掌握了足夠的資訊後,給出一個全面且準確的答覆。
當你理解了上述的 ReAct 流程後,我們就可以把格局放得更大。現在,讓我們來看看那些看似複雜的架構圖。
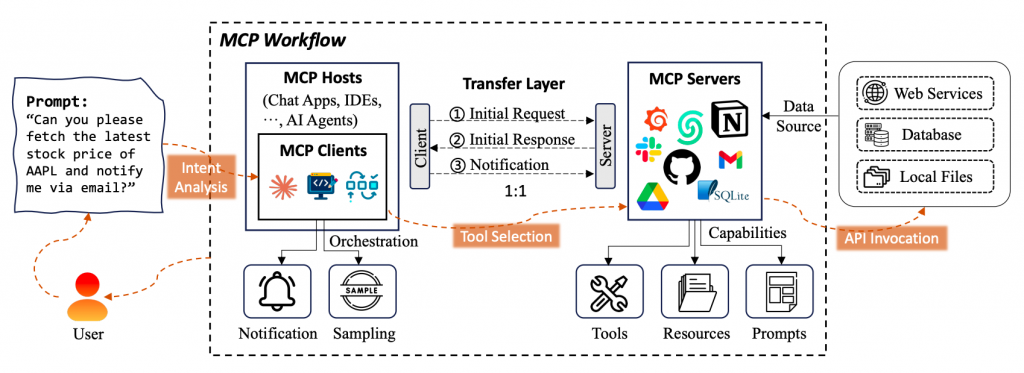
在這張 MCP 工作流圖中,我們可以看到用戶提出請求「幫我查詢 AAPL 的最新股價並用 email 通知我」。
這張圖看起來複雜,但讓我們用「工具」的視角來重新解讀它:
get_stock_price, send_email),都只是一個個可以被描述和調用的「工具」而已。看到了嗎?MCP 只是將我們前面單一的 Function Calling 流程,進行了規模化和標準化。它定義了一套通訊協定,讓 LLM (Model) 和執行端 (Client) 能夠更高效、更穩定地協作。但其核心思想從未改變:
LLM 依然是決策者,它眼中看到的所有外部服務,都只是一個個待選的「工具」。
現在,我們把視角拉到最高層級:Agent 之間的協作。
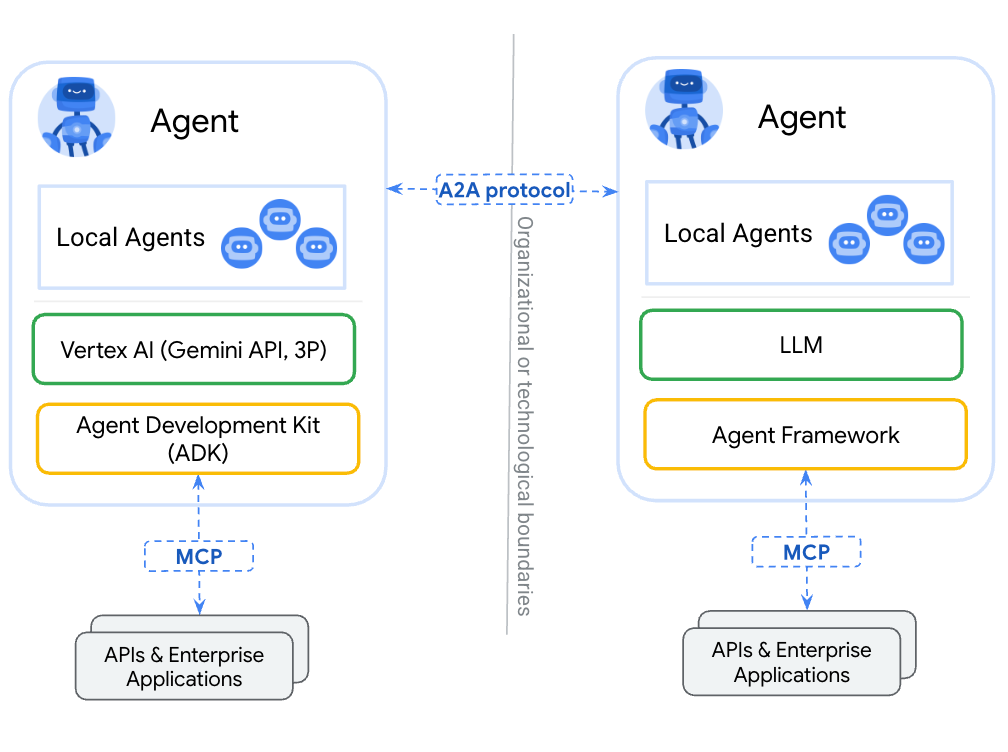
當一個 Agent 需要另一個 Agent 幫忙時,會發生什麼?其實還是一樣的道理!
例如:一個「旅遊規劃 Agent」需要訂機票,但它自己沒有這個功能。但它知道有一個「票務預訂 Agent」。對「旅遊規劃 Agent」的 LLM 來說,「票務預訂 Agent」就是一個巨大的工具,這個工具的函式簽名可能是 book_flight(origin, destination, date)。
整個流程依然是:決策 -> 請求調用 -> 執行 -> 返回結果。
從一個簡單的 get_current_weather 函式,到一個處理多步驟任務的 ReAct 流程,再到更宏觀的 MCP 和 A2A 架構,我們發現其背後的邏輯竟然是如此統一。
核心的鑰匙,就是將一切外部功能、服務、乃至其他 Agent,都抽象為 LLM 眼中的「工具」。
一旦你掌握了這個視角,你就會有一種豁然開朗的感覺。因為你找到了一個可以舉一反三的思考框架:
這就是 LLM Agent 的力量所在,也是未來智慧應用開發的核心範式。希望這篇文章,能幫助我們牢牢掌握這把開啟未來的鑰匙。
References: