
主張:graph 好用是因為節點間資料流動有規矩;規矩之外還有一整套「乾脆放棄畫圖、直接寫程式碼」的路,叫 Dynamic Workflows。
讀完能做到:分清楚output/message/state三個參數各自的用途,並在 graph 撐不住複雜迴圈時改用 dynamic workflow 且拿到自動 checkpoint 的好處。
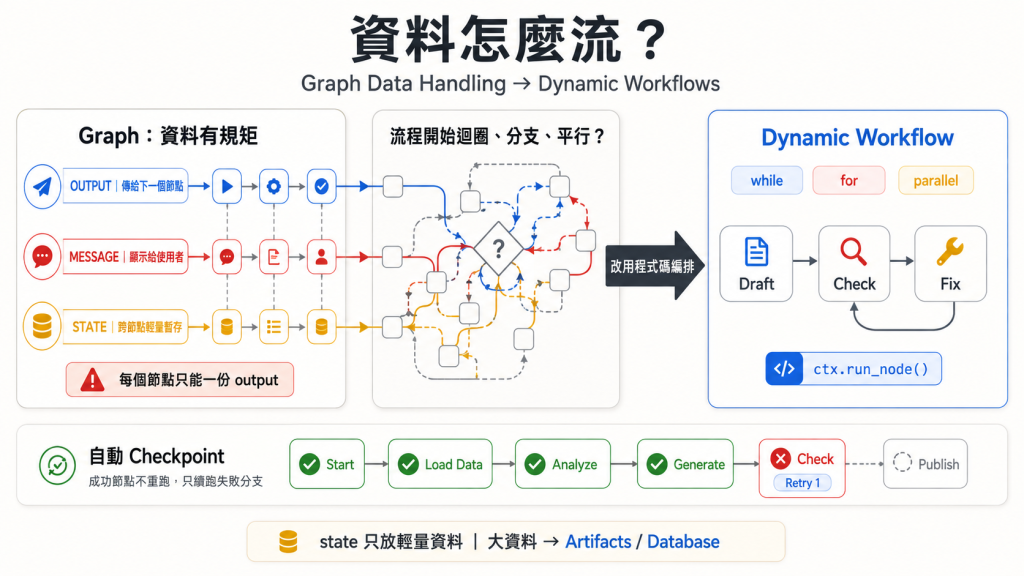
昨天Day13 畫完圖,你可能會問:節點之間傳來傳去的資料,到底是怎麼一回事?為什麼有時候要用 return,有時候要用 yield?state 跟 output 又差在哪?今天把這塊講清楚,講完之後帶你認識 graph 的另一個選擇——當流程複雜到畫不出一張乾淨的圖時,直接用程式碼寫。
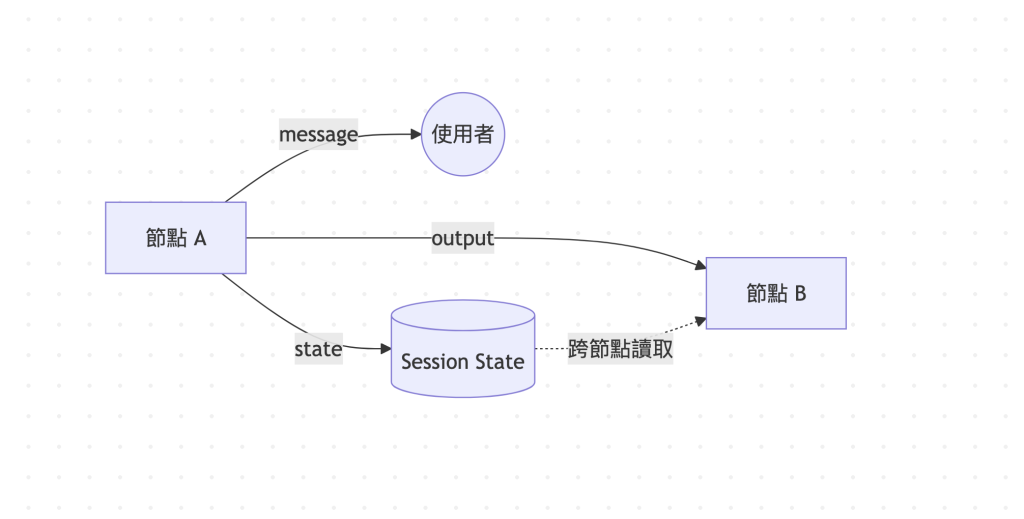
在 graph 裡,節點之間透過 Event 傳資料,不是靠共享變數。Python 端有三個參數,各自負責不同的事:
output:傳給下一個節點的資料message:要顯示給使用者的回應state:透過 Event 自動跨節點持久化的資料,整個 session 有效畫成圖大概是這樣——同一個 Event 同時身兼三個角色,分別流向三個不同的地方:
from google.adk import Event

def my_function_node(node_input: str):
    output_value = node_input.upper()
    return Event(output=output_value) # "THE RESULT"
return 用在不需要額外處理的單一輸出;需要分批處理或多次輸出時改用 yield。這裡有一個容易忽略、但一寫錯就會直接 runtime error 的限制:一個節點每次執行只能發出一份 Event.output。你可以用多個 yield 做別的事(例如發多個 message 通知使用者「正在處理中」),但只要有兩個以上帶 output 的 yield,系統就會直接報錯——這是設計上刻意的限制,逼你把「一個節點只做一件事、產出一個結果」的原則落實到程式碼上。
如果只是想讓使用者知道「流程正在跑」,不想把這句話當成傳給下一個節點的資料,用 message:
async def user_message(node_input: str):
  """Tell user research process is starting."""
  yield Event(message="Beginning research process...")
state 是跨節點自動持久化的資料,key 可以加前綴決定生命週期:
| 前綴 | 作用域 |
|---|---|
app: |
整個 app 的所有使用者與 session 共享 |
user: |
綁定使用者,跨他的所有 session |
temp: |
本次 invocation 結束後丟棄 |
| (無前綴) | 存活於該 session 的生命週期 |
下面兩個函式用到的 Content 型別沒有 import(官方原文的程式碼範例本身就漏了這行,不是本文轉錄時漏的),它來自 google.genai.types。
async def init_state_node(attempts: int = 0):
  yield Event(
      state={
          "attempts": attempts,
      },
  )

async def task_attempt_node(node_input: Content, attempts: int):
  yield Event(
      state={
          "attempts": attempts + 1,
      },
  )

async def read_state_node(ctx: Context):
  print(f"attempts state: {ctx.state}") # attempts state: attempts: 1

root_agent = Workflow(
    name="root_agent",
    edges=[("START", init_state_node, task_attempt_node, read_state_node)],
)
補上 read_state_node 與組裝成 root_agent 的收尾後,才看得到 state 真的跨節點持久化——read_state_node 印出的 attempts state: attempts: 1,證明 task_attempt_node 寫入的值確實被下一個節點讀到。
⚠️ state 不是拿來放大東西的。文件用兩次獨立的 caution 強調這件事:大檔案、二進位資料、長篇文字,一律走 Artifacts 或資料庫工具,不要塞進 state。這條規則在後面的 Live API、Memory 相關主題還會再遇到——state 的定位始終是「輕量的 key-value 暫存區」,不是資料庫。
input_schema / output_schema 接一個繼承 BaseModel 的類別,可以同時約束任何 agent 節點接受與產出的資料格式:
from google.adk import Agent
from pydantic import BaseModel

class FlightSearchInput(BaseModel):
    origin: str
    destination: str
    departure_date: date
    passengers: int = 1

class FlightSearchOutput(BaseModel):
    flights: list[Flight]
    cheapest_price: float

flight_searcher = Agent(
    name="flight_searcher",
    instruction="Search for available flights.",
    input_schema=FlightSearchInput,
    output_schema=FlightSearchOutput,
    tools=[search_flights_api],
    mode="single_turn",
    ...
)
在下游 agent 的 instruction 裡取用結構化資料,有兩種語法:{CityTime.time_info} 依 schema 類別取欄位;<CityTime.city from lookup_time_function> 則額外限定資料的來源節點,語意更嚴謹,適合同一個 schema 被多個節點產出時避免混淆。完整範例長這樣:
class CityTime(BaseModel):
    time_info: str  # time information
    city: str       # city name

def lookup_time_function(city: str):
    """Simulate returning the current time in the specified city."""
    return Event(output=CityTime(time_info='10:10 AM', city=city))

city_report_agent = Agent(
    name="city_report_agent",
    model="gemini-flash-latest",
    input_schema=CityTime,

    # data selection based on class and parameter
    # instruction="""
    #     Return a sentence in the following format:
    #     It is {CityTime.time_info} in {CityTime.city} right now.
    # """,

    # more restrictive data selection based on source node name
    instruction="""
        Return a sentence in the following format:
        It is <CityTime.time_info from lookup_time_function> in
        <CityTime.city from lookup_time_function> right now.
    """,
)

root_agent = Workflow(
    name="root_agent",
    edges=[
        (START, city_generator_agent, lookup_time_function, city_report_agent)
    ],
)
官方範例把 {} 語法那段直接寫成註解,只留 <> 語法生效——這正好對照出兩種寫法可以並存,選一種留著就好。
Graph 適合「靜態、結構清楚」的流程。但當你的邏輯需要迭代迴圈或複雜分支——例如「反覆修正程式碼直到 lint 通過」這種次數不固定的迴圈——用一張靜態的圖去表達,不是畫不出來就是變得很難維護,官方也明白建議這種情況改走別的路。
Dynamic workflows 讓你直接用程式語言原生的控制結構(while、for、遞迴)寫編排邏輯,同時保留三個關鍵好處:
最簡單的 dynamic workflow,是用 @node 裝飾器包一個函式,再用一個 rerun_on_resume=True 的 orchestrator 呼叫它:
from google.adk import Context
from google.adk import Workflow
from google.adk.workflow import node
from typing import Any

@node(name="hello_node")
def my_node(node_input: Any):
    return "Hello World"

@node(rerun_on_resume=True)
async def my_workflow(ctx: Context, node_input: str) -> str:
    result = await ctx.run_node(my_node, node_input="hello")
    return result

root_agent = Workflow(
    name="root_agent",
    edges=[("START", my_workflow)],
)
ctx.run_node() 是這裡的核心:呼叫一個節點,拿到它的輸出,像呼叫函式一樣自然。重要提醒:呼叫 ctx.run_node 的 parent 節點必須設定 rerun_on_resume=True,才能正確處理中斷後的恢復——這是因為 orchestrator 的邏輯要在恢復時重新從頭跑一次,才能透過 checkpointing 機制把已完成的子節點結果重新接上。
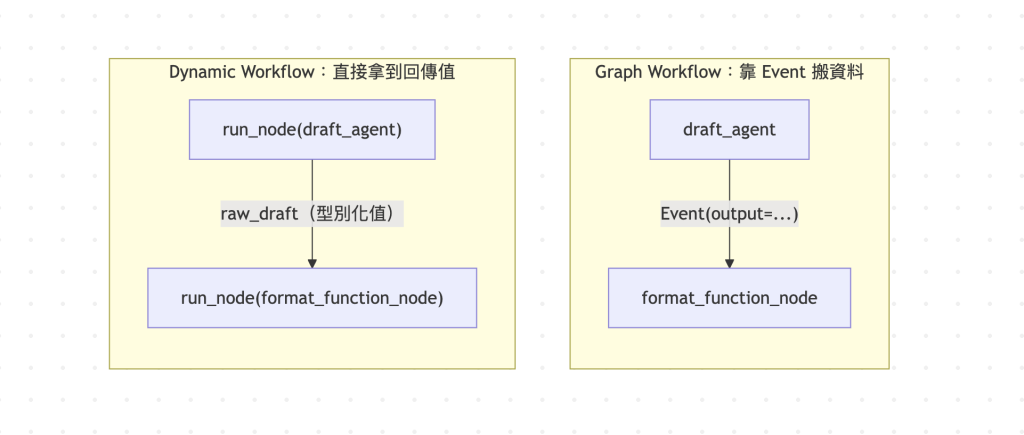
跟 graph 比起來,dynamic workflow 的資料傳遞更直觀:ctx.run_node() 直接回傳子節點的輸出型別化值,不需要手動讀寫 session state 或建構 Event。兩種編排方式的資料流對照如下:
from google.adk import Context
from google.adk.workflow import node

@node(rerun_on_resume=True)
async def editorial_workflow(ctx: Context, user_request: str):
    raw_draft = await ctx.run_node(draft_agent, user_request)
    formatted_text = await ctx.run_node(format_function_node, raw_draft)
    return formatted_text
Sequence:在 orchestrator 裡依序呼叫 ctx.run_node,每個呼叫都 await 前一個完成後才開始下一個——一個 agent 產生城市名稱、一個 function node 查詢時間、再一個 agent 寫報告:
@node # workflow node
async def city_workflow(ctx: Context):
    city = await ctx.run_node(city_generator_agent)
    city_time = await ctx.run_node(city_time_function, city)
    report_text = await ctx.run_node(city_report_agent, city_time)

    return report_text
Loop:官方給了一個很實際的例子——寫程式碼、跑 lint 檢查、有問題就修正、再檢查一次,直到沒有 findings 為止:
@node
async def code_workflow(ctx: Context, user_request: str):
  code = await ctx.run_node(coder_agent, user_request)
  check_resp = await ctx.run_node(compile_lint_check, code)

  while check_resp.findings:
    yield Event(state={"code": code, "findings": check_resp.findings})
    code = await ctx.run_node(fixer_agent, {"code": code, "findings": check_resp.findings})
    check_resp = await ctx.run_node(compile_lint_check, code)

  yield Event(output=code)
收尾用 yield Event(output=code),不是單純 return code——函式裡只要出現過 yield,整個函式在 Python 眼裡就是 async generator,而 async generator 不允許帶值的 return。這個寫法剛好也呼應前面「一個節點只能有一個帶 output 的 yield」的規則,兩全其美。
這段迴圈用一般的 while 寫,如果改用 graph 的靜態邊表達同樣的邏輯,會需要一條反向邊加上路由條件,可讀性明顯差一截——這正是官方建議「迭代邏輯改用 dynamic workflow」的具體理由。
Parallel:Python 端用 asyncio.gather 平行跑多個子節點:
import asyncio
from typing import Any
from google.adk import Context
from google.adk.workflow import BaseNode, node

@node(rerun_on_resume=True)
async def parallel_supervisor(
    ctx: Context, node_input: list[Any], real_node: BaseNode
):
    tasks = []
    for item in node_input:
        tasks.append(ctx.run_node(real_node, item))
    results = await asyncio.gather(*tasks)
    return results
有個很貼心的細節值得記住:即使是平行跑的 worker 節點,workflow 恢復執行時,框架也只會重跑失敗或被中斷的那幾個 worker,已經成功的分支不會被重複執行。
Dynamic workflow 一樣能加入人類輸入節點,用 yield RequestInput(...) 暫停流程等待回覆——這部分留到 Day 15 深入講,因為它跟 graph 的 HITL 節點是同一套底層機制、不同的包裝方式。
另一個進階但容易踩雷的功能是自訂 execution ID。ADK 預設用父節點 ID 加計數器,自動產生確定性的子節點執行 ID,用於 checkpointing 與重跑排序。你幾乎不該自己指定——因為 execution ID 同時也決定了節點的執行順序,自訂 ID 可能讓系統在重跑那些節點時出問題。
唯一合理的例外是處理可重新排序的清單(例如批次處理一堆訂單,訂單本身有天生穩定的 ID)。這種情境下,自訂的 run_id 必須包含至少一個非數字字元,避免跟自動產生的循序整數 ID(從 "1" 開始)衝突。
今天把 graph 與 dynamic workflow 的資料流都攤開講完了,但兩者都還沒碰到一個現實問題:當流程需要在某個節點暫停、等一個活生生的人做決定或核准時,該怎麼設計?Day 15 把兩套 HITL 機制——graph 的 RequestInput 節點與 LLM agent 層的 tool confirmation——一次講清楚,並指出它們常被搞混的地方。
Google ADK 官方網站
GitHub - Agent Development Kit (ADK) 2.0
GitHub 開源實作:https://github.com/SeanLinH/adk_tutor



 iThome鐵人賽
 看影片追技術