
主張:ADK 裡有兩套完全不同的「等人類回覆」機制,混著講會讓讀者兩套都學不會。
讀完能做到:分辨 graph 的RequestInput節點跟 LLM agent 的 tool confirmation 該用在什麼場景,並知道response_schema不會自動幫你把回覆整形。
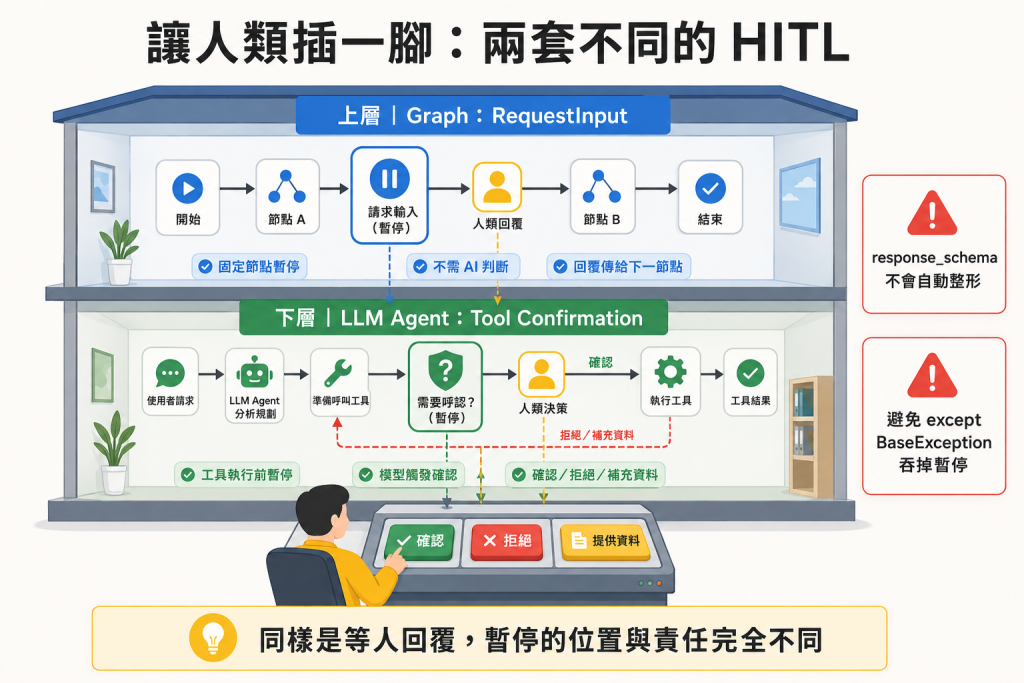
圖說:一棟兩層樓的示意圖——上層是 Graph 的
RequestInput(固定節點暫停、不需 AI 判斷、回覆直接傳給下一節點),下層是 LLM Agent 的 Tool Confirmation(工具執行前暫停、由模型觸發、人類可確認/拒絕/補充資料)。同樣是等人回覆,暫停的位置與責任完全不同。
上一篇提到 dynamic workflow 也能做人類輸入節點,這不是巧合——ADK 的 human-in-the-loop(HITL)其實有兩套獨立的機制,很多人會把它們當成同一件事講,但用途、實作層級、限制都不一樣:
RequestInput 節點:在流程圖層級暫停,不需要任何 AI 模型參與判斷要不要問。今天把兩套分開講清楚。
在 graph 或 dynamic workflow 裡,你可以用 RequestInput 類別搭配一段文字提示,建一個純粹等人類輸入的節點——這個節點完全不需要 AI 模型,單純暫停執行、等回覆、把回覆傳給下一個節點:
from google.adk.events import RequestInput
from google.adk import Workflow

def step1(): # Human input step
  yield RequestInput(message="Enter a number:")

def step2(node_input):
  return node_input * 2

root_agent = Workflow(
    name="root_agent",
    edges=[('START', step1, step2)],
)
step1 會暫停整個 agent 的執行,直到系統收到使用者輸入;收到之後,那個輸入值就變成 step2 的 node_input。因為這個節點不靠模型判斷「要不要問」,行為比讓 LLM 自己臨場決定「我要不要跟使用者確認一下」要可預測得多。支援語言:Python v2.0.0 / Go v2.0.0。
graph 與 dynamic workflow 是 Day 13、14 介紹過的編排方式:用一組節點函式與 edges 參數描述執行順序,edges=[('START', step1, step2)] 這行就是宣告「從 START 依序執行到 step1、step2」。想親眼看到 step1 真的把流程卡住,把上面這段存成 agent 目錄後跑 adk run <你的 agent 目錄>,就會在終端機看到程式停在等待輸入的畫面。
message:給使用者看的說明文字payload:隨請求附上的結構化資料,讓前端可以把上下文渲染出來response_schema:期望的回應要符合的資料結構⚠️ 這裡有一個容易誤會、寫錯就會炸掉下游邏輯的細節:response_schema 不是自動整形器。它只是宣告「我期望收到符合這個結構的回覆」,不會幫你把使用者亂打的文字自動轉成該格式。如果你設了 response_schema=UserFeedback 卻只收到一句自由文字,下游程式碼直接拿去解析大概率會出錯。官方給的建議是兩條路:做一個 UI 讓使用者只能輸入結構化資料,或是接一個 agent 節點負責把非結構化的回覆轉成你要的格式。
一個更完整的範例,示範同時帶 payload 與 response_schema——一個行程規劃 agent 先生成一份結構化的行程表,再用 HITL 節點把整份行程表當成 payload 附上,讓使用者針對具體內容給回饋:
class ActivitiesList(BaseModel):
   """Itinerary should be a list of dictionaries for each activity."""
   itinerary: List[Dict[str, str]]

class UserFeedback(BaseModel):
   """Expected response structure from the user."""
   user_response: str

async def get_user_feedback(node_input: ActivitiesList):
   message = (
       f"""
       Here is your recommended base itinerary:\n{node_input}\n\n
       Which of these items appeal to you (if any)?
       """
   )
   yield RequestInput(
       message=message,
       payload=node_input,
        response_schema=UserFeedback,
   )
payload 欄位在這裡的作用很清楚:讓前端能把完整的行程表渲染給使用者看,而不是只丟一句乾巴巴的文字提示——這對建構真正可用的互動介面很重要。
這是完全不同的機制:不是在圖上放一個節點,而是在 LlmAgent(也就是 Agent)的工具函式內部要求 yes/no 或結構化的核准,讓模型自己決定的某次工具呼叫暫停等人類拍板。支援語言:Python v1.14.0 / TypeScript v0.2.0 / Go v0.3.0,標記 Experimental。
Python 透過把工具包進 FunctionTool 並設定 require_confirmation=True 來開啟。下面的程式碼只列出跟 confirmation 有關的部分,reimburse 函式本身與 Agent 的 name、model 請沿用你自己專案裡已經定義好的 agent:
root_agent = Agent(
    # ...
    tools = [
        # Set require_confirmation to True to require user confirmation
        # for the tool call.
        FunctionTool(reimburse, require_confirmation=True),
    ],
    # ...
)
還可以用一個函式動態決定要不要要求確認,而不是寫死一個布林值——例如金額超過某個門檻才需要核准:
async def confirmation_threshold(
    amount: int, tool_context: ToolContext
) -> bool:
  """Returns true if the amount is greater than 1000."""
  return amount > 1000

root_agent = Agent(
    # ...
    tools = [
        FunctionTool(reimburse, require_confirmation=confirmation_threshold),
    ],
    # ...
)
當簡單的 yes/no 不夠用,你想跟使用者要更具體的結構化資料(不只是核准,還要核准「幾天」「多少額度」),就要自己用 tool_context.request_confirmation() 手動組裝請求與 hint,並在工具函式裡自己檢查 tool_confirmation 是否已經有值來判斷目前處在「第一次呼叫、還沒核准」還是「核准後恢復執行」哪個階段:
def request_time_off(days: int, tool_context: ToolContext):
    """Request day off for the employee."""
    # ...
    tool_confirmation = tool_context.tool_confirmation
    if not tool_confirmation:
        tool_context.request_confirmation(
            hint=(
                'Please approve or reject the tool call request_time_off() by'
                ' responding with a FunctionResponse with an expected'
                ' ToolConfirmation payload.'
            ),
            payload={
                'approved_days': 0,
            },
        )
        return {'status': 'Manager approval is required.'}

    approved_days = tool_confirmation.payload['approved_days']
    approved_days = min(approved_days, days)
    if approved_days == 0:
        return {'status': 'The time off request is rejected.', 'approved_days': 0}
    return {
        'status': 'ok',
        'approved_days': approved_days,
    }
這段程式碼裡,同一個函式被呼叫兩次,靠 tool_confirmation 是否存在來分辨這是「第一次執行、要暫停等核准」還是「核准後的第二次呼叫、要真正執行業務邏輯」——工具函式本身要自己處理這個雙階段的狀態機。
如果現場沒有一個能顯示對話框的介面,可以透過 ADK API server 的 /run 或 /run_sse 端點,用一個帶 function_response 的請求把確認結果送回去:
curl -X POST http://localhost:8000/run_sse \
 -H "Content-Type: application/json" \
 -d '{
    "app_name": "human_tool_confirmation",
    "user_id": "user",
    "session_id": "7828f575-2402-489f-8079-74ea95b6a300",
    "new_message": {
        "parts": [
            {
                "function_response": {
                    "id": "adk-13b84a8c-c95c-4d66-b006-d72b30447e35",
                    "name": "adk_request_confirmation",
                    "response": {
                        "confirmed": true,
                        "payload": {
                            "approved_days": 5
                        }
                    }
                }
            }
        ],
        "role": "user"
    }
}'
這個 REST 回應要滿足三個條件才會被接受:function_response.id 必須對到當初 adk_request_confirmation 那個 FunctionCall 事件的 function_call_id;name 必須是固定字串 adk_request_confirmation;response 要包含 confirmed 狀態與(如果有的話)payload。如果你的 agent 同時開了 Resume 功能,確認回應裡還必須額外帶上 invocation_id,而且要跟當初產生這次確認請求的那個 invocation 完全一致——帶錯或漏帶,系統會直接開一個新的 invocation 來處理這次回應,而不是接續原本被暫停的那一輪。
Tool Confirmation 目前不支援 DatabaseSessionService 與 VertexAiSessionService 這兩種 session 儲存後端——如果你的 production 部署用的是這兩種持久化方案,這個功能現階段用不了。
這裡有一個橫跨兩篇文章、值得特別點出來的連結。Day 1 提過 ADK 2.0 的破壞性變更之一是:如果你的程式碼裡有 except BaseException 這種過寬的例外捕捉,會不小心連 NodeInterruptedError 都一起吃掉——而 NodeInterruptedError 正是 graph HITL 節點暫停流程時,底層依賴的機制。換句話說,一段寫得「防禦性很強」的 try/except,反而會讓你的 HITL 節點永遠暫停不了、悄悄地把使用者的核准步驟跳過去。這是那種只在生產環境的邊界案例才會被發現、debug 起來會非常痛苦的坑,寫 HITL 相關程式碼時,例外處理範圍務必收窄。
講完了「怎麼讓流程停下來等人」,接下來要退一步,回頭認識 ADK 裡最基礎、也是唯一支援五種語言的編排積木——SequentialAgent、ParallelAgent、LoopAgent。Day 16 會告訴你為什麼即使 graph 和 dynamic workflow 更強大,這三個「老前輩」在很多場景依然是更省事的選擇。
Google ADK 官方網站
GitHub - Agent Development Kit (ADK) 2.0
GitHub 開源實作:https://github.com/SeanLinH/adk_tutor



 iThome鐵人賽
 看影片追技術