昨天沒把樹葉畫上去,還是心癢癢的,所以動手簡單裝飾了一下這棵樹:
https://jerry-the-potato.github.io/Chapter3-demo2-object/
不過靈感跟美感畢竟不太夠,還是趕快前進到第四章要緊先
(進度快的話最後還能把樹放到遊戲中然後優化它)
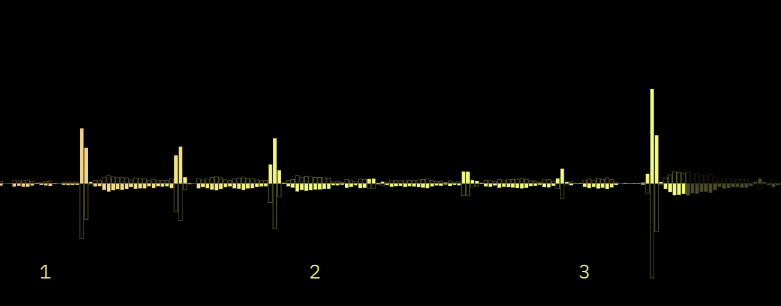
是時候結合1-3章的內容了,首先我們觀察一下幾首歌的音量變化:(音量增加圖)
出自: 我的Demo

當初沒有教大家怎麼畫這個,沒關係這不難也不是重點,聽結論就好
經過觀察得知,每當音符/和弦出來的時候,都會有2-4偵的音量急遽增加,隨後緩慢降低,因此第一個思路就很單純,我們希望程式能懂得把連續的音量脈衝,當成完整一次的旋律,並且在第2偵時會接近高峰值,也是音樂正在傳入耳朵時,因此將其脈衝大小作為參考,來決定要一次做出多少個動畫。
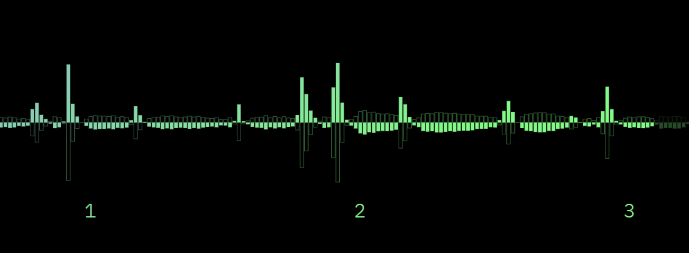
接著看下一首,有鋼琴和弦作為開場的音樂:
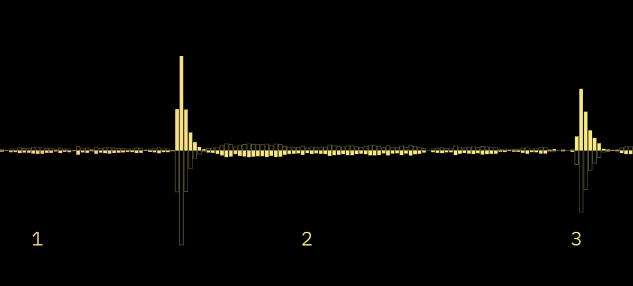
可以看到,音量的曲線應該接近於Ease-out達到高峰,所以音量的增加才會如圖,到達高峰後陸續下降並趨於平緩,這種和弦帶來的效果是拉長的聽覺效果,先做個筆記,未來有時間可以再新增第二種動畫模式,來呈現其綿延的旋律。
剛也有提到音量增加圖表示了音量的差值,直接取名為volume,還記得我們用reduce方法的那篇寫到:
// 陣列最大長度到 INDEX 為止
(dataIndex.volume > INDEX) ? dataIndex.volume = 0 : dataIndex.volume++;
let volume = dataArray.delta.reduce((a,b) => a+b, 0);
dataArray.volume.splice(dataIndex.volume, 1, volume);
// 計算最大值
let maxVolume = dataArray.volume.reduce((a,b) => Math.max(a,b), 1);
沒印象的話可以回頭去看這篇 https://ithelp.ithome.com.tw/articles/10268606
當初為了畫圖已經有做好這個陣列,這邊我們就有很簡單的方法,拿到最近三次的差值:
let v1 = dataArray.volume[dataIndex.volume - 1];
let v2 = dataArray.volume[dataIndex.volume - 2];
let v3 = dataArray.volume[dataIndex.volume - 3];
// 我們只要連續兩次,連續三次以上都不算數,因此判斷 v3 <= 0
if(v1 > 0 && v2 > 0 && v3 <= 0){
    let times = 100 * Math.max(v1, v2) / maxVolume; // 100乘上一個0~1之間的數
    animeList.push(new animeObject(times, 'Falling'));
}
animeObject 是我們第二章操作的落葉物件
animeList 是個把物件們放在一起,用來迭代的陣列
let animeList = new Array();
function animeObject(times, animeName='Falling',
                     imgNumber=Math.floor(Math.random()*4),
                     sizeMin=0.03,sizeMax=0.04,
                     lifeTime=5, timestamp=Date.now()){
    this.animeName = animeName;
    this.imgNumber = imgNumber;
    this.img = pngImg[this.imgNumber];
    if(animeName == "Falling" || animeName == "Staring"){
        this.beginX = Math.random() * WIDTH;
        this.beginY = Math.random() * HEIGHT;
    }
    this.size = Math.random() * (sizeMax - sizeMin) + sizeMin;
    this.timestamp = Date.now();
    this.lifeTime = lifeTime;
    this.period = 1 + Math.random() * 1;

    // 變化屬性
    this.pointX = this.beginX;
    this.pointY = this.beginY;
    this.sizeNow = 0;
    this.rotateTheta = Math.random() * 360 / 180 * Math.PI;
    this.rotateOmega = 60 / 180 * Math.PI;
    this.revolveTheta = Math.random() * 360 / 180 * Math.PI;
    this.revolveOmega = 60 / 180 * Math.PI;
    if(times > 5) animeList.push(new animeObject(Math.pow(times, 0.9), 'Falling'));

    // times 的算法可以自行設計,就是把輸入的參數轉換成迭代的參數
    // 我是設計為5-100之間會進行迭代,然後每次開0.9次方根號
    // (100共會做十次、40會做八次、20會做六次、12會做四次、7會做兩次)
}
開頭傳入參數時,若無值傳入,則預設為Falling模式、圖片以4個一組隨機抽籤etc...
整體跟落葉物件那篇相去不遠,主要添加了遞迴的觀念
以及一個隨機的週期參數period,使動畫物件彼此擁有不同的週期,範圍是1~2倍
接著搭配第三章畫樹時學到的prototype改寫方法:
animeObject.prototype.NextFrame = function(){

    // 計算下一偵的位置
    let dT = (Date.now() - this.timestamp) / 1000;
    if(this.animeName == "Floating") this.Floating(dT);
    else if(this.animeName == "Falling") this.Falling(dT);
    else if(this.animeName == "Staring") this.Staring(dT);

    if(dT < this.lifeTime){
        // 畫出下一偵的位置
        if(this.img.complete){
            let width = this.sizeNow;
            let height = this.sizeNow * this.img.height / this.img.width;
            let rotateNow = this.rotateTheta + this.rotateOmega * dT;
            context.save();
            context.translate(this.pointX, this.pointY);
            context.rotate(rotateNow);
            context.drawImage(this.img, -width/2, -height/2, width, height);
            context.restore();
        }
    }
    else{
        // 把動畫物件刪掉
        let index = animeList.indexOf(this);
        delete animeList[index];
        animeList.splice(index, 1);
    }
}
計算下一偵的位置,根據不同種類的動畫公式去做計算,以落下為例子:
animeObject.prototype.Falling = function(dT){
    let revolveNow = this.revolveTheta + this.revolveOmega * dT;
    let A = Math.sin(revolveNow);
    let B = Math.cos(revolveNow);
    let C = Math.sin(revolveNow * this.period);
    let D = Math.cos(revolveNow * this.period);
    this.pointX = this.beginX + WIDTH * 0.04 * A;
    this.pointY = this.beginY + HEIGHT * 0.01 * C + HEIGHT * 0.05 * dT;
    const popSize = 0.2;
    let lT = this.lifeTime;
    let distanceT = (Math.abs(dT - lT*0.35) + Math.abs(dT - lT*0.65)) / lT;
    this.sizeNow = WIDTH * this.size * (popSize + (1 - distanceT));
}
在第二章的動畫基礎上,添加幾個部分:
- 有兩種三角函數,一種是基本的、另一種是乘上週期倍速period的變速版本
- 添加popSize,使得動畫一開始出現時以只有0.2倍大(從遠方漸入的效果)
- distanceT是一個國中學過的線性函式,用來計算數線0-1之間,任一點與0.35和0.65的距離總和,結果就不用解釋...了吧?XD
接下來第四章(包括這篇)都是重頭戲,先前鋪陳那麼久,就是為了能讓大家循序漸進好上手,如果前面的章節你都看過,想必這一篇並不會太難吧!也是不斷精簡過後的內容了,這段code是我重寫第三次了,第一次大概是2倍的行數,第二次是1.5倍,現在就如各位看到的。
話說,明天上個流程圖吧!
